HANGING & GLAZING TImber DOOrS - Wickes
HANGING & GLAZING TImber DOOrS - Wickes
HANGING & GLAZING TImber DOOrS - Wickes

You also want an ePaper? Increase the reach of your titles
YUMPU automatically turns print PDFs into web optimized ePapers that Google loves.
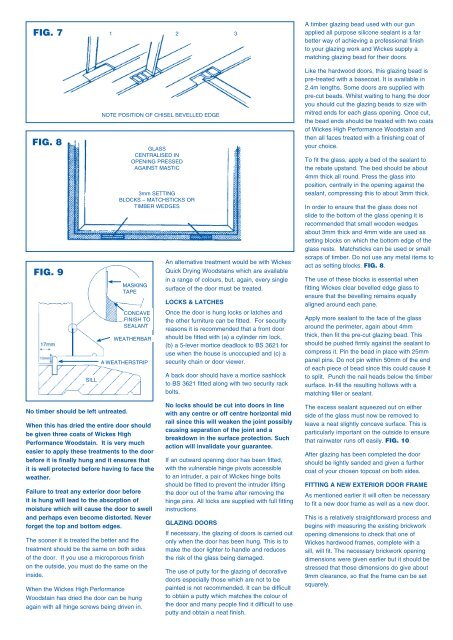
FIG. 7<br />
FIG. 8<br />
FIG. 9<br />
SILL<br />
No timber should be left untreated.<br />
When this has dried the entire door should<br />
be given three coats of <strong>Wickes</strong> High<br />
Performance Woodstain. It is very much<br />
easier to apply these treatments to the door<br />
before it is finally hung and it ensures that<br />
it is well protected before having to face the<br />
weather.<br />
Failure to treat any exterior door before<br />
it is hung will lead to the absorption of<br />
moisture which will cause the door to swell<br />
and perhaps even become distorted. Never<br />
forget the top and bottom edges.<br />
The sooner it is treated the better and the<br />
treatment should be the same on both sides<br />
of the door. If you use a microporous finish<br />
on the outside, you must do the same on the<br />
inside.<br />
When the <strong>Wickes</strong> High Performance<br />
Woodstain has dried the door can be hung<br />
again with all hinge screws being driven in.<br />
1 2 3<br />
NOTE POSITION OF CHISEL BEVELLED EDGE<br />
GLASS<br />
CENTRALISED IN<br />
OPENING PRESSED<br />
AGAINST MASTIC<br />
3mm SETTING<br />
BLOCKS – MATCHSTICKS OR<br />
TIMBER WEDGES<br />
MASKING<br />
TAPE<br />
CONCAVE<br />
FINISH TO<br />
SEALANT<br />
WEATHERBAR<br />
A WEATHERSTRIP<br />
An alternative treatment would be with <strong>Wickes</strong><br />
Quick Drying Woodstains which are available<br />
in a range of colours, but, again, every single<br />
surface of the door must be treated.<br />
LOCKS & LATCHES<br />
Once the door is hung locks or latches and<br />
the other furniture can be fitted. For security<br />
reasons it is recommended that a front door<br />
should be fitted with (a) a cylinder rim lock,<br />
(b) a 5-lever mortice deadlock to BS 3621 for<br />
use when the house is unoccupied and (c) a<br />
security chain or door viewer.<br />
A back door should have a mortice sashlock<br />
to BS 3621 fitted along with two security rack<br />
bolts.<br />
No locks should be cut into doors in line<br />
with any centre or off centre horizontal mid<br />
rail since this will weaken the joint possibly<br />
causing separation of the joint and a<br />
breakdown in the surface protection. Such<br />
action will invalidate your guarantee.<br />
If an outward opening door has been fitted,<br />
with the vulnerable hinge pivots accessible<br />
to an intruder, a pair of <strong>Wickes</strong> hinge bolts<br />
should be fitted to prevent the intruder lifting<br />
the door out of the frame after removing the<br />
hinge pins. All locks are supplied with full fitting<br />
instructions.<br />
<strong>GLAZING</strong> DOORS<br />
If necessary, the glazing of doors is carried out<br />
only when the door has been hung. This is to<br />
make the door lighter to handle and reduces<br />
the risk of the glass being damaged.<br />
The use of putty for the glazing of decorative<br />
doors especially those which are not to be<br />
painted is not recommended. It can be difficult<br />
to obtain a putty which matches the colour of<br />
the door and many people find it difficult to use<br />
putty and obtain a neat finish.<br />
A timber glazing bead used with our gun<br />
applied all purpose silicone sealant is a far<br />
better way of achieving a professional finish<br />
to your glazing work and <strong>Wickes</strong> supply a<br />
matching glazing bead for their doors.<br />
Like the hardwood doors, this glazing bead is<br />
pre-treated with a basecoat. It is available in<br />
2.4m lengths. Some doors are supplied with<br />
pre-cut beads. Whilst waiting to hang the door<br />
you should cut the glazing beads to size with<br />
mitred ends for each glass opening. Once cut,<br />
the bead ends should be treated with two coats<br />
of <strong>Wickes</strong> High Performance Woodstain and<br />
then all faces treated with a finishing coat of<br />
your choice.<br />
To fit the glass, apply a bed of the sealant to<br />
the rebate upstand. The bed should be about<br />
4mm thick all round. Press the glass into<br />
position, centrally in the opening against the<br />
sealant, compressing this to about 3mm thick.<br />
In order to ensure that the glass does not<br />
slide to the bottom of the glass opening it is<br />
recommended that small wooden wedges<br />
about 3mm thick and 4mm wide are used as<br />
setting blocks on which the bottom edge of the<br />
glass rests. Matchsticks can be used or small<br />
scraps of timber. Do not use any metal items to<br />
act as setting blocks. FIG. 8.<br />
The use of these blocks is essential when<br />
fitting <strong>Wickes</strong> clear bevelled edge glass to<br />
ensure that the bevelling remains equally<br />
aligned around each pane.<br />
Apply more sealant to the face of the glass<br />
around the perimeter, again about 4mm<br />
thick, then fit the pre-cut glazing bead. This<br />
should be pushed firmly against the sealant to<br />
compress it. Pin the bead in place with 25mm<br />
panel pins. Do not pin within 50mm of the end<br />
of each piece of bead since this could cause it<br />
to split. Punch the nail heads below the timber<br />
surface. In-fill the resulting hollows with a<br />
matching filler or sealant.<br />
The excess sealant squeezed out on either<br />
side of the glass must now be removed to<br />
leave a neat slightly concave surface. This is<br />
particularly important on the outside to ensure<br />
that rainwater runs off easily. FIG. 10.<br />
After glazing has been completed the door<br />
should be lightly sanded and given a further<br />
coat of your chosen topcoat on both sides.<br />
FITTING A NEW EXTERIOR DOOR FRAME<br />
As mentioned earlier it will often be necessary<br />
to fit a new door frame as well as a new door.<br />
This is a relatively straightforward process and<br />
begins with measuring the existing brickwork<br />
opening dimensions to check that one of<br />
<strong>Wickes</strong> hardwood frames, complete with a<br />
sill, will fit. The necessary brickwork opening<br />
dimensions were given earlier but it should be<br />
stressed that those dimensions do give about<br />
9mm clearance, so that the frame can be set<br />
squarely.
![To-Order Kitchens [PDF] - Wickes](https://img.yumpu.com/30243922/1/184x260/to-order-kitchens-pdf-wickes.jpg?quality=85)