350 Series Vinyl Patio Doors Owner's Manual - Pella.com
350 Series Vinyl Patio Doors Owner's Manual - Pella.com
350 Series Vinyl Patio Doors Owner's Manual - Pella.com

You also want an ePaper? Increase the reach of your titles
YUMPU automatically turns print PDFs into web optimized ePapers that Google loves.
<strong>350</strong> <strong>Series</strong> <strong>Vinyl</strong> <strong>Patio</strong> <strong>Doors</strong><br />
Owner’s <strong>Manual</strong>
Congratulations on your purchase of a <strong>Pella</strong> ® <strong>350</strong> <strong>Series</strong> vinyl patio door!<br />
You have joined a select group of homeowners who have made their homes more beautiful and<br />
<strong>com</strong>fortable with <strong>Pella</strong> windows and doors for more than 85 years. With proper installation, care<br />
and operation, your <strong>Pella</strong> vinyl patio door will provide years of enjoyment and make every day<br />
a little easier. Read this manual thoroughly during your first few days of ownership so you feel<br />
<strong>com</strong>fortable operating, cleaning and maintaining your door. Then refer to it in the future should<br />
a question arise.<br />
Rest assured that <strong>Pella</strong>’s <strong>com</strong>mitment to service is as strong as its windows and doors.<br />
Your <strong>com</strong>plete satisfaction is of utmost importance to us. If you have any questions or concerns<br />
or would like to learn more about your vinyl patio door, help is as close as your <strong>Pella</strong> retailer of<br />
vinyl products or at pella.<strong>com</strong>. We’re here for you today … and for years to <strong>com</strong>e.
owner’s <strong>Manual</strong> How to Use/Table of Contents<br />
How to Use YoUr owner’s ManUal<br />
overview<br />
The <strong>Pella</strong> ® <strong>350</strong> <strong>Series</strong> <strong>Vinyl</strong> <strong>Patio</strong> <strong>Doors</strong> Owner’s <strong>Manual</strong> contains specific information for patio doors. Use the drawings and descriptions<br />
next to each section of the Table of Contents to help locate the information you need. For the most up-to-date owner’s manuals and<br />
warranties for all <strong>Pella</strong> products, go to pella.<strong>com</strong>.<br />
sliding <strong>Patio</strong> doors<br />
The operable door(s)<br />
open and close.<br />
sliding <strong>Patio</strong> doors<br />
1.1 Operation<br />
1.1 Locking system<br />
1.1 Screens<br />
1.1 Grilles<br />
1.1 Blinds<br />
1.2 Shades<br />
1.2 Cleaning<br />
1.2 Cleaning the glass<br />
1.2 Spot-cleaning stubborn materials on all glass<br />
1.3 Cleaning flat screens<br />
1.3 Cleaning the weep system<br />
1.3 Cleaning the interior and exterior frame<br />
1.3 Cleaning the hardware finish<br />
recoMMended Maintenance<br />
2.1 Overview<br />
2.1 Exterior<br />
2.1 Cleaning the weatherstrip<br />
2.1 Sliding patio doors<br />
2.2 Sliding screen doors<br />
2.2 Salt spray environments<br />
troUblesHooting<br />
3.1 Overview<br />
3.1 Glass breakage/damage<br />
3.1 Sliding patio doors<br />
3.1 Sliding screen doors<br />
3.2 Preventing condensation<br />
3.3 EIFS/synthetic stucco<br />
3.3 NFRC label<br />
3.4 Unit ID Number: Service made simpler<br />
warrantY<br />
Please visit pella.<strong>com</strong>/warranty.
For service assistance<br />
For Service Assistance owner’s <strong>Manual</strong><br />
In the event you need assistance, please contact the store where your patio door was purchased. Should you need additional assistance,<br />
contact <strong>Pella</strong> Customer Service by phone at 800-374-4758 or via our website at pella.<strong>com</strong>. Please have the Unit ID Number for your patio<br />
door ready when you contact us.<br />
triPle-Pane glass<br />
The Unit ID Number can be found in an upper corner in the airspace<br />
between the glass panels, or on the visible glass in a lower corner.<br />
doUble-Pane glass<br />
PELLA-300-PLCCMLH1Z2-025AD47AWHT-511S-NFRC<br />
On doors with double-pane glass, the Unit ID Number is located<br />
on the upper right corner of the door, in between the glass panels.<br />
IGCC IGMA CIG-2 A 08-07 P0412345678 NFRC PEL-N-023 PELLA-300-PLCCMLH1Z2-025AD47AWHT-511S-NFRC<br />
On doors with triple-pane glass, the Unit ID Number is etched<br />
on the glass in the lower right corner of the door.<br />
blinds- or sHadesbetween-tHe-glass<br />
On doors with shades- or blinds-between-the-glass, you’ll find the<br />
Unit ID Number on a sticker in the lower right corner of the door.
sliding <strong>Patio</strong> doors Operation/Screens/Grilles/Blinds<br />
1.1<br />
sliding <strong>Patio</strong> doors<br />
oPeration<br />
locking system<br />
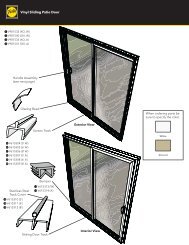
thumbturn lock<br />
The thumbturn lock is located on the flat panel behind the door handle. to lock the<br />
door, fully close the venting/sliding panel and turn the thumbturn to a horizontal<br />
position. to unlock the door, turn the thumbturn to a vertical position.<br />
screens<br />
to remove the screen door for storage, lift the screen and tilt the bottom portion away from the sliding<br />
door while lifting the screen out of the sill frame track.<br />
grilles<br />
caUtion: Use caution when children or pets are around open windows and patio doors.<br />
screens are not designed to retain children or pets.<br />
aluminum grilles-between-the-glass<br />
The aluminum grilles are permanently installed between panes of insulating glass so they stay clean and never need to be removed.<br />
blinds<br />
blinds-between-the-glass<br />
The aluminum blinds are permanently installed between panes of insulating glass so they stay clean and never need to be removed.<br />
blinds-between-the-glass operation<br />
Move the operators up and down in a slow and steady motion. The operators are attached<br />
to the operating mechanism with high-powered magnets. Moving the operators abruptly<br />
could cause them to be<strong>com</strong>e disengaged from the magnet.<br />
note: if a handle be<strong>com</strong>es disengaged from the operator and<br />
remains attached to the track, slide the operator up and down until the<br />
magnet reengages. slowly slide the handle all the way to the top of<br />
the track to fully engage the handle with the operator.<br />
if the blind does not <strong>com</strong>pletely lower on one side, using the tilt<br />
operator, ensure the slats are in the open position, then raise and<br />
lower the blind.<br />
locked Unlocked
sHades<br />
shades-between-the-glass<br />
Shades/Cleaning sliding <strong>Patio</strong> doors<br />
The cellular shades are permanently installed between panes of insulating glass so they stay clean and never need to be removed.<br />
shades-between-the-glass operation<br />
Move the operator up and down in a slow and steady motion. The operator is attached<br />
to the operating mechanism with a high-powered magnet. Moving the operator abruptly<br />
could cause it to be<strong>com</strong>e disengaged from the magnet.<br />
note: if a handle be<strong>com</strong>es disengaged from the operator and<br />
remains attached to the track, slide the operator up and down until the<br />
magnet reengages. slowly slide the handle all the way to the top of<br />
the track to fully engage the handle with the operator.<br />
cleaning<br />
cleaning the glass<br />
To wash the glass:<br />
1. Use a premixed vinegar-based cleaning solution (or make your own with one part white vinegar to 10 parts water), and apply to<br />
a soft, clean, lint-free microfiber cloth or paper towel. Or you may use an ammonia-free glass cleaner such as Windex ® (clear liquid)<br />
or Sparkle ® (purple liquid). Feel free to be generous with the amount of cleaner you apply, but avoid getting any cleaning solution on<br />
the vinyl frames as it may discolor the finish.<br />
2. Rub from several different directions.<br />
3. Rinse with water if streaks remain after cleaning.<br />
caUtion: do not use glass cleaners that are ammonia- or alcohol-based. they may leave streaks or produce a film that attracts moisture or dust.<br />
spot-cleaning stubborn materials on all glass<br />
to remove any markings from grease, oil, tape adhesive, crayons or paint, or marks from plastics that may have <strong>com</strong>e in contact<br />
with the glass:<br />
1. Apply a small amount of a nonabrasive cleaner such as Bar Keepers Friend ® (SerVaas Laboratories) to a clean, wet cloth — or apply<br />
a solvent such as acetone or mineral spirits to a clean, dry, lint-free microfiber cloth or paper towel.<br />
2. Rub on the areas of glass that need spot-cleaning. Avoid getting any cleansers or solvents on the vinyl frames as they may<br />
discolor the finish.<br />
3. Wipe clean using a clean, dry, lint-free microfiber cloth or paper towel.<br />
4. Then clean the glass as mentioned above.<br />
caUtion: do not use a razor blade to scrape off stubborn materials — doing so may leave permanent marks on the<br />
glass or scratches that could cause glass breakage. contact the <strong>Pella</strong> window and door showroom nearest you for<br />
special cleaning instructions.<br />
1.2
sliding <strong>Patio</strong> doors Cleaning<br />
1.3<br />
cleaning flat screens<br />
To clean a flat fiberglass screen, use the drapery brush attachment on your vacuum cleaner.<br />
caUtion: Use caution when children or pets are around open windows and patio doors.<br />
screens are not designed to retain children or pets.<br />
cleaning the weep system<br />
It is normal for water to accumulate in the sill and track. The water is intended to drain to the outside<br />
via the drainage or “weep” holes. Check to make sure that the weep holes are clear of obstruction<br />
(dirt, sand or building materials). To clean the weep holes, use a small, soft brush to clear the opening.<br />
Weep holes are located both inside and outside the door in the bottom of the frame.<br />
cleaning the interior and exterior frame<br />
Begin cleaning by vacuuming dirt from the door track areas. Then wash the door frame with a mixture of mild dish soap and water.<br />
warning: do not use abrasive or caustic solvents as they may damage your patio doors. do not scrape or use tools that might damage the surface.<br />
do not power-wash.<br />
cleaning the hardware finish<br />
A soft cloth and mild cleaner may be used on all hardware finishes for vinyl sliding patio doors.<br />
weep Hole
ecoMMended Maintenance<br />
overview<br />
<strong>Pella</strong>® vinyl patio doors<br />
re<strong>com</strong>mended Maintenance<br />
<strong>Pella</strong> re<strong>com</strong>mends that you inspect your doors at least annually as part of a home checkup. Re<strong>com</strong>mended maintenance can prolong the life<br />
of your vinyl patio doors and will help ensure maximum warranty coverage. As needed, clean your patio doors and recaulk around them to<br />
help maintain optimal performance. Also be sure to regularly check for leaks, improper drainage above or around vents and sprinkler systems<br />
that may subject your doors to prolonged water exposure. With re<strong>com</strong>mended care, vinyl patio doors can reward you with many years of<br />
beauty and performance.<br />
exterior<br />
An annual checkup can help preserve and maintain the beauty of your vinyl products for years to <strong>com</strong>e.<br />
Inspect the sealant/caulking on the exterior perimeter of your patio doors at least once a year. The sealant/caulking helps create<br />
a watertight seal between the door frames and the exterior siding (whether it is vinyl, cedar, aluminum, brick, etc.). It is extremely<br />
important that the sealant/caulking remains intact and in good condition at all times. Pay particular attention to the caulking at the lower<br />
corners of doors and under joints between doors in <strong>com</strong>binations. The sealant material should not be cracked, broken or missing — or<br />
it may cause premature failure of your vinyl products or other parts of your home. Deterioration that occurs as a result of improper or<br />
insufficient maintenance is not covered by the vinyl product Limited Lifetime Warranty.*<br />
cleaning the weatherstrip<br />
To remove any deposits — such as grease, oil or stains — that may have <strong>com</strong>e in contact with the weatherstrip, apply a small amount of<br />
concentrated fabric cleaner or carpet cleaner — such as Spray-n-Wash ® , OxiClean ® Fabric Cleaner or Resolve ® Carpet Cleaner — to the<br />
weatherstrip. Scrub the cleaner into the weatherstrip with a toothbrush or similar applicator. Continue applying cleaner until the deposits<br />
are no longer visible. Rinse weatherstrip with clean water, and dry with a paper towel.<br />
sliding patio doors<br />
For proper operation, keep the door track free of debris. You can adjust the rollers located in the bottom of the door if<br />
necessary. The lock strike can also be adjusted if needed. (See page 3.1 for detailed instructions.) You may want to apply a<br />
thin layer of paraffin or other dry lubricant (Teflon ® Dry Lubricant or Gulf Wax ® , available at most home improvement stores, works well).<br />
do not use oily lubricants; they attract dust and grime, which will eventually restrict the door’s movement.<br />
cleaning under the track<br />
Open the sliding patio door panel. Make sure the top of the panel has cleared<br />
the anti-lift clips in the lower track. Grasp the panel with both hands, and lift<br />
up to remove it from the lower track. Then pull down to remove it from the<br />
upper channel (1). Pry up the track from the door frame with an Allen wrench<br />
or flat-head screwdriver. Grasp the track and lift it all the way out (2).<br />
Vacuum out any debris, and thoroughly clean the lower channel with warm soapy water.<br />
To replace, insert the lower track into the door frame and press it down all the way across. Reinstall the sliding patio door panel by lifting<br />
it up into the upper channel of the frame. Line up the panel with the bottom track, and gently lower the panel into the frame. Check for<br />
smooth operation by opening and closing the door.<br />
* See written warranty for <strong>com</strong>plete details at pella.<strong>com</strong>/warranty.<br />
1 2<br />
2.1
2.2<br />
re<strong>com</strong>mended Maintenance<br />
sliding screen doors<br />
It is important to keep the upper and lower door tracks free of dirt and debris. The rollers on the top of the screen can be<br />
adjusted if necessary. (See page 3.1 for <strong>com</strong>plete details.) If the screen be<strong>com</strong>es dirty, you can clean it by using a vacuum<br />
cleaner with the drapery brush attachment.<br />
cleaning under the track<br />
Open the sliding screen door. You might have to adjust screen rollers so they<br />
can clear the lower track. (See page 3.1 for detailed instructions.) From the<br />
exterior, grasp the screen door with both hands and lift up to remove it from<br />
the lower track. Then pull down to remove it from the upper channel (1).<br />
Pry up the track from the door frame with an Allen wrench or flat-head<br />
screwdriver. Grasp the track and lift it all the way out (2).<br />
Vacuum out any debris, and thoroughly clean the lower track with warm soapy water.<br />
To replace, insert the lower track into the door frame and press it down all the way across. Reinstall the sliding screen door by lifting it<br />
up into the upper channel of the frame. Tilt in the bottom of the screen door, and set it on the lower track. Adjust the screen rollers if<br />
necessary. (See page 3.1 for detailed instructions.) Check for smooth operation by opening and closing the door.<br />
salt spray environments<br />
The seacoast environment is extremely hard on all sorts of products (automobiles, recreational vehicles, building products, etc.).<br />
Any product used in a seacoast location will require more frequent inspection and maintenance to help it last as long as possible in this<br />
harsh environment. <strong>Doors</strong> are no different from other products in this respect.<br />
If your home is in a coastal environment and is subjected to wind-driven salt spray or salt fog, use a mild detergent soap to clean the<br />
exteriors, including operation hardware, at least quarterly — and more often if necessary — to prevent salt and other abrasive materials<br />
from building up on the exterior surfaces.<br />
caUtion: do not power-wash.<br />
1 2
troUblesHooting<br />
overview<br />
If you have a concern with your vinyl product or need additional assistance from an experienced professional, consult your Yellow Pages<br />
(under “Windows”) for the <strong>Pella</strong> window and door showroom nearest you or use the store finder at pella.<strong>com</strong>.<br />
glass breakage/damage<br />
In the event of glass breakage, consult the <strong>Pella</strong> Window and Door Showroom nearest you for assistance. Be sure to have your <strong>Pella</strong> ® Unit ID<br />
Number handy (see page 3.4). For safety reasons and to ensure optimum performance, we strongly advise that you consult a professional for<br />
glass replacement.<br />
U.S. federal law and most local codes require the use of tempered glass in doors and other specific applications. Tempered glass can<br />
withstand greater impact than ordinary glass, but it is sensitive to scratches. Scratches can cause immediate or delayed breakage. If the<br />
glass is tempered, it will break into small, rounded pieces. If tempered glass is broken, likely by law it must be reglazed or replaced with<br />
tempered glass.<br />
sliding patio doors<br />
the door does not slide smoothly. There are several possible causes. The track the door<br />
slides on may have debris on it, causing it to drag. If so, simply clean the track below the<br />
sliding panel. If this does not work, you may need to adjust the rollers to raise the door clear of the track.<br />
Adjust the rollers up or down to make sure that the edge of the movable door is parallel to the side of the<br />
door frame. The adjustment screws are located on either side of the movable door, near the bottom. The<br />
lower of the three screws is the adjustment screw. Turn the adjusting screw clockwise to raise the end of the<br />
door and counterclockwise to lower it.<br />
the door lock doesn’t latch. To adjust the keeper, mark its current location with a pen or pencil. Remove all<br />
three screws and the keeper from the door frame. Slide the keeper up or down to align with the lock, then<br />
replace the screws in their original holes. Shut the door and operate the lock to ensure correct placement of<br />
the keeper.<br />
sliding screen doors<br />
the screen door does not slide smoothly. The screen<br />
should move smoothly on its track. Apply a thin layer<br />
of paraffin or other dry lubricant (Teflon ® Dry Lubricant or Gulf Wax ® ,<br />
available at most home improvement stores, works well). do not use oily<br />
lubricants; they attract dust and grime, which will eventually restrict the<br />
door’s movement.<br />
The screen rollers can be adjusted by use of the roller adjustment screws located on the top and bottom rails of the screen door. If the screen<br />
door is tight on the bottom, turn the adjusting screws clockwise to raise the door. If the screen door is too tight at the top, turn the adjusting<br />
screws counterclockwise to lower the door. Level the screen door so the edge aligns with the lock jamb of the frame.<br />
note: depending on the model of your door, the adjusting screws will be located on either the lower inside or lower outside of the frame.<br />
troubleshooting<br />
3.1
3.2<br />
troubleshooting<br />
Preventing condensation<br />
Understanding condensation.<br />
Moisture is present in all homes, but when it be<strong>com</strong>es excessive, homeowners need to take an active role in protecting their investment.<br />
Humidity and condensation.<br />
Humidity is a measure of the amount of water vapor in the air.<br />
Condensation is water that forms when warm, moist air hits a cooler surface. In homes, it might occur on surfaces such as windows,<br />
bathroom walls and cold-water pipes.<br />
When interior humidity levels are too high, relative to cooler outdoor temperatures, condensation can form on the coldest surface in a room —<br />
often the glass in a window or door. While windows and doors do not cause condensation, they may be one of the first places it shows up.<br />
what causes condensation?<br />
Excess humidity is typically the cause of condensation. There are many sources for moisture in a home: showers, dishwashers, clothes<br />
washers and dryers, house plants, humans and pets, among others. In newly built homes, additional moisture may escape from building<br />
materials such as lumber, plaster and masonry for up to three heating seasons — even with proper airflow and temperature management.<br />
older vs. newer homes.<br />
Condensation may be less of an issue in older homes if conditions allow for more air exchange between indoors and out, often from around<br />
aging, loose or poorly installed windows and doors. However, the tradeoff is higher energy costs.<br />
Newer homes, on the other hand, are more airtight and energy-efficient. Many have vapor barriers — plastic within the wall cavity that blocks<br />
moisture passage in either direction. With tighter-fitting doors and windows, vapor barriers and increased insulation, energy costs are lower,<br />
but humidity levels must be monitored more closely.<br />
No matter when your home was built, the key is to strike the right balance when it <strong>com</strong>es to humidity levels. Air that’s too dry can cause<br />
furniture to dry out and crack, joints and studs to shrink and twist, and paint and plaster to crack. Excessive moisture in the home can cause<br />
paint to peel and insulation to deteriorate, and condensation on windows and doors can damage sills and trim.<br />
Measuring and controlling humidity.<br />
To determine how much humidity is present in your home, you can purchase a<br />
humidity gauge from a hardware store or home center. Invest in a quality unit for<br />
greater potential accuracy in assessing humidity levels, or consult an expert. Another<br />
way to monitor the interior humidity level is to watch your windows. When interior<br />
condensation begins to form, wipe it off to reduce the humidity, open windows, run<br />
exhaust fans or dehumidifiers, or minimize sources of moisture.<br />
The University of Minnesota Laboratories provides a chart showing re<strong>com</strong>mended<br />
relative humidity levels for the home.<br />
exterior condensation.<br />
Exterior condensation on windows occurs primarily in the morning when days are warm and humid, but nights are cool. Typically, it clears as<br />
the day warms. Exterior condensation can occur at any time, especially in warm, humid climates where interior temperatures are cooler than<br />
outdoor conditions. Exterior condensation means that windows are doing their job properly. However, if you spot excessive condensation on<br />
the inside of your windows, check your inside humidity — it may be a signal of potential problems if not addressed.<br />
Fogging between the panes of sealed glass.<br />
Maximum re<strong>com</strong>mended Humidity levels<br />
outside temperature inside Humidity<br />
20º F to 40º F Not over 40%<br />
10º F to 20º F Not over 35%<br />
0º F to 10º F Not over 30%<br />
-10º F to 0º F Not over 25%<br />
-20º F to -10º F Not over 20%<br />
-20º F or below Not over 15%<br />
based on engineering studies at 70º F conducted at<br />
the University of Minnesota laboratories.<br />
Fogging between the panes of sealed insulating glass indicates a problem with a seal, not excess humidity. Contact your <strong>Pella</strong> retailer<br />
for information.
tips for wintertime moisture management.<br />
• Open window coverings — such as blinds, shades, drapes and curtains — during daylight hours to increase airflow over the glass.<br />
• Closely monitor the furnace humidifier and any other humidifying devices.<br />
• Be sure louvers and vents for the attic, basement and/or crawl space are open, adequately sized and cross-ventilated.<br />
• Run exhaust fans for the kitchen, bathroom and laundry rooms for longer periods.<br />
• Make sure exhaust fans vent directly outside, not into attics or crawl spaces.<br />
• Be sure chimneys are free and clear, so moisture in <strong>com</strong>bustion gases can escape.<br />
• Follow the manufacturer’s instructions for venting gas appliances. In most cases, that will mean directing vents to the outside of the home.<br />
• Make sure your furnace is in proper working order and is serviced regularly.<br />
• Store firewood outside or in the garage — as wood dries, it gives off moisture.<br />
• Install energy-efficient windows, such as those that have earned the ENERGY STAR ® .<br />
For more information on condensation in the home, consult the following:<br />
• Building Research Council at the School of Architecture, University of Illinois at Urbana-Champaign, http://brc.arch.uiuc.edu/f62.htm<br />
• Home Moisture Problems (<strong>Series</strong> 1437), published by the Oregon State University Extension Services,<br />
http://extension.oregonstate.edu/catalog<br />
• The University of Minnesota Laboratories,<br />
http://www.pella.<strong>com</strong>/maint/troubleshooting/preventing.asp?path=/maint.troubleshooting/preventing<br />
eiFs/synthetic stucco<br />
<strong>Vinyl</strong> products should not be used in barrier Exterior Insulation and Finish Systems (EIFS, also known as synthetic stucco) or similar systems<br />
— except in the states of Arizona, California, Colorado, Nevada, New Mexico and Utah. <strong>Pella</strong> makes no warranty of any kind on and<br />
assumes no responsibility for vinyl windows and doors manufactured by <strong>Pella</strong> installed in barrier eiFs. in the states listed above,<br />
the installation of <strong>Pella</strong> ® products in eiFs or similar barrier systems must be in accordance with <strong>Pella</strong>’s instructions for that type of<br />
construction.<br />
nFrc label<br />
<strong>Pella</strong> vinyl patio doors labeled with the National Fenestration Rating Council (NFRC) Energy<br />
Performance label are tested in accordance with NFRC standards. NFRC ratings are based on a<br />
<strong>com</strong>bination of <strong>com</strong>puter simulations and physical testing of product samples. For details on NFRC<br />
Energy Performance ratings, go to NFRC.org.<br />
what’s so special about the nFrc label?<br />
It represents one standard testing method from an independent source for all kinds and brands of<br />
windows and doors. It replaces a system of individual manufacturers testing their own products with<br />
many different testing standards. With this label, you can make direct <strong>com</strong>parisons. Keep in mind, energy<br />
efficiency is just one of the many important qualities to look for in windows and patio doors. The NFRC<br />
has one single purpose: to establish and improve upon uniform energy-rating procedures for all brands<br />
of windows and doors.<br />
This nonpartisan coalition of professionals includes home and <strong>com</strong>mercial builders, product designers<br />
and specifiers, manufacturers, consumer advocates, utility <strong>com</strong>pany energy specialists, and government<br />
agencies.<br />
<strong>Pella</strong> Corporation is a member of the NFRC and supports its work on behalf of homeowners and the<br />
building industry. If you have questions about the NFRC, write to NFRC, 1300 Spring Street, Suite 500,<br />
Silver Spring, MD 20910. Or call 301-589-1776, fax 301-588-0854 or visit NFRC.org.<br />
Always read the <strong>com</strong>plete <strong>Pella</strong> warranty for details at pella.<strong>com</strong>/warranty.<br />
note: For example purposes only.<br />
nFrc ratings vary by product.<br />
troubleshooting<br />
3.3
3.4<br />
troubleshooting<br />
Unit id number: service made simpler<br />
To help save you time if your product ever needs service or repair, <strong>Pella</strong> includes a special identification<br />
number. Depending on the type of door you have, this number will either be located in an upper corner<br />
in the airspace between the glass panels, or on the visible glass in a lower corner. Refer to the illustrations<br />
shown here to find your door’s unit ID number.<br />
triPle-Pane glass<br />
The Unit ID Number can be found in an upper corner in the airspace<br />
between the glass panels, or on the visible glass in a lower corner.<br />
doUble-Pane glass<br />
PELLA-300-PLCCMLH1Z2-025AD47AWHT-511S-NFRC<br />
On doors with double-pane glass, the Unit ID Number is located<br />
on the upper right corner of the door, in between the glass panels.<br />
IGCC IGMA CIG-2 A 08-07 P0412345678 NFRC PEL-N-023 PELLA-300-PLCCMLH1Z2-025AD47AWHT-511S-NFRC<br />
On doors with triple-pane glass, the Unit ID Number is etched<br />
on the glass in the lower right corner of the door.<br />
blinds- or sHadesbetween-tHe-glass<br />
On doors with shades- or blinds-between-the-glass, you’ll find the<br />
Unit ID Number on a sticker in the lower right corner of the door.
troubleshooting<br />
3.5
A <strong>com</strong>mitment to care for our world.<br />
When we’re making our energy-efficient windows and doors — and even when we’re not — <strong>Pella</strong> is protecting<br />
our environment in <strong>com</strong>munities across the country through forest stewardship, pollution prevention, waste<br />
management and other important green initiatives. Not only because it’s good for business. But because it’s<br />
the right thing to do. And, frankly, it’s just part of the way we’ve always done things at <strong>Pella</strong>. When you choose<br />
<strong>Pella</strong> ®<br />
windows and doors, you’re making an environmentally responsible purchase you can feel good about.<br />
Want to learn more about <strong>Pella</strong> windows and doors? Call us at 866-209-4260 or visit pella.<strong>com</strong><br />
Always read the <strong>Pella</strong> warranties before purchasing<br />
or installing <strong>Pella</strong> products. See warranties for<br />
<strong>com</strong>plete details at pella.<strong>com</strong>/warranty.<br />
<strong>Pella</strong> Corporation is a proud volunteer partner in the U.S. Environmental<br />
Protection Agency and the Department of Energy’s ENERGY STAR ®<br />
program to promote the use of high-efficiency products.<br />
© 2011 <strong>Pella</strong> corPoration • 102 Main street • <strong>Pella</strong>, iowa 50219 OMTFS0111<br />
®