Twin Disc HP 300, 600 service manual - Morbark
Twin Disc HP 300, 600 service manual - Morbark
Twin Disc HP 300, 600 service manual - Morbark

You also want an ePaper? Increase the reach of your titles
YUMPU automatically turns print PDFs into web optimized ePapers that Google loves.
<strong>Twin</strong> <strong>Disc</strong>, Incorporated Assembly<br />
13. Remove one of the alignment tools and install a second 12 pt. capscrew<br />
(68). Again, use thread sealant on the threads before it is installed. Hand<br />
tighten.<br />
14. Remove the second alignment tool and install the remaining 12 pt.<br />
capscrew (68) with sealant on the threads. Hand tighten.<br />
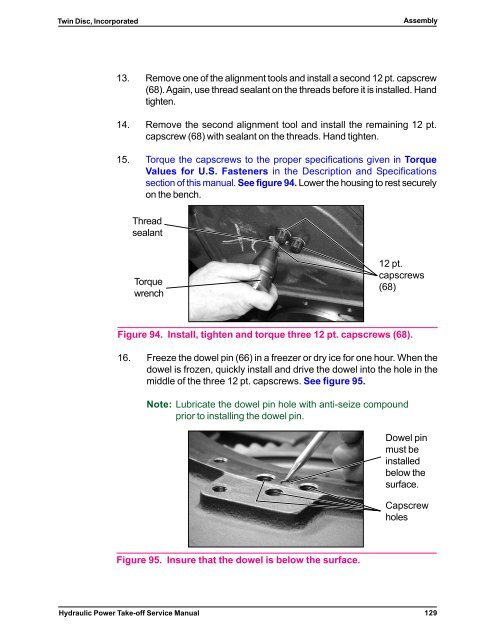
15. Torque the capscrews to the proper specifications given in Torque<br />
Values for U.S. Fasteners in the Description and Specifications<br />
section of this <strong>manual</strong>. See figure 94. Lower the housing to rest securely<br />
on the bench.<br />
Thread<br />
sealant<br />
Torque<br />
wrench<br />
Figure 94. Install, tighten and torque three 12 pt. capscrews (68).<br />
16. Freeze the dowel pin (66) in a freezer or dry ice for one hour. When the<br />
dowel is frozen, quickly install and drive the dowel into the hole in the<br />
middle of the three 12 pt. capscrews. See figure 95.<br />
Hydraulic Power Take-off Service Manual<br />
12 pt.<br />
capscrews<br />
(68)<br />
Note: Lubricate the dowel pin hole with anti-seize compound<br />
prior to installing the dowel pin.<br />
Figure 95. Insure that the dowel is below the surface.<br />
Dowel pin<br />
must be<br />
installed<br />
below the<br />
surface.<br />
Capscrew<br />
holes<br />
129