SIS offline - The IUCN Red List of Threatened Species
SIS offline - The IUCN Red List of Threatened Species
SIS offline - The IUCN Red List of Threatened Species

You also want an ePaper? Increase the reach of your titles
YUMPU automatically turns print PDFs into web optimized ePapers that Google loves.
<strong>SIS</strong> <strong><strong>of</strong>fline</strong><br />
We highly recommend using Firefox version 3.0 or newer with the <strong><strong>of</strong>fline</strong> <strong>SIS</strong>. Internet<br />
Explorer is specifically not recommended because <strong>of</strong> its noncompliance with internet<br />
standards.<br />
Getting Started<br />
<strong>SIS</strong> <strong><strong>of</strong>fline</strong> doesn’t really “install” on your computer the way normal programs do.<br />
<strong>The</strong> whole system runs from a file folder without the need to install it at all. You<br />
will, however, need to have a browser and a current version <strong>of</strong> the Java Runtime<br />
Environment (JRE), which can be downloaded for free from http://www.java.com<br />
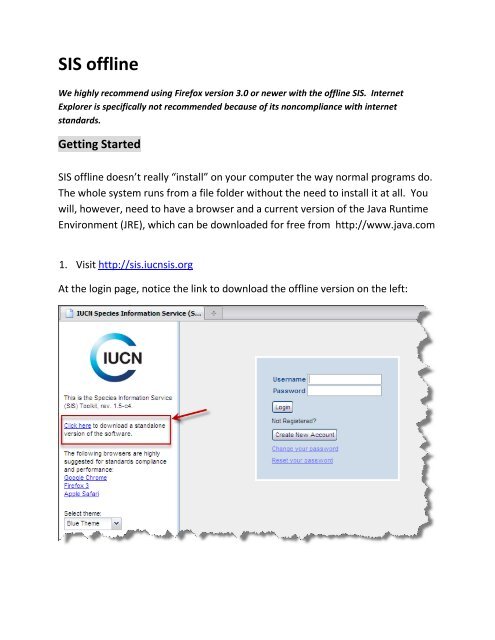
1. Visit http://sis.iucnsis.org<br />
At the login page, notice the link to download the <strong><strong>of</strong>fline</strong> version on the left:
2. Click the link shown above, which will initiate downloading the standalone <strong>SIS</strong><br />
toolkit (large file – please be patient). When finished, you will have a file<br />
named sisOffline.zip stored on your hard drive. By default, browsers may<br />
place downloaded files on the desktop or in a special “downloads” folder; as a<br />
result, you may need to search for the zip file once downloaded.<br />
3. Locate the downloaded zip file and unzip it to a location you will remember<br />
(the desktop is a fine temporary place, or MyDocuments). Windows has a<br />
built-in tool for unzipping, or extracting, the contents <strong>of</strong> a zip file. Simply right<br />
click on the zipped file and select “Extract all”, or double-click on the file and<br />
click on “Extract all” to initiate the extraction process.<br />
4. Now that the file is unzipped, you should have a folder with the following files<br />
and folders:<br />
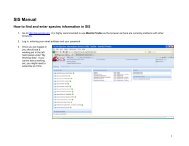
5. Double-click on the file named <strong>SIS</strong>_Toolkit.jar. This will launch the <strong>SIS</strong><br />
application server, start the service, and will launch your browser, bringing you<br />
to the login page <strong>of</strong> <strong>SIS</strong> in an <strong><strong>of</strong>fline</strong> mode. <strong>The</strong>se tasks may take up to a<br />
minute to complete, so please be patient.<br />
When <strong><strong>of</strong>fline</strong> <strong>SIS</strong> starts, the only indication that you are not using it over the<br />
internet are:<br />
<strong>The</strong> URL in your browser will display a local address, as in<br />
http://127.0.0.1:10000/<strong>SIS</strong>/index.html<br />
- and -
You will see a small icon in your computer’s task bar indicating that <strong><strong>of</strong>fline</strong> <strong>SIS</strong><br />
is running.<br />
6. When the login page appears for the <strong><strong>of</strong>fline</strong> <strong>SIS</strong>, please note a little box at<br />
the top <strong>of</strong> the screen regarding s<strong>of</strong>tware updates. If the box contains the<br />
test “No Updates Available”, then you have the most recent <strong><strong>of</strong>fline</strong> <strong>SIS</strong><br />
s<strong>of</strong>tware. If the box contains text reading “<strong>The</strong>re are X updates available<br />
for download” with a button to process updates, this indicates that there<br />
are s<strong>of</strong>tware updates available and you should press the update button in<br />
order to receive the updates. When the updates are completed, you will<br />
need to close the browser window and restart <strong>SIS</strong>. Below is a screenshot <strong>of</strong><br />
the notification when the <strong><strong>of</strong>fline</strong> <strong>SIS</strong> is out-<strong>of</strong>-date.<br />
7. Now, assuming <strong><strong>of</strong>fline</strong> <strong>SIS</strong> is running and you’ve either processed updates<br />
or are using the most recent version, and you are at the login screen, please<br />
do not log in with your normal online <strong>SIS</strong> password. In <strong><strong>of</strong>fline</strong> mode, <strong>SIS</strong> is<br />
an empty shell with no user accounts. You will need to create a user
account by clicking on the “Create New Account” button on the login page.<br />
Follow the prompts to create a new account; the account does not need to<br />
be identical to your online account, but should nevertheless identify you<br />
and be easy to remember.<br />
8. Once you’ve created the user account, login to the <strong><strong>of</strong>fline</strong> <strong>SIS</strong>. Upon logging<br />
in, you should see the normal <strong>SIS</strong> dashboard or homepage, but you won’t<br />
see any working sets or recent assessments. If you’ve made it this far,<br />
<strong><strong>of</strong>fline</strong> <strong>SIS</strong> is successfully able to run on your computer and the server is<br />
started.<br />
Important notes<br />
If you close your browser while using <strong>SIS</strong> <strong><strong>of</strong>fline</strong>, you can restart it again by<br />
simply right-clicking on the little <strong>SIS</strong> icon in your task bar and selecting<br />
“Open <strong>SIS</strong> Toolkit”. This will launch your browser and take you to the login<br />
page.<br />
If you turn <strong>of</strong>f or restart your computer, you’ll need to go to the sisOffline<br />
folder and double-click on <strong>SIS</strong>_Toolkit.jar, which will restart the service and<br />
take you to the login page.<br />
If you were not able to get <strong>SIS</strong> started in <strong><strong>of</strong>fline</strong> mode or using a Mac,<br />
please read the information in the <strong>SIS</strong>_Offline folder in the readme.txt file.
Exporting and Importing Assessments from Online to Offline <strong>SIS</strong><br />
<strong>The</strong> next step, once you’ve got <strong>SIS</strong> up and running <strong><strong>of</strong>fline</strong> and you’ve created an<br />
account, is to copy a group <strong>of</strong> assessments over from the online <strong>SIS</strong> for use by the<br />
<strong><strong>of</strong>fline</strong> <strong>SIS</strong>.<br />
1. Log into the online <strong>SIS</strong> (http://sis.iucnsis.org). In order to copy<br />
assessments into the <strong><strong>of</strong>fline</strong> <strong>SIS</strong>, they must be stored in a Working Set.<br />
2. In online <strong>SIS</strong>, locate the Working Set you’d like to use in <strong>SIS</strong> <strong><strong>of</strong>fline</strong>.<br />
3. On the Working Set Page, click on Working Set Manager, then scroll down<br />
to find the button labeled “Export to Offline”. See below.
4. Click on the Export to Offline button. Confirm by ticking the name <strong>of</strong> the<br />
Working Set once again and hit “Export” at the bottom <strong>of</strong> the screen. If you<br />
are prompted to lock the assessments, click Yes – this will avoid someone<br />
else working on those assessments while you are working on them <strong><strong>of</strong>fline</strong>.<br />
You can unlock them later when you are finished working <strong><strong>of</strong>fline</strong>.<br />
5. Preparing the export for download may take a while, depending on the size<br />
<strong>of</strong> the working set. Once complete, you’ll receive a message alerting you<br />
that the export was successful and prompting you to download the file.<br />
6. Click on “Download File” to begin downloading a zip file containing your<br />
working set and all assessments within it. This could be a large file. Please<br />
note the location your browser saves downloaded files to.<br />
7. Once the zip file is download, do not unzip it. This file is going to be<br />
imported into your <strong><strong>of</strong>fline</strong> <strong>SIS</strong> as-is. Make sure you remember the location<br />
where the zip file was downloaded to, or move it somewhere obvious like<br />
your desktop.<br />
8. Now, launch your <strong><strong>of</strong>fline</strong> <strong>SIS</strong> (either use the icon in the lower right , or<br />
double click on <strong>SIS</strong>_Toolkit.jar) and login using the account you created<br />
earlier.
9. Click on Working Set Page, then on Working Set Manager, then scroll down<br />
to “Import from Offline”.<br />
It may seem illogical to click “Import from Offline”, when you are actually<br />
wanting to import to <strong><strong>of</strong>fline</strong>, but this is how exported working sets are<br />
imported, regardless <strong>of</strong> whether you are importing to the online or <strong><strong>of</strong>fline</strong>.<br />
10. After clicking “Import from Offline”, browse and locate the zip file you<br />
downloaded from the online <strong>SIS</strong>. When attached, press “Import Working<br />
Set” and your working set will begin the importation process. Please be<br />
patient; depending on the size <strong>of</strong> your working set, this may take several<br />
minutes.<br />
11. When the working set has been imported, you will be notified <strong>of</strong> its success<br />
and the new working set will be available in the <strong><strong>of</strong>fline</strong> <strong>SIS</strong> from the<br />
Working Set page. In addition, it will be displayed on your <strong>SIS</strong> dashboard.
Now, you can begin to work on your assessments in the same manner as using<br />
the online <strong>SIS</strong>.<br />
Important notes<br />
Your working set and all the assessment data within it, is stored within the<br />
<strong>SIS</strong> Offline folder, which is named sisOffline and is located on your hard<br />
drive in the location you saved it to. Please do not delete this folder, as<br />
you will delete all the assessment data you’ve been working on since<br />
<strong><strong>of</strong>fline</strong>.<br />
If you wish to backup your work while working <strong><strong>of</strong>fline</strong>, you have two<br />
options:<br />
o Take the entire sisOffline folder that you are working from and save<br />
it to a USB flash drive, burn it to a CD or DVD, or otherwise copy it to<br />
a safe place. Your data is in there.<br />
o Use the “Export to Offline” feature (just as you did to get the<br />
assessments out <strong>of</strong> the online <strong>SIS</strong>) to create a zip file backup <strong>of</strong> your<br />
data, which you can save to a USB flash drive, etc. If you choose this<br />
option, just answer No when the system prompts you to lock your<br />
assessments. This way, you can still work on them <strong><strong>of</strong>fline</strong> but you’ll<br />
have a backup zip file. This is the preferred method as it doesn’t<br />
require as much space as the first option.<br />
Importing your edited assessments back into the online <strong>SIS</strong><br />
Once you’ve finished working on your assessments <strong><strong>of</strong>fline</strong>, it is very important to<br />
get them imported back online in a timely fashion. Follow these steps, which are<br />
almost exactly the same steps you’ve already done, in order to safely get your<br />
assessments back into <strong>SIS</strong>.
1. Log into your <strong><strong>of</strong>fline</strong> <strong>SIS</strong> (either use the icon in the lower right , or<br />
double click on <strong>SIS</strong>_Toolkit.jar in the sisOffline folder).<br />
2. Locate the Working Set you’d like to place back in the online <strong>SIS</strong>.<br />
3. On the Working Set Page, click on Working Set Manager, then scroll down<br />
to find the button labeled “Export to Offline”. See below.<br />
4. Click on the Export to Offline button. Confirm by ticking the name <strong>of</strong> the<br />
Working Set once again and hit “Export” at the bottom <strong>of</strong> the screen. If you<br />
are prompted to lock the assessments, this time click No.<br />
5. Preparing the export for download may take a while, depending on the size<br />
<strong>of</strong> the working set. Once complete, you’ll receive a message alerting you
that the export was successful and prompting you to download the file.<br />
6. Click on “Download File” to begin downloading a zip file containing your<br />
working set and all assessments within it. This could be a large file. Please<br />
note the location your browser saves downloaded files to.<br />
7. Once the zip file is download, do not unzip it. This file is going to be<br />
imported back into the online <strong>SIS</strong> as-is. Make sure you remember the<br />
location where the zip file was downloaded to, or move it somewhere<br />
obvious like your desktop.<br />
8. Now, log into the online <strong>SIS</strong> (http://sis.iucnsis.org) and login using your<br />
normal <strong>SIS</strong> login.<br />
9. Click on the “Working Set Page” tab, then on the “Working Set Manager”<br />
tab when it appears.<br />
10. Scroll to near the bottom <strong>of</strong> the list <strong>of</strong> buttons and click on “Import from<br />
Offline”.<br />
11. Locate the zip file that you just created from your <strong><strong>of</strong>fline</strong> <strong>SIS</strong> work and press<br />
“Import Working Set”. <strong>The</strong> importation process will begin and may take a<br />
while, depending on the size <strong>of</strong> the working set and your internet<br />
connection speed.
12. When you are notified that the working set has been imported, please<br />
check your assessments just to make sure the ones that now appear on the<br />
online <strong>SIS</strong> are the edited ones from your <strong><strong>of</strong>fline</strong> <strong>SIS</strong> work.<br />
That’s it. <strong>The</strong> online assessments will now be unlocked and can be edited by<br />
others in <strong>SIS</strong>, provided they have the proper editing permissions.<br />
Very Important final notes<br />
Once you’ve finished working <strong><strong>of</strong>fline</strong> and imported the assessments back into the<br />
online <strong>SIS</strong>, do not work on them anymore in your <strong><strong>of</strong>fline</strong> <strong>SIS</strong>! <strong>The</strong> act <strong>of</strong> placing<br />
them back into online <strong>SIS</strong> and removing the locks means the most recent version<br />
<strong>of</strong> those assessments is in the online <strong>SIS</strong>. <strong>The</strong> copy in your <strong><strong>of</strong>fline</strong> <strong>SIS</strong> should now<br />
be deleted to prevent accidental editing <strong>of</strong> them. If in the future you want to<br />
work on them again <strong><strong>of</strong>fline</strong>, you’ll need to download them again from online <strong>SIS</strong><br />
in order to get any recent changes and to lock the assessments.<br />
<strong>The</strong> best way to manage your <strong><strong>of</strong>fline</strong> <strong>SIS</strong> after confirming that your assessments<br />
are safely back online is to do the following:<br />
1. Make sure you have a backup copy <strong>of</strong> the zip file you used to bring the<br />
completed assessments back into online <strong>SIS</strong> – and make sure it is not stored<br />
in the sisOffline folder.<br />
2. Return to the <strong><strong>of</strong>fline</strong> <strong>SIS</strong> login page. If logged in, simply click logout next to<br />
your name in the upper right corner <strong>of</strong> <strong>SIS</strong>.
3. Click on the “Clear Data” button in the lower left. This will completely clear<br />
your <strong><strong>of</strong>fline</strong> <strong>SIS</strong> <strong>of</strong> all the data you have ever imported. Essentially, this is<br />
used to return your <strong><strong>of</strong>fline</strong> <strong>SIS</strong> to the exact state it was when you installed<br />
it, with the exception that it saves your user account.<br />
Remember, once you’ve brought the data back into the online <strong>SIS</strong>, there is<br />
no reason to keep it in the <strong><strong>of</strong>fline</strong> <strong>SIS</strong>.<br />
4. Once you’ve cleared all data, you have effectively started over with a fresh<br />
copy <strong>of</strong> the <strong><strong>of</strong>fline</strong> <strong>SIS</strong>, completely empty.<br />
For more information or troubleshooting<br />
If you have problems with any <strong>of</strong> the above steps, please visit<br />
http://support.iucnsis.org and log in with your online <strong>SIS</strong> credentials. You may<br />
browse current and solved issues in <strong>SIS</strong>, browse the user forums, and also submit<br />
your own requests for support.