Sony SRW-5800 Manual (PDF) - Westside Media Group
Sony SRW-5800 Manual (PDF) - Westside Media Group
Sony SRW-5800 Manual (PDF) - Westside Media Group

You also want an ePaper? Increase the reach of your titles
YUMPU automatically turns print PDFs into web optimized ePapers that Google loves.
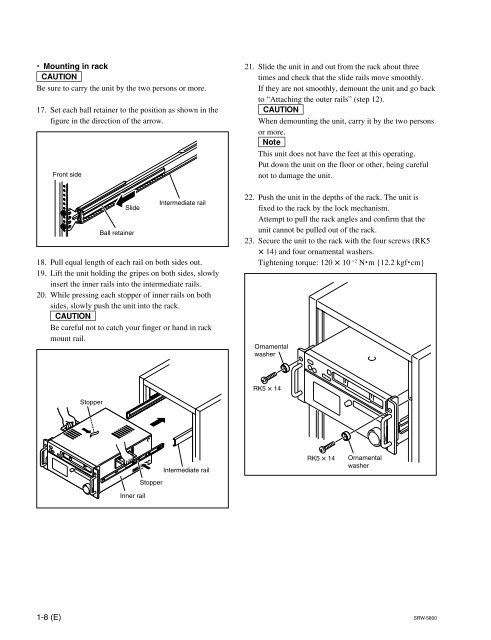
. Mounting in rack<br />
c<br />
Be sure to carry the unit by the two persons or more.<br />
17. Set each ball retainer to the position as shown in the<br />
figure in the direction of the arrow.<br />
Front side<br />
Stopper<br />
Slide<br />
Ball retainer<br />
Inner rail<br />
Stopper<br />
Intermediate rail<br />
18. Pull equal length of each rail on both sides out.<br />
19. Lift the unit holding the gripes on both sides, slowly<br />
insert the inner rails into the intermediate rails.<br />
20. While pressing each stopper of inner rails on both<br />
sides, slowly push the unit into the rack.<br />
c<br />
Be careful not to catch your finger or hand in rack<br />
mount rail.<br />
Intermediate rail<br />
21. Slide the unit in and out from the rack about three<br />
times and check that the slide rails move smoothly.<br />
If they are not smoothly, demount the unit and go back<br />
to “Attaching the outer rails” (step 12).<br />
c<br />
When demounting the unit, carry it by the two persons<br />
or more.<br />
n<br />
This unit does not have the feet at this operating.<br />
Put down the unit on the floor or other, being careful<br />
not to damage the unit.<br />
22. Push the unit in the depths of the rack. The unit is<br />
fixed to the rack by the lock mechanism.<br />
Attempt to pull the rack angles and confirm that the<br />
unit cannot be pulled out of the rack.<br />
23. Secure the unit to the rack with the four screws (RK5<br />
x 14) and four ornamental washers.<br />
Tightening torque: 120 x 10 _2 N.m {12.2 kgf.cm}<br />
Ornamental<br />
washer<br />
RK5 x 14<br />
RK5 x 14<br />
Ornamental<br />
washer<br />
1-8 (E) <strong>SRW</strong>-<strong>5800</strong>