Care & Use of Your Lynx Professional Grill - Lynx Professional Grills
Care & Use of Your Lynx Professional Grill - Lynx Professional Grills
Care & Use of Your Lynx Professional Grill - Lynx Professional Grills

Create successful ePaper yourself
Turn your PDF publications into a flip-book with our unique Google optimized e-Paper software.
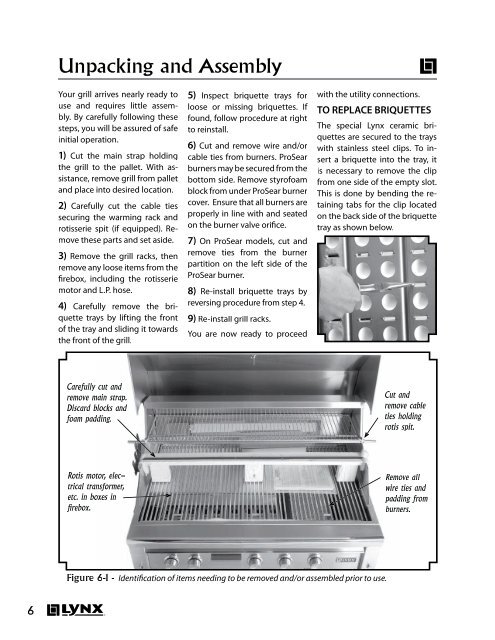
Unpacking and Assembly<br />
<strong>Your</strong> grill arrives nearly ready to<br />
use and requires little assembly.<br />
By carefully following these<br />
steps, you will be assured <strong>of</strong> safe<br />
initial operation.<br />
1) Cut the main strap holding<br />
the grill to the pallet. With assistance,<br />
remove grill from pallet<br />
and place into desired location.<br />
2) <strong>Care</strong>fully cut the cable ties<br />
securing the warming rack and<br />
rotisserie spit (if equipped). Remove<br />
these parts and set aside.<br />
3) Remove the grill racks, then<br />
remove any loose items from the<br />
firebox, including the rotisserie<br />
motor and L.P. hose.<br />
4) <strong>Care</strong>fully remove the briquette<br />
trays by lifting the front<br />
<strong>of</strong> the tray and sliding it towards<br />
the front <strong>of</strong> the grill.<br />
<strong>Care</strong>fully cut and<br />
remove main strap.<br />
Discard blocks and<br />
foam padding.<br />
Rotis motor, elec- elec-<br />
trical transformer,<br />
etc. in boxes in<br />
firebox.<br />
5) Inspect briquette trays for<br />
loose or missing briquettes. If<br />
found, follow procedure at right<br />
to reinstall.<br />
6) Cut and remove wire and/or<br />
cable ties from burners. ProSear<br />
burners may be secured from the<br />
bottom side. Remove styr<strong>of</strong>oam<br />
block from under ProSear burner<br />
cover. Ensure that all burners are<br />
properly in line with and seated<br />
on the burner valve orifice.<br />
7) On ProSear models, cut and<br />
remove ties from the burner<br />
partition on the left side <strong>of</strong> the<br />
ProSear burner.<br />
8) Re-install briquette trays by<br />
reversing procedure from step 4.<br />
9) Re-install grill racks.<br />
You are now ready to proceed<br />
with the utility connections.<br />
TO REPLACE BRIQUETTES<br />
The special <strong>Lynx</strong> ceramic briquettes<br />
are secured to the trays<br />
with stainless steel clips. To insert<br />
a briquette into the tray, it<br />
is necessary to remove the clip<br />
from one side <strong>of</strong> the empty slot.<br />
This is done by bending the retaining<br />
tabs for the clip located<br />
on the back side <strong>of</strong> the briquette<br />
tray as shown below.<br />
Figure -1 - Identification <strong>of</strong> items needing to be removed and/or assembled prior to use.<br />
Cut and<br />
remove cable<br />
ties holding<br />
rotis spit.<br />
Remove all<br />
wire ties and<br />
padding from<br />
burners.