Care & Use of Your Lynx Professional Grill - Lynx Professional Grills
Care & Use of Your Lynx Professional Grill - Lynx Professional Grills
Care & Use of Your Lynx Professional Grill - Lynx Professional Grills
You also want an ePaper? Increase the reach of your titles
YUMPU automatically turns print PDFs into web optimized ePapers that Google loves.
Locating <strong>Your</strong> <strong>Grill</strong><br />
When selecting a suitable location,<br />
take into account concerns<br />
such as exposure to wind and<br />
traffic paths. Try to keep all gas<br />
supply lines as short as possible.<br />
Never locate the grill under a<br />
ro<strong>of</strong> or overhang, in a building,<br />
garage, shed or other such<br />
enclosed area. A carpenter’s<br />
“spirit level” should be used to<br />
assure that the unit is level both<br />
front-to-back and side-to-side.<br />
If it is not level, burner combustion<br />
may be erratic or the unit<br />
may not function efficiently. If<br />
the floor is uneven or has a decided<br />
slope, re-leveling may be<br />
required after each moving <strong>of</strong> a<br />
freestanding unit.<br />
BUILT-IN INSTALLATIONS:<br />
The LYNX Built-In <strong>Grill</strong> is designed<br />
for easy installation into masonry<br />
enclosures. For non-combustible<br />
applications, the grill drops<br />
into the opening shown in the<br />
cutout detail drawing and hangs<br />
from its counter-top trim. A deck<br />
is not required to support it from<br />
the bottom. When using the insulated<br />
jacket in a combustible<br />
enclosure, the jacket must be<br />
supported from the bottom by a<br />
ledge on each side or a full deck<br />
beneath the jacket. Review the<br />
detailed drawing and pay special<br />
attention to the provisions<br />
shown for gas line hook-up. It is<br />
recommended that the enclosure<br />
have ventilation holes to<br />
prevent gas build-up in the event<br />
<strong>of</strong> a leak. The deck ledges and<br />
counter should be flat and level.<br />
If your grill is equipped with a ro-<br />
tisserie, electrical service should<br />
be provided (on the Left Side <strong>of</strong><br />
most models).<br />
REAR HOOD CLEARANCE:<br />
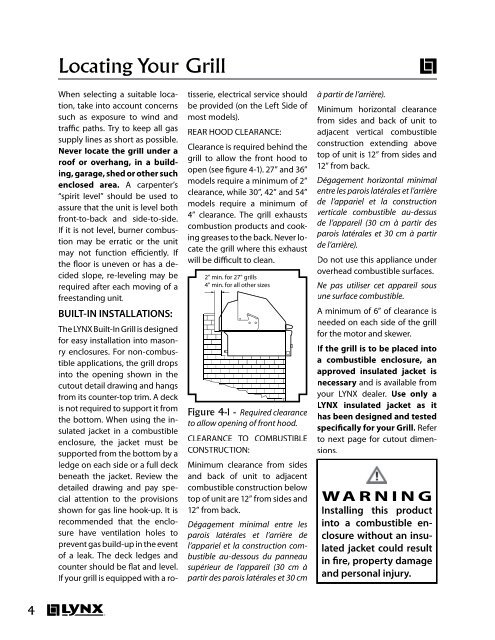
Clearance is required behind the<br />
grill to allow the front hood to<br />
open (see figure 4-1). 27” and 36”<br />
models require a minimum <strong>of</strong> 2”<br />
clearance, while 30”, 42” and 54”<br />
models require a minimum <strong>of</strong><br />
4” clearance. The grill exhausts<br />
combustion products and cooking<br />
greases to the back. Never locate<br />
the grill where this exhaust<br />
will be difficult to clean.<br />
2" min. for 27" grills<br />
4" min. for all other sizes<br />
Figure -1 - Required clearance<br />
to allow opening <strong>of</strong> front hood.<br />
CLEARANCE TO COMBUSTIBLE<br />
CONSTRUCTION:<br />
Minimum clearance from sides<br />
and back <strong>of</strong> unit to adjacent<br />
combustible construction below<br />
top <strong>of</strong> unit are 12” from sides and<br />
12” from back.<br />
Dégagement minimal entre les<br />
parois latérales et l’arrière de<br />
l’appariel et la construction combustible<br />
au-dessous du panneau<br />
supérieur de l’appareil (30 cm à<br />
partir des parois latérales et 30 cm<br />
à partir de l’arrière).<br />
Minimum horizontal clearance<br />
from sides and back <strong>of</strong> unit to<br />
adjacent vertical combustible<br />
construction extending above<br />
top <strong>of</strong> unit is 12” from sides and<br />
12” from back.<br />
Dégagement horizontal minimal<br />
entre les parois latérales et l’arrière<br />
de l’appariel et la construction<br />
verticale combustible au-dessus<br />
de l’appareil (30 cm à partir des<br />
parois latérales et 30 cm à partir<br />
de l’arrière).<br />
Do not use this appliance under<br />
overhead combustible surfaces.<br />
Ne pas utiliser cet appareil sous<br />
une surface combustible.<br />
A minimum <strong>of</strong> 6” <strong>of</strong> clearance is<br />
needed on each side <strong>of</strong> the grill<br />
for the motor and skewer.<br />
If the grill is to be placed into<br />
a combustible enclosure, an<br />
approved insulated jacket is<br />
necessary and is available from<br />
your LYNX dealer. <strong>Use</strong> only a<br />
LYNX insulated jacket as it<br />
has been designed and tested<br />
specifically for your <strong>Grill</strong>. Refer<br />
to next page for cutout dimensions.<br />
WARNING<br />
Installing this product<br />
into a combustible enclosure<br />
without an insulated<br />
jacket could result<br />
in fire, property damage<br />
and personal injury.


