Camp-on-a-Disk Guide - Robotics Academy - Carnegie Mellon ...
Camp-on-a-Disk Guide - Robotics Academy - Carnegie Mellon ...
Camp-on-a-Disk Guide - Robotics Academy - Carnegie Mellon ...

Create successful ePaper yourself
Turn your PDF publications into a flip-book with our unique Google optimized e-Paper software.
Voyage to Sea Lab Nautilus AQUABOTS CD-Rom<br />
What to cover in this sessi<strong>on</strong><br />
Dem<strong>on</strong>strate how touch sensors work. Bugbot is a great<br />
dem<strong>on</strong>strati<strong>on</strong> of touch sensors that children understand and really<br />
like. (See Boat / ROBOLAB Trials / Touch Sensors / BugBot )<br />
Explain to campers that:<br />
• Touch sensors provide digital feedback; things are either <strong>on</strong> or off.<br />
• When the touch sensor is pressed the circuit is being completed,<br />
which sends a signal to the c<strong>on</strong>troller.<br />
• The RCX shows feedback the robot is getting <strong>on</strong> the view screen.<br />
A example of how touch sensors work can be found at:<br />
Base / Robot Hardware / Sensors / Touch Sensor<br />
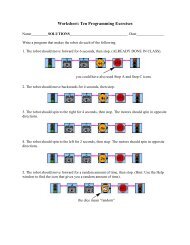
Programming Exercises<br />
Go Forward until Touch<br />
Have campers build the touch sensor bumper; Base / Robot<br />
Hardware / Attachments / Touch Sensor.<br />
Challenge the campers to write a program that will make their robot<br />
move forward until the touch sensor hits the wall. When it hits the<br />
wall the robot should move backward, turn, and move forward again.<br />
(Boat / ROBOLAB Trials / Touch Sensors / Wait For Push)<br />
Note: Remind students to build robot behaviors in small parts. Write a simple<br />
behavior (move forward until it hits a wall and stops), test the behavior, and<br />
make sure that <strong>on</strong>e behavior works before adding other behaviors.<br />
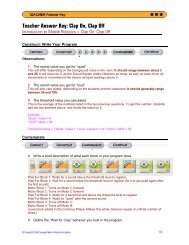
Introducti<strong>on</strong> to C<strong>on</strong>diti<strong>on</strong>al Statements<br />
The “Wait For Touch” and “Wait For Let Go” ic<strong>on</strong>s introduce the<br />
c<strong>on</strong>cept of a “c<strong>on</strong>diti<strong>on</strong>al statement”. In “Wait for Let Go”, the robot<br />
will c<strong>on</strong>tinue to move forward until the touch sensor is pressed.<br />
Wait For Let Go<br />
Use the exercise Boat / ROBOLAB Trials / Touch Sensors / Wait<br />
For Let Go. This is in fact more of an engineering challenge than a<br />
programming challenge. <str<strong>on</strong>g>Camp</str<strong>on</strong>g>ers will need to design a switching<br />
system that attaches to the bottom of their robots. (Hint: have them<br />
attach a touch sensor to the light sensor attachment)<br />
“Base Clean-up” Training Task<br />
Remind students they are the new “deckmates” so they must clean<br />
up the base– a task given to all the youngest members of the crew.<br />
They have an advantage over most people given this task, though.<br />
They can use robots! <strong>Guide</strong> them to the challenge <strong>on</strong> the CD and let<br />
them come up with a soluti<strong>on</strong>. The exercise is found in Base / Training<br />
Tasks / Base Clean Up.<br />
What might your students have trouble with today?<br />
• Since this is their fi rst time working with sensors, students may<br />
have a diffi cult time remembering to add modifi ers to their<br />
sensors, and/or wire their sensors into the right ports.<br />
• You will need to teach what the default port is for each sensor<br />
(Port 1) and that the robot w<strong>on</strong>’t get proper feedback unless the<br />
sensor is wired correctly to the robot.<br />
• The ic<strong>on</strong>s for different functi<strong>on</strong>s (wait for push, wait for release,<br />
etc.) look fairly similar, so if something is not working check that<br />
campers are using the correct ic<strong>on</strong>.<br />
• The touch sensor can be diffi cult to use if– mechanically– the<br />
touch sensor attachment doesn’t operate smoothly. This is an<br />
engineering design problem– encourage campers to create their<br />
own soluti<strong>on</strong>.<br />
• Add port modifi ers to all sensor ic<strong>on</strong>s, even if they are using the<br />
default port. It gets campers into the habit of adding the port<br />
modifi ers and will keep them out of trouble when they are using<br />
multiple sensors in future projects.<br />
Learning Objectives for Sessi<strong>on</strong> 3<br />
<str<strong>on</strong>g>Camp</str<strong>on</strong>g>ers should be able to:<br />
• Describe what a sensor is.<br />
• Describe a c<strong>on</strong>diti<strong>on</strong>al statement.<br />
• Describe how modifi ers are used with touch sensors.<br />
• Read the feedback from the view screen<br />
<strong>on</strong> their robot.<br />
• Use c<strong>on</strong>diti<strong>on</strong>al statements to c<strong>on</strong>trol robot<br />
behavior.<br />
• Write programs that use touch sensors to complete<br />
director assigned challenges.<br />
• Cooperatively work in teams.<br />
Sessi<strong>on</strong> 4<br />
Introducti<strong>on</strong> to Rotati<strong>on</strong> / Angle Sensors<br />
The rotati<strong>on</strong> sensor (also known as an angle sensor) is a powerful tool<br />
that campers can use to move point to point <strong>on</strong> the board. To review how<br />
the rotati<strong>on</strong> sensor gives feedback to the RCX go to Base / Robot Hardware<br />
/ Sensors / Rotati<strong>on</strong> Sensors. There are a variety of challenges for<br />
campers that will help them learn how to integrate rotati<strong>on</strong> sensors into<br />
their robot design. Since this is a camp, and children should be learning<br />
by doing, many of these c<strong>on</strong>cepts can be taught <strong>on</strong> a need-to-know basis.<br />
An example that dem<strong>on</strong>strates <strong>on</strong>e way to c<strong>on</strong>nect a rotati<strong>on</strong> sensor can<br />
be found in Base / Robot Hardware / Attachments / Rotati<strong>on</strong> Angle I.<br />
In this sessi<strong>on</strong> campers will be challenged to:<br />
• Add a rotati<strong>on</strong> sensor to their robots:<br />
Base / Robot Hardware / Attachments / Rotati<strong>on</strong> Angle I<br />
• Program their robots to use a rotati<strong>on</strong> sensor<br />
Boat / ROBOLAB Trials / Rotati<strong>on</strong> Sensors / Move Straight<br />
Boat / ROBOLAB Trials / Rotati<strong>on</strong> Sensors / Point Turns<br />
• Complete an Aquabot challenge that uses rotati<strong>on</strong> sensor feedback<br />
Base / Training Tasks / Flag Tripper<br />
Boat / Boat Excursi<strong>on</strong>s / Mail Crate<br />
What to cover in this sessi<strong>on</strong><br />
Build a few robots programmed with rotati<strong>on</strong> sensors so that you can<br />
dem<strong>on</strong>strate how they work. Take a few minutes and explain the following<br />
to the campers:<br />
• A rotati<strong>on</strong> sensor works better than programming with timing. As the<br />
battery level of the RCX changes, the speed of the robot decreases<br />
and so does the distance the robot travels; this makes programming<br />
robots using timing unpredictable. The rotati<strong>on</strong> sensor counts how<br />
many times the wheel turns, therefore robot movement becomes<br />
more predictable.<br />
• A rotati<strong>on</strong> sensor provides analog feedback, which is a range of<br />
numbers.<br />
• The rotati<strong>on</strong> sensor gives both negative and positive feedback.<br />
• The rotati<strong>on</strong> sensor needs to be reset before it can be used. If the<br />
user forgets to reset the rotati<strong>on</strong> sensor, it will c<strong>on</strong>tinue to count,<br />
rather than begin to count at zero.<br />
• <str<strong>on</strong>g>Camp</str<strong>on</strong>g>ers should know that 1/16th of a revoluti<strong>on</strong> is 22.5 degrees.<br />
• Every time a rotati<strong>on</strong> sensor turns <strong>on</strong>e revoluti<strong>on</strong> it counts 16 clicks.<br />
• Feedback from the rotati<strong>on</strong> sensor can be seen immediately <strong>on</strong> the<br />
view screen of the RCX. Dem<strong>on</strong>strate how to use the view screen to<br />
see feedback from the sensor.<br />
The Wait for Rotati<strong>on</strong> ic<strong>on</strong><br />
The “wait for rotati<strong>on</strong>” ic<strong>on</strong> is dem<strong>on</strong>strated in:<br />
Boat / ROBOLAB Trials / Rotati<strong>on</strong> Sensors / Move Straight<br />
Boat / ROBOLAB Trials / Rotati<strong>on</strong> Sensors / Point Turns<br />
When campers have completed the programming exercises you can<br />
assign them another Aquabot exercise from the “Base” or “Boat”, or<br />
have them write a program to move the robot through their own “custom”<br />
camper developed challenge.