A16 2 - OMRON
A16 2 - OMRON
A16 2 - OMRON

You also want an ePaper? Increase the reach of your titles
YUMPU automatically turns print PDFs into web optimized ePapers that Google loves.
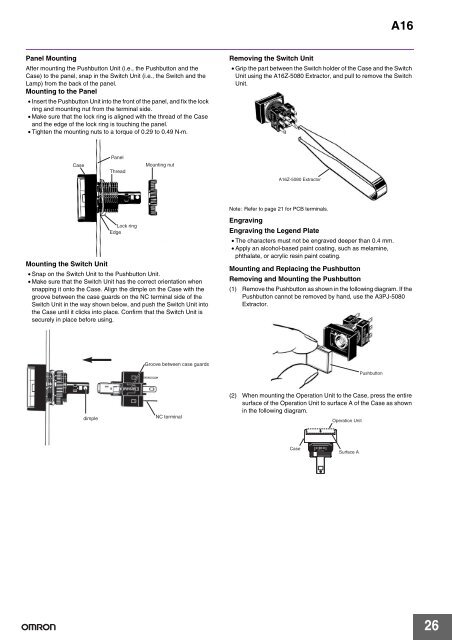
Panel Mounting<br />
After mounting the Pushbutton Unit (i.e., the Pushbutton and the<br />
Case) to the panel, snap in the Switch Unit (i.e., the Switch and the<br />
Lamp) from the back of the panel.<br />
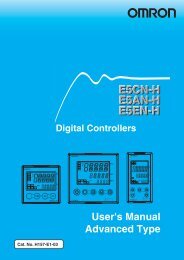
Mounting to the Panel<br />
• Insert the Pushbutton Unit into the front of the panel, and fix the lock<br />
ring and mounting nut from the terminal side.<br />
• Make sure that the lock ring is aligned with the thread of the Case<br />
and the edge of the lock ring is touching the panel.<br />
• Tighten the mounting nuts to a torque of 0.29 to 0.49 N·m.<br />
Case<br />
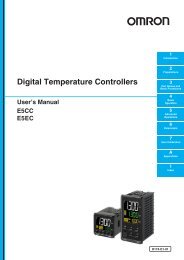
Mounting the Switch Unit<br />
• Snap on the Switch Unit to the Pushbutton Unit.<br />
• Make sure that the Switch Unit has the correct orientation when<br />
snapping it onto the Case. Align the dimple on the Case with the<br />
groove between the case guards on the NC terminal side of the<br />
Switch Unit in the way shown below, and push the Switch Unit into<br />
the Case until it clicks into place. Confirm that the Switch Unit is<br />
securely in place before using.<br />
dimple<br />
Panel<br />
Thread<br />
Lock ring<br />
Edge<br />
Mounting nut<br />
Groove between case guards<br />
NC terminal<br />
<strong>A16</strong><br />
Removing the Switch Unit<br />
• Grip the part between the Switch holder of the Case and the Switch<br />
Unit using the <strong>A16</strong>Z-5080 Extractor, and pull to remove the Switch<br />
Unit.<br />
<strong>A16</strong>Z-5080 Extractor<br />
Note: Refer to page 21 for PCB terminals.<br />
Engraving<br />
Engraving the Legend Plate<br />
• The characters must not be engraved deeper than 0.4 mm.<br />
• Apply an alcohol-based paint coating, such as melamine,<br />
phthalate, or acrylic resin paint coating.<br />
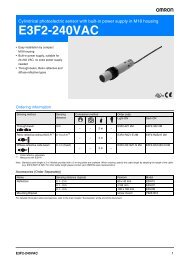
Mounting and Replacing the Pushbutton<br />
Removing and Mounting the Pushbutton<br />
(1) Remove the Pushbutton as shown in the following diagram. If the<br />
Pushbutton cannot be removed by hand, use the A3PJ-5080<br />
Extractor.<br />
(2) When mounting the Operation Unit to the Case, press the entire<br />
surface of the Operation Unit to surface A of the Case as shown<br />
in the following diagram.<br />
Case<br />
Operation Unit<br />
Surface A<br />
Pushbutton<br />
26