M-A6027 STEAM ROOM
M-A6027 STEAM ROOM
M-A6027 STEAM ROOM
- TAGS
- steam
- www.inocal.com

You also want an ePaper? Increase the reach of your titles
YUMPU automatically turns print PDFs into web optimized ePapers that Google loves.
Instruction for the installation of<br />
M-<strong>A6027</strong> <strong>STEAM</strong> <strong>ROOM</strong><br />
Thank you for choosing Midocean computerized steam rooms. Our best wishes are to<br />
warm your lovely life by our elaborate design. It is such an honor to have you enjoyed.<br />
For your proper operation and using, please read this instruction and act accordingly.<br />
Your satisfaction is our best reward.<br />
Make the most of your shower, make the best for your home!
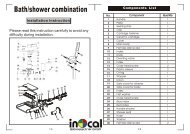
M-<strong>A6027</strong> Installation instruction of the stream room<br />
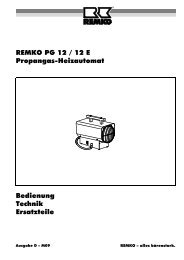
I、Product Part List<br />
1.Base<br />
2.Control Panel<br />
3.Back Glass<br />
4.Glass fixed clip<br />
5.Right fixed glass<br />
6.Left fixed glass<br />
7.Top<br />
8.Right fixed glass door<br />
9.Hinge<br />
10.Left fixed glass door<br />
11.Movable glass door<br />
12.Shelf<br />
13.Hand shower<br />
14.Hand shower Holder<br />
15.Teak wood base<br />
16.Seat<br />
17.Handle<br />
II、Technological Parameters<br />
2.1 Picture<br />
6<br />
5<br />
7<br />
1<br />
1<br />
12<br />
16<br />
15<br />
10<br />
13<br />
14<br />
11<br />
3<br />
9<br />
8<br />
4<br />
17<br />
2
M-<strong>A6027</strong> Installation instruction of the stream room Technological Parameters<br />
2.2 Technological Parameters<br />
System<br />
Remark:Packing size:<br />
(1) Glass pack(mm/inch): Length :2120/83;Width:1380/54;Height:200/8<br />
(2) Top and base(mm/inch): Length:1550/61;Width:870/34;Height:260/10<br />
(3) Bench and Electric system(mm/inch): Length:780/31;Width:480/19;Height:470/19<br />
Other Technological Parameters:<br />
1、Top<br />
2、LED Light<br />
3、Head shower<br />
4、Control Panel<br />
5、Hand shower<br />
6、Faucet<br />
7、Hand shower<br />
holder<br />
8、Water Jet<br />
9、Steam Jet<br />
10、Base<br />
11、Shelf<br />
12、Handle<br />
13、Hinge<br />
Electrical parameters Size(mm/inch)<br />
Voltage Power Frequency Length Width Height<br />
Model 220V~240V 3.5KW 50~60HZ 1500/59 813/32 2135/84<br />
2
M-<strong>A6027</strong> Installation instruction of the stream room Electricity and Plumbing<br />
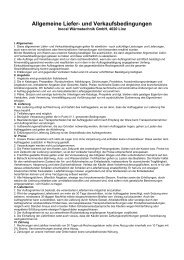
III Electricity and Plumbing<br />
3.1 See attached drawing:<br />
A:Hot water in<br />
B:Cold water in<br />
C:Power jack for the whole unit: 30A<br />
D:φ40 Ground Drainage<br />
3.2 The installation method of the sewer pipe is as follows:<br />
3.3 Electric and Plumbing:<br />
A、Water Supply:Stainless Steel Shower hose for hot and cold water<br />
B、Power: 220V,Earthing,the diameter of the wire is above 5 m㎡,the length of the power cord is<br />
1.5 meters, the end user could move in the area.<br />
C、Drainage:The diameter of the drain hole is bigger or equal toφ40mm.<br />
Notice:<br />
(1) It requires that the height from the floor to the ceiling must be 10cm higher than the total product<br />
height.<br />
(2) The product requires 3KG/cm3 water pressure,<br />
and balance hot and cold water pressure.<br />
If the end user don’t satisfy with the water pressure,<br />
please employ the engineer to add the pressure pump<br />
on your general water supply of the house.<br />
3<br />
500<br />
100<br />
500
(3) Please make sure there is a Creepage Protection switch on the main power supply of the end user’s<br />
house.<br />
(4) After finishing assembling the product, please leave the length at least 50cm from the product, in<br />
order to leave enough space for maintenance.<br />
4
M-<strong>A6027</strong> Installation instruction of the stream room Tools and fittings<br />
IV、Tools and fittings<br />
1. When you receive the goods, check the package and the goods, especially the visible damage on the<br />
package. Once there is any damage, work it out with the carrier or the deliverer immediately.<br />
The manufacturer is not responsible for the problems during the shipment.<br />
2. Ensure the required water and electrical condition at the scene of the installation of M-A6028<br />
3. The installation needs the cooperation of two people at least.<br />
4、You need the following tools while doing the installation:<br />
wooden hammer spanner gradienter tape screwdriver pencil 4mm six angle spanner<br />
V、Installation procedure<br />
1.Take out the base,place it 400~600mm apart<br />
from the wall corner. Shown as picture<br />
2.Install the control box on the base, use M6×25<br />
to fix. (Shown as picture)<br />
5<br />
3.Install the glass fixed clip on the back glass,<br />
use M6×10 screws to connect them, and tighten<br />
them with 4mm six angle spanner. Shown as<br />
picture<br />
Glass fixed clip<br />
M-A6028 蒸汽房安装说明
M-<strong>A6027</strong> Installation instruction of the stream room Installation procedure<br />
4.Insert the back glass on the gap of the base, it<br />
needs one person to hold this. Shown as picture<br />
5.Install the glass fixed clip on the big fixed glass,<br />
use M6×10 screws to connect them, and tighten<br />
them with 4mm six angle spanner. And then insert<br />
the rubber seal on the left side of the glass.<br />
Shown as picture<br />
Rubber seal<br />
1<br />
6.Insert the big fixed glass into the base, hold the<br />
glass, and use M6×10 screws to connect them,<br />
and tighten them with 4mm six angle spanner.<br />
Shown as picture<br />
7 Install the glass fixed clip on the left and right<br />
fixed glass, use M6×10 screws to connect them,<br />
and tighten them with 4mm six angle spanner.<br />
Shown as picture
M-<strong>A6027</strong> Installation instruction of the stream room Installation Procedure<br />
8. Lift the left fixed glass, insert it into base, and<br />
the rubber seal of the big fixed glass. Shown as<br />
picture<br />
Rubber seal<br />
9.Install the glass fixed clip on the top glass<br />
(position shown on picture ), use M6×10<br />
screws to connect them, and tighten them with<br />
4mm six angle spanner. Shown as picture<br />
Back side<br />
Left side<br />
Front side<br />
10.Lift the top glass on the top of the steam room,<br />
connect the glass with the screws of three side<br />
glasses. Use M6×10 countersunk head screw to<br />
connect, and tighten them with 4mm six angle<br />
spanner. Shown as picture<br />
11.Place the right fixed door on the base, insert<br />
the door into the gap. Use M6×10<br />
countersunk head screw to connect, and<br />
tighten them with 4mm six angle spanner.<br />
Shown as picture
M-<strong>A6027</strong> Installation instruction of the stream room Installation Procedure<br />
12. Hold the right fixed door, install the door axis<br />
and hinge on the glass. Shown as picture<br />
Hinge<br />
13. Install the left fixed glass: Place the glass on<br />
the base, insert it into the gap. Use M6×10<br />
countersunk head screw to connect, and<br />
tighten them with 4mm six angle spanner.<br />
Shown as picture<br />
14.Place the door on the base, insert it into the<br />
gap and install the hinge on the door ( Shown<br />
as picture). After the installation of the door,<br />
adjust to make the door go smoothly.<br />
.<br />
15. According to the sign, connect the wires of<br />
speaker/fan/LED light with the connection<br />
on the top, and connect the temperature<br />
sensor with the control box through the<br />
small hole of the top. Shown as picture<br />
Speaker, fan, LED<br />
light wire<br />
Control<br />
panel cable<br />
Temperature<br />
sensor
M-<strong>A6027</strong> Installation instruction of the stream room Installation Procedure<br />
16.Connect all the wires for speaker, fan, and<br />
top LED light, Shown as picture<br />
17.Connect the top shower with the faucet, and<br />
connect the steam generator with the<br />
middle pipe of th faucet, and the hot<br />
flexible pipe connect with the steam jet. At<br />
last, connect the hot and cold water<br />
according to the sign. Shown as picture<br />
Steam outlet<br />
Water pipe inlet<br />
Dirt outlet<br />
18.Place the shelf to the certain position. See<br />
attached drawing, Shown as picture<br />
1 19.Assembly the hand shower on the glass, and<br />
Head shower connect the shower hose with the shower<br />
Pipe<br />
holder connection. Place the teak wood base<br />
into the steam room. Shown as picture<br />
Faucet pipe<br />
Steam generator<br />
Power cord<br />
Water pipe<br />
connect, see<br />
attached<br />
drawing<br />
Hand shower holder<br />
connection<br />
Hand shower holder
M-<strong>A6027</strong> Installation instruction of the stream room Installation Procedure<br />
20.Install the door handle,Shown as picture<br />
21.Pull the unit into the wall corner, plug in and<br />
you could enjoy the steam room. Shown as<br />
picture
M-<strong>A6027</strong> Installation instruction of the stream room Faucet usage and technical parameters<br />
VI、Faucet usage and technical parameters<br />
6.1 Faucet usage<br />
◇ Switch on/off<br />
You can turn it on by rotating the lever to clockwise direction,<br />
while you will turn it off to the other direction.<br />
The water flow is adjustable.<br />
◇ Shower convertor<br />
Switch the shower function, such as hand shower,<br />
top shower, acupuncture shower, foot massage,<br />
according to the sign on the faucet.<br />
◇ Water temperature adjustment:turn<br />
the cold and hot water<br />
◇<br />
faucet to left and right. It can also be turned on or off<br />
by turning up and down. (See attachment)<br />
Turn the convertor to whatever you need according to the signs.<br />
6.2 Faucet Parameters<br />
1.Standard Water Pressure:0.1-0.5MPA<br />
2 Cold water temperature range:8-29℃<br />
3.Temperature setting:38℃<br />
Hot water temperature range:55-85℃<br />
Water temperature range :20-50℃<br />
4.If the cold water don’t come out normally, it would happen this: the cold water comes out ≤42<br />
in 5 seconds.<br />
5.Water temperature testing:When the cold water changes between 8-29℃ and hot water change<br />
between 55-85, at the same time, the water pressure changed 50%, the water temperature will<br />
have tolerance no less than ±2℃
M-<strong>A6027</strong> Installation instruction of the stream room Trouble shooting<br />
VII Special Tips and trouble shooting<br />
7.1 Special Tips<br />
1、All power supply should be according to the national standard, power voltage and frequency should<br />
be same with the nameplate. The power supply should be assembled with 30mA electric current<br />
RCD, And with efficient earthing protection.<br />
2、 Power cable should be permanent fixed connection. Every power cord should have three wires<br />
and the section size couldn’t less than 2.5 (that is 3×2.5mm).<br />
3、Please drain the water for 10 minutes from the new built house, to drain all the dirt from the pipe.<br />
4、Please cut off the water supply and electric supply after usage.<br />
5、Earth wire should connect with the water pipe and the heating pipe.<br />
7.2 Trouble shooting<br />
phenomenon Malfunction<br />
ed display<br />
Can not start No display<br />
on the<br />
monitor<br />
Switch failure Power off<br />
Shut off<br />
spontaneously<br />
No steam<br />
comes out<br />
right after<br />
turned on<br />
Indicating<br />
light is on<br />
Indicating<br />
light is off<br />
Failure possible reason Solutions<br />
1.Power line unsuitably connected or no<br />
power supply.<br />
2.Insufficient power<br />
3.2A fuse damaged.<br />
4. Current leakage protection switch<br />
damaged.<br />
1.Leakage protection switch damped or<br />
damaged<br />
2.short cut<br />
1.inlet or outlet valve damaged<br />
2.the drainage of the outlet valve got<br />
stuck<br />
1.electronic components damaged<br />
2.cable loosen<br />
1.lack of water supply<br />
2.water pressure too low<br />
3.heating element in the steam generator<br />
is broke<br />
4.no water coming in the steam generator<br />
5.steam pipe is stuck or broke<br />
6.haven’t reached the required heating<br />
time<br />
7.the indoor temperature is higher than<br />
the set temperature<br />
1.Correctly connect or wait for he<br />
electricity supply to resume.<br />
2.The power must reach the required<br />
standard<br />
3.Replace the 2A fuse.<br />
4. Replace the current leakage protection<br />
1.replace the switch<br />
2.recheck the circuit<br />
switch.<br />
1.replace the inlet or outlet valve<br />
2.clean out the draining pipes<br />
1.repair or replace the relevant<br />
component<br />
2.reconnect the cables<br />
1.wait for the water back to normal<br />
2.install booster on the main water pipe<br />
3.replace with a new one<br />
4.check the inlet valve<br />
5.remove the obstruction or replace the<br />
pipe<br />
6.wait for a while<br />
7.set a higher temperature or wait for it<br />
to cool down
Self protection 1.lack of water pressure<br />
Sauna fails to<br />
work<br />
2.inlet or outlet valve got stuck<br />
3. draining pipe got stuck<br />
4. steam pipe got stuck<br />
1.heating element damaged<br />
2.circuit board or components damaged<br />
Overheating 1.the set temperature is too high<br />
Steam cut off 1.Set time’s up.<br />
Water leaks<br />
from the steam<br />
outlet<br />
No sound<br />
comes from the<br />
speaker<br />
Monitor is<br />
working<br />
Monitor is<br />
not working<br />
2.temperature sensor fails to work<br />
2.set temperature is too low<br />
3.electronic component(heating<br />
element)damaged<br />
1.floater is out of control<br />
2.the circuit in charge of checking the<br />
water level is out of control<br />
1.no FM signal<br />
2.mute<br />
3.speaker damaged<br />
4.antenna loosen<br />
1.circuit or electronic components<br />
damaged<br />
2.cable loosen and not connected well<br />
1.install booster<br />
2.clean out the obstruction<br />
3.same as above<br />
4.clean the steam pipe<br />
1.replace with new one<br />
2.same as above<br />
1.set a lower one<br />
2.replace with new one<br />
1.reset the time<br />
2.set a higher one(couldn’t be lower then<br />
the temperature in the room)<br />
3.repair or replace<br />
1.check the floater<br />
2.check the components in that circuit<br />
1.readjust the channel<br />
2.increase volume<br />
3.replace a new one<br />
4.reconnect it and adjust the position<br />
1.replace it<br />
2.reconnect it or replace it<br />
Attention: Within the guarantee time, DO NOT break the seal on the electrical box and the steam generator on your<br />
own. DO NOT repair or replace the circuit on your own. If any problem occurred, please contact the local distributor or<br />
the manufacturer for after-sale service.
M-<strong>A6027</strong> Installation instruction of the stream room Cleaning and Maintainence<br />
1、When it comes to daily cleaning, basically, liquid detergent and soft cloth should be involved. DO<br />
NOT EVER sterilize it by detergent with acetone and ammonia. DO NOT EVER use detergent with<br />
formic acid or formaldehyde.<br />
2、To apply with some wax to polish it will bring you the glossy surface back.<br />
3、The blotch on the surface can be wiped away by soft cloth with toothpaste.<br />
4、The scale on the surface can be cleaned out by soft cloth with lemonade or heated vinegar.<br />
5、To deal with slight scratchs or burn by cigarette, you shall rub it off by 1200 sand paper which needs<br />
to be softened by water first, then polish it by certain amount polishing paste.<br />
6、After every 20 times of using the unit, we strongly suggest you to clean the steam generator. When<br />
you start to clean it, make some solution mixed with 1.5-1.7 litre of warm water and 5-10gram of<br />
citric acid. Pour the solution into the steam generator through the water inlet. Switch it on after 8 to<br />
10 hours, wait for it to be discharged as gas.<br />
7、When the water is too hard, we strongly suggest you to clean the whirlpool device twice a year. The<br />
way is as follows:<br />
A、Fill 40℃ hot water in the tub to the necessary water level (right to the level that can ensure to get<br />
the tub working).<br />
B、According to the proportion of mixing 2 gram of liquid detergent into 1 litre of water, put certain<br />
amount of detergent into the water, and switch the system on for 5mins.<br />
C、Switch it off, drain out the water.<br />
D、Fill cold water in the tub, switch on the system and keep it working for 3mins.<br />
E、Switch it off, drain out the water and clean the tub.