Installation Instruction
Installation Instruction
Installation Instruction

Create successful ePaper yourself
Turn your PDF publications into a flip-book with our unique Google optimized e-Paper software.
Bath/shower combination<br />
<strong>Installation</strong> <strong>Instruction</strong><br />
Please read this instruction carefully to avoid any<br />
difficulty during installation.<br />
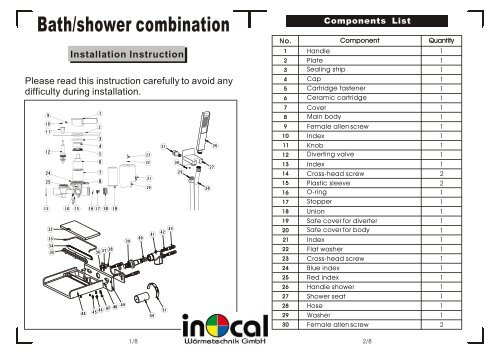
Components List<br />
N o . Component Quantity<br />
1/8 2/8<br />
1<br />
2<br />
3<br />
4<br />
5<br />
6<br />
7<br />
8<br />
9<br />
10<br />
11<br />
12<br />
13<br />
14<br />
15<br />
16<br />
17<br />
18<br />
19<br />
20<br />
21<br />
22<br />
23<br />
24<br />
25<br />
26<br />
27<br />
28<br />
29<br />
30<br />
Handle<br />
Plate<br />
Sealing strip<br />
Cap<br />
Cartridge fastener<br />
Ceramic cartridge<br />
Cover<br />
Main body<br />
Female allen screw<br />
Index<br />
Knob<br />
Diverting valve<br />
Index<br />
Cross-head screw<br />
Plastic sleeve<br />
O-ring<br />
Stopper<br />
Union<br />
Safe cover for diverter<br />
Safe cover for body<br />
Index<br />
Flat washer<br />
Cross-head screw<br />
Blue index<br />
Red index<br />
Handle shower<br />
Shower seat<br />
Hose<br />
Washer<br />
Female allen screw 2<br />
1<br />
1<br />
1<br />
1<br />
1<br />
1<br />
1<br />
1<br />
1<br />
1<br />
1<br />
1<br />
1<br />
2<br />
2<br />
1<br />
1<br />
1<br />
1<br />
1<br />
1<br />
1<br />
1<br />
1<br />
1<br />
1<br />
1<br />
1<br />
1
Components List<br />
N o . Component Quantity<br />
31<br />
32<br />
33<br />
34<br />
35<br />
36<br />
37<br />
38<br />
39<br />
40<br />
41<br />
42<br />
43<br />
44<br />
45<br />
46<br />
47<br />
48<br />
49<br />
50<br />
51<br />
Connection pipe<br />
Cover<br />
Sealing strip<br />
Net<br />
Plate<br />
Spring shim<br />
Cross-head screw<br />
Seat<br />
Union<br />
O-ring<br />
Seat<br />
Cross-head screw<br />
Plastic sleeve<br />
Spout<br />
Female allen screw<br />
Index<br />
Cross-head screw<br />
Setting pin<br />
Plate<br />
Safe cover<br />
Index<br />
1<br />
1<br />
1<br />
8<br />
1<br />
2<br />
2<br />
1<br />
1<br />
3<br />
1<br />
4<br />
4<br />
1<br />
2<br />
4<br />
4<br />
2<br />
1<br />
1<br />
1<br />
Flow rate Curves<br />
L/min<br />
35<br />
0<br />
0.1 0.2 0.3 0.4 0.5 1 2 3<br />
Note<br />
Test pressure: 1.6MPa (16bar)<br />
Flow pressure:<br />
Min 0.05MPa<br />
Max<br />
1.60MPa<br />
Recommended pressure:<br />
0.1MPa to 0.8MPa (1 to 8 bar)<br />
1.Ensure proper cleaning of the water supply pipe before<br />
installation to avoid any jammed.<br />
2.The cold-water supply must be connected on the right and<br />
the hot-water supply must be connected to the left.<br />
3.Check the installation dimensions according to the Figure and<br />
ensure it is installed correctly.<br />
o<br />
4.Hot-water inlet temperature must not be over 80 C.<br />
3/8 8/8<br />
30<br />
25<br />
20<br />
15<br />
10<br />
5<br />
Bar<br />
PZMF159800<br />
2010.12.20
<strong>Installation</strong> Step<br />
Before installing the main body, read the index on cover , install the decorating tiles<br />
and glue the plate (4).<br />
6<br />
3<br />
2<br />
5<br />
7<br />
1<br />
The internal diameter of this pipe must be<br />
greater than 13mm.<br />
Have to connect the pipe to wall tub spout or<br />
Head rain shower.<br />
5/8<br />
4<br />
1<br />
2<br />
3<br />
<strong>Installation</strong> Step<br />
8<br />
9<br />
10<br />
Pay attention to the index on the safe<br />
cover , in order to install (17),(19) .<br />
16<br />
16<br />
13<br />
6/8<br />
11<br />
Put the installing seat on the wall and draw two<br />
screw holes.<br />
17 18<br />
14<br />
14<br />
18 19<br />
20<br />
12<br />
PZMF159800<br />
2010.12.20<br />
4<br />
5<br />
15<br />
6
<strong>Installation</strong> Step<br />
Read the <strong>Installation</strong> Fig and confirm the installing position.<br />
Test:<br />
Open the supply pipes, close the ceramic cartridge and check the connections<br />
for leakage; open the ceramic cartridge and check the smooth water flow. Decorate<br />
the wall after checking and remove the safe cover. Install the escutcheon and handle.<br />
7/8<br />
21 22<br />
24<br />
23<br />
25<br />
7<br />
<strong>Installation</strong> Fig<br />
4/8