- Page 1:
® SlickEdit Code Quick | Think Sli
- Page 6:
Information in this documentation i
- Page 10:
TABLE OF CONTENTS Embedded Language
- Page 14:
TABLE OF CONTENTS Memory 73 Registe
- Page 18:
TABLE OF CONTENTS Restoring Setting
- Page 22:
TABLE OF CONTENTS Managing Tag File
- Page 26:
TABLE OF CONTENTS Line Selections 2
- Page 30:
TABLE OF CONTENTS Language-Specific
- Page 34:
TABLE OF CONTENTS Line Highlights 3
- Page 38:
TABLE OF CONTENTS Statements/Declar
- Page 42:
TABLE OF CONTENTS Perl Regular Expr
- Page 46:
TABLE OF CONTENTS Paragraphs 558 Hi
- Page 50:
TABLE OF CONTENTS Debugger Runtime
- Page 54:
TABLE OF CONTENTS Build the Project
- Page 58:
TABLE OF CONTENTS 28 SlickEdit® Us
- Page 62:
INTRODUCTION 30 SlickEdit® User Gu
- Page 66:
GETTING THE MOST OUT OF SLICKEDIT®
- Page 70:
NEW FEATURES AND ENHANCEMENTS Insta
- Page 74:
NEW FEATURES AND ENHANCEMENTS Slick
- Page 78:
NEW FEATURES AND ENHANCEMENTS 38 Sl
- Page 82:
DOCUMENTATION Platform-Specific Not
- Page 86:
DOCUMENTATION Help Key Shortcuts Th
- Page 90:
SUPPORTED LANGUAGES AND ENVIRONMENT
- Page 94:
SUPPORTED LANGUAGES AND ENVIRONMENT
- Page 98:
INSTALLATION Mac 2. At an xterm or
- Page 102:
INSTALLATION • Request a license
- Page 106:
INSTALLATION Windows If your comput
- Page 110:
STARTUP AND EXIT • Create Tag Fil
- Page 114:
PRODUCT SUPPORT 56 SlickEdit® User
- Page 118:
QUICK START • Setting color schem
- Page 122:
QUICK START 4. To add the source fi
- Page 126:
USER INTERFACE 62 SlickEdit® User
- Page 130:
SCREEN LAYOUT • File tabs - File
- Page 134:
SCREEN LAYOUT 66 SlickEdit® User G
- Page 138:
TOOLBARS AND TOOL WINDOWS Changing
- Page 142:
TOOLBARS AND TOOL WINDOWS Files All
- Page 146:
TOOLBARS AND TOOL WINDOWS Edit Cont
- Page 150:
TOOLBARS AND TOOL WINDOWS Watch Con
- Page 154:
BUFFERS AND EDITOR WINDOWS By defau
- Page 158:
BUFFERS AND EDITOR WINDOWS Switchin
- Page 162:
BUFFERS AND EDITOR WINDOWS • Clos
- Page 166:
BUFFERS AND EDITOR WINDOWS 82 Slick
- Page 170:
ACCESSING MENUS corresponding menu
- Page 174:
THE SLICKEDIT® COMMAND LINE Some c
- Page 178:
THE SLICKEDIT® COMMAND LINE The fo
- Page 182:
THE SLICKEDIT® COMMAND LINE 90 Sli
- Page 186:
SCREEN MANAGEMENT 92 SlickEdit® Us
- Page 190:
USING THE MOUSE AND KEYBOARD Text B
- Page 194:
PRINTING Header/Footer Print Settin
- Page 198:
PRINTING 98 SlickEdit® User Guide
- Page 202:
USER PREFERENCES 100 SlickEdit® Us
- Page 206:
INTRODUCTION TO USER PREFERENCES 10
- Page 210:
EMULATIONS Visual Studio does not p
- Page 214:
EMULATIONS 106 SlickEdit® User Gui
- Page 218:
KEY AND MOUSE BINDINGS language edi
- Page 222:
KEY AND MOUSE BINDINGS To clear eit
- Page 226:
KEY AND MOUSE BINDINGS Exporting an
- Page 230:
KEY AND MOUSE BINDINGS 114 SlickEdi
- Page 234:
CURSOR, MOUSE, AND SCROLL SETTINGS
- Page 238:
SETTING FONTS AND COLORS SBCS/DBCS
- Page 242:
SETTING FONTS AND COLORS 5. If you
- Page 246:
RESTORING SETTINGS ON STARTUP 122 S
- Page 250:
SETTING FILE ASSOCIATIONS 124 Slick
- Page 254:
WORKSPACES, PROJECTS, AND FILES 126
- Page 258:
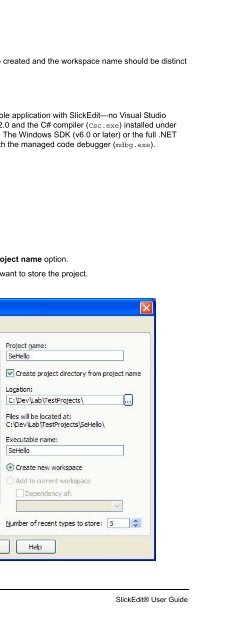
WORKSPACES AND PROJECTS project to
- Page 262:
WORKSPACES AND PROJECTS add to the
- Page 266:
WORKSPACES AND PROJECTS 3. Locate t
- Page 270:
WORKSPACES AND PROJECTS Dynamic Lan
- Page 274:
WORKSPACES AND PROJECTS “All conf
- Page 278:
WORKSPACES AND PROJECTS tool specif
- Page 282:
WORKSPACES AND PROJECTS to Compile)
- Page 286:
WORKSPACES AND PROJECTS o Import -
- Page 290:
WORKSPACES AND PROJECTS 144 SlickEd
- Page 294:
WORKING WITH FILES To see the curre
- Page 298:
WORKING WITH FILES 1. From the main
- Page 302:
WORKING WITH FILES Invocation Examp
- Page 306:
WORKING WITH FILES override some of
- Page 310:
WORKING WITH FILES Selecting Files
- Page 314:
WORKING WITH FILES SlickEdit® crea
- Page 318:
WORKING WITH FILES 158 SlickEdit®
- Page 322:
CONTEXT TAGGING® 160 SlickEdit® U
- Page 326:
CONTEXT TAGGING® The example below
- Page 330:
CONTEXT TAGGING® you’re currentl
- Page 334:
BUILDING AND MANAGING TAG FILES For
- Page 338:
BUILDING AND MANAGING TAG FILES Con
- Page 342:
BUILDING AND MANAGING TAG FILES The
- Page 346:
BUILDING AND MANAGING TAG FILES 172
- Page 350:
BUILDING, RUNNING, AND DEBUGGING 17
- Page 354:
BUILDING AND COMPILING General opti
- Page 358:
BUILDING AND COMPILING 3. From the
- Page 362:
BUILDING AND COMPILING file is dele
- Page 366:
BUILDING AND COMPILING Exclusions S
- Page 370:
BUILDING AND COMPILING 184 SlickEdi
- Page 374:
RUNNING AND DEBUGGING Ctrl+Shift+F5
- Page 378:
RUNNING AND DEBUGGING 4. Set the Ex
- Page 382:
RUNNING AND DEBUGGING 190 SlickEdit
- Page 386:
EDITING FEATURES 192 SlickEdit® Us
- Page 390:
NAVIGATION Navigating Between Multi
- Page 394:
NAVIGATION • begin_statement/end_
- Page 398:
NAVIGATION Handling File URLS Files
- Page 402:
SYMBOL BROWSING If you are coding w
- Page 406:
SYMBOL BROWSING • Add Member Func
- Page 410:
SYMBOL BROWSING • Show Hierarchy
- Page 414:
SYMBOL BROWSING • Documentation c
- Page 418:
SYMBOL BROWSING The References tool
- Page 422:
SYMBOL BROWSING Symbols Tool Window
- Page 426:
SYMBOL BROWSING Viewing Base and De
- Page 430:
SYMBOL BROWSING o Const - (C++ only
- Page 434:
SYMBOL BROWSING 216 SlickEdit® Use
- Page 438:
TEXT EDITING Improve Your Editing E
- Page 442:
TEXT EDITING Shortcut for Extending
- Page 446:
TEXT EDITING Cycling Through Select
- Page 450:
TEXT EDITING Selection Operation De
- Page 454:
TEXT EDITING Selection Operation De
- Page 458:
TEXT EDITING Copying Text Cut Opera
- Page 462:
TEXT EDITING Moving Text To move a
- Page 466:
TEXT EDITING This section includes
- Page 470:
TEXT EDITING • To change the view
- Page 474:
TEXT EDITING The figure below shows
- Page 478:
TEXT EDITING 238 SlickEdit® User G
- Page 482:
CODE TEMPLATES We call the process
- Page 486:
CODE TEMPLATES Add the Template Fil
- Page 490:
CODE TEMPLATES 1. Create a new fold
- Page 494:
CODE TEMPLATES Add File Dialog Used
- Page 498:
CODE TEMPLATES [ConfigDir]/template
- Page 502:
CODE TEMPLATES Summary of metadata
- Page 506:
CODE TEMPLATES • Attributes • C
- Page 510:
CODE TEMPLATES Parameter Parameter
- Page 514:
CODE TEMPLATES Example The followin
- Page 518:
CODE TEMPLATES My Java Class My cu
- Page 522:
COLOR CODING 5. Correct the ID foll
- Page 526:
SYNTAX INDENT AND SMARTPASTE® Sett
- Page 530:
ADAPTIVE FORMATTING value set in th
- Page 534:
ADAPTIVE FORMATTING Formatting Opti
- Page 538:
ADAPTIVE FORMATTING This dialog let
- Page 542:
ADAPTIVE FORMATTING 270 SlickEdit®
- Page 546:
COMPLETIONS To cancel out of Auto-C
- Page 550:
COMPLETIONS 2. Type _open and the _
- Page 554:
ALIASES 2. In the File name field,
- Page 558:
ALIASES Alias Escape Sequences Alia
- Page 562:
ALIASES Alias Name and Description
- Page 566:
ALIASES 282 SlickEdit® User Guide
- Page 570:
SYNTAX EXPANSION For example, to ad
- Page 574:
QUICK BRACE/UNBRACE You can use Unb
- Page 578:
DYNAMIC SURROUND AND SURROUND WITH
- Page 582:
DYNAMIC SURROUND AND SURROUND WITH
- Page 586:
DYNAMIC SURROUND AND SURROUND WITH
- Page 590:
DYNAMIC SURROUND AND SURROUND WITH
- Page 594:
BOOKMARKS Setting a Bookmark With a
- Page 598:
BOOKMARKS that are not in the curre
- Page 602:
BOOKMARKS 300 SlickEdit® User Guid
- Page 606:
CODE ANNOTATIONS Workspace and Proj
- Page 610:
CODE ANNOTATIONS 6. After entering
- Page 614:
CODE ANNOTATIONS 3. In the Fields a
- Page 618:
CODE ANNOTATIONS Annotation File Ma
- Page 622:
CODE ANNOTATIONS During the review
- Page 626:
MESSAGE LIST • Indicator - The fi
- Page 630:
COMMENTING Doc Comments Doc comment
- Page 634:
COMMENTING The box on the left cont
- Page 638:
COMMENTING 318 SlickEdit® User Gui
- Page 642:
BEAUTIFYING CODE 320 SlickEdit® Us
- Page 646:
QUICK REFACTORING Quick Modify Para
- Page 650:
QUICK REFACTORING Prev Input. You w
- Page 654:
VIEWING AND DISPLAYING To define th
- Page 658:
VIEWING AND DISPLAYING When Selecti
- Page 662:
VIEWING AND DISPLAYING Rather than
- Page 666:
LANGUAGE-SPECIFIC EDITING 332 Slick
- Page 670:
LANGUAGE-SPECIFIC EDITING Installed
- Page 674:
LANGUAGE-SPECIFIC EDITING Recognize
- Page 678:
LANGUAGE-SPECIFIC EDITING 338 Slick
- Page 682:
C AND C++ The top of the tab lets y
- Page 686:
C AND C++ of this option is control
- Page 690:
C AND C++ • Extensionless C++ fil
- Page 694:
C AND C++ Indenting Tab The Indenti
- Page 698:
C AND C++ /* stand alone comment */
- Page 702:
C AND C++ C/C++ Compiler Settings I
- Page 706:
C AND C++ 3. Click New to add new p
- Page 710:
JAVA 2. Click the Auto Tag button t
- Page 714:
JAVA The project type determines yo
- Page 718:
JAVA The Unit Testing tool window d
- Page 722:
JAVA Java Options Dialog The Java O
- Page 726:
JAVA This tab contains the followin
- Page 730:
JAVA This tab contains the followin
- Page 734:
JAVA This tab contains the followin
- Page 738:
JAVA This tab provides the followin
- Page 742:
JAVA • Begin/end style - Specify
- Page 746:
JAVA The following settings are ava
- Page 750:
JAVA 374 SlickEdit® User Guide
- Page 754:
XML AND HTML The following settings
- Page 758:
XML AND HTML The following settings
- Page 762:
XML AND HTML o Literal - When on, a
- Page 766:
XML AND HTML beautified to . Select
- Page 770:
XML AND HTML To define a new scheme
- Page 774:
XML AND HTML Other miscellaneous ta
- Page 778:
XML AND HTML • Auto formatting op
- Page 782:
XML AND HTML Tags Tab The Tags tab
- Page 786:
XML AND HTML Attributes/Values Tab
- Page 790:
XML AND HTML Advanced Tab The res
- Page 794:
XML AND HTML Configuring Symbol Ali
- Page 798:
XML/HTML FORMATTING You can also tu
- Page 802:
XML/HTML FORMATTING The html (defau
- Page 806:
XML/HTML FORMATTING Adding and Dele
- Page 810:
ADA • Tab size - Specifies output
- Page 814:
ADA o Nested paren list item - A pa
- Page 818:
ADA Schemes Tab or else E = F then
- Page 822:
COBOL o SPF style line numbering -
- Page 826:
PASCAL • Keyword case - Specifies
- Page 830:
PL/I • Keyword case - Specifies t
- Page 834:
PYTHON 416 SlickEdit® User Guide
- Page 838:
TOOLS AND UTILITIES 418 SlickEdit®
- Page 842:
FIND AND REPLACE To use Quick Repla
- Page 846:
FIND AND REPLACE Option Character(s
- Page 850:
FIND AND REPLACE Key Action Ctrl+W
- Page 854:
FIND AND REPLACE Syntax-Driven Sear
- Page 858:
FIND AND REPLACE Match Highlighting
- Page 862:
COMPARING AND MERGING 2. Under Diff
- Page 866:
COMPARING AND MERGING 1. From the m
- Page 870:
COMPARING AND MERGING Performing a
- Page 874:
COMPARING AND MERGING 1. Open (Ctrl
- Page 878:
VERSION CONTROL • Available - Whe
- Page 882:
VERSION CONTROL • ComponentSoftwa
- Page 886:
VERSION CONTROL 442 SlickEdit® Use
- Page 890:
SPELL CHECKING • Change All - Rep
- Page 894:
SPELL CHECKING 446 SlickEdit® User
- Page 898:
SORTING TEXT • sort_buffer - Sort
- Page 902:
FTP 2. Click Add to create a new pr
- Page 906:
FTP 452 SlickEdit® User Guide
- Page 910:
REGULAR EXPRESSIONS o Use the L opt
- Page 914:
REGULAR EXPRESSIONS Example 2: Reve
- Page 918:
REGULAR EXPRESSIONS The Regex Evalu
- Page 922:
REGULAR EXPRESSIONS Brief Regular E
- Page 926:
REGULAR EXPRESSIONS Brief Regular E
- Page 930:
REGULAR EXPRESSIONS Brief Regular E
- Page 934:
REGULAR EXPRESSIONS Perl Regular Ex
- Page 938:
REGULAR EXPRESSIONS Perl Regular Ex
- Page 942:
REGULAR EXPRESSIONS SlickEdit Regul
- Page 946:
REGULAR EXPRESSIONS SlickEdit Regul
- Page 950:
REGULAR EXPRESSIONS SlickEdit Regul
- Page 954:
REGULAR EXPRESSIONS UNIX Regular Ex
- Page 958:
REGULAR EXPRESSIONS UNIX Regular Ex
- Page 962:
REGULAR EXPRESSIONS Wildcard Expres
- Page 966:
REGULAR EXPRESSIONS The following t
- Page 970:
REGULAR EXPRESSIONS Range Block Nam
- Page 974:
REGULAR EXPRESSIONS 486 SlickEdit®
- Page 978:
USING THE CALCULATOR AND MATH COMMA
- Page 982:
USING THE CALCULATOR AND MATH COMMA
- Page 986:
OS FILE BROWSER 492 SlickEdit® Use
- Page 990:
MACROS AND MACRO PROGRAMMING 494 Sl
- Page 994:
MACROS AND MACRO PROGRAMMING • To
- Page 998:
MACROS AND MACRO PROGRAMMING Saving
- Page 1002:
MACROS AND MACRO PROGRAMMING Slick-
- Page 1006:
MENUS, DIALOGS, AND TOOL WINDOWS 50
- Page 1010:
FILE File Menu Item Description Com
- Page 1014:
FILE File Manager Select Menu Item
- Page 1018:
FILE • Encoding - The encoding in
- Page 1022:
FILE • Blank Workspace - Select t
- Page 1026:
FILE To provide better support for
- Page 1030:
FILE • List files of type - This
- Page 1034:
FILE • URL - Enter a URL to open
- Page 1038:
FILE Appearance > General). Show fi
- Page 1042:
FILE • Directory name - Name of d
- Page 1046:
FILE • Selection only - When this
- Page 1050:
FILE • After header/Before footer
- Page 1054:
FILE • Selection Only - When this
- Page 1058:
FILE • Profile name - Name displa
- Page 1062:
FILE 530 SlickEdit® User Guide
- Page 1066:
EDIT Edit Menu Item Description Com
- Page 1070:
EDIT Edit Other Menu Item Descripti
- Page 1074:
EDIT top of the list. You can use t
- Page 1078:
EDIT 538 SlickEdit® User Guide
- Page 1082:
SEARCH Search Menu Item Description
- Page 1086:
SEARCH Find Tab This tab on the Fin
- Page 1090:
SEARCH • Find button - Click this
- Page 1094:
SEARCH • Foreground search - If s
- Page 1098:
SEARCH • Leave modified files ope
- Page 1102:
SEARCH o - Select this setting to
- Page 1106:
SEARCH the order in which the bookm
- Page 1110:
SEARCH TIP Global named bookmarks a
- Page 1114:
VIEW View Menu Item Description Com
- Page 1118:
VIEW • Show comments - When check
- Page 1122:
VIEW 560 SlickEdit® User Guide
- Page 1126:
PROJECT Project Menu Item Descripti
- Page 1130:
PROJECT Click and drag the dialog b
- Page 1134:
PROJECT • Remove All - Removes al
- Page 1138:
PROJECT • New - Click the New but
- Page 1142:
PROJECT The list below describes th
- Page 1146:
PROJECT The following settings are
- Page 1150:
PROJECT The dialog contains the fol
- Page 1154:
PROJECT 576 SlickEdit® User Guide
- Page 1158:
BUILD 578 SlickEdit® User Guide
- Page 1162:
DEBUG Debug Menu Item Description C
- Page 1166:
DEBUG 582 SlickEdit® User Guide
- Page 1170:
DOCUMENT Document Menu Item Descrip
- Page 1174:
DOCUMENT When the Files tool window
- Page 1178:
DOCUMENT • View Files in the Curr
- Page 1182:
DOCUMENT The dialog contains the fo
- Page 1186:
DOCUMENT General Settings The Gener
- Page 1190:
DOCUMENT If Maximum right column is
- Page 1194:
DOCUMENT o Indent - When selected,
- Page 1198:
MACRO Macro Menu Item Description C
- Page 1202:
MACRO The dialog contains the follo
- Page 1206:
MACRO Enter the name of Slick-C var
- Page 1210:
MACRO Grid Settings Dialog The Grid
- Page 1214:
MACRO The following settings are av
- Page 1218:
TOOLS Tools Menu Item Description C
- Page 1222:
TOOLS Spell Check Menu The Tools >
- Page 1226:
TOOLS • Ignore spaces - If select
- Page 1230:
TOOLS File Compare Options The file
- Page 1234:
TOOLS Multi-File Diff Output Dialog
- Page 1238:
TOOLS Note that some language-speci
- Page 1242:
OPTIONS Using the Options Dialog Th
- Page 1246:
OPTIONS selected (Cursor style). No
- Page 1250:
OPTIONS Summary Option Categories K
- Page 1254:
OPTIONS Ctrl+Shift+Enter (Ctrl+Ente
- Page 1258:
OPTIONS Foreground color will only
- Page 1262:
OPTIONS o Selection List - The font
- Page 1266:
OPTIONS • Show tool tips - When s
- Page 1270:
OPTIONS (in tenths of a second) bef
- Page 1274:
OPTIONS The options are described a
- Page 1278:
OPTIONS NOTES • The first time th
- Page 1282:
OPTIONS The dialog is described as
- Page 1286:
OPTIONS • Backspace in Replace mo
- Page 1290:
OPTIONS you can greatly improve you
- Page 1294:
OPTIONS o Highlight matching blocks
- Page 1298:
OPTIONS The following options are a
- Page 1302:
OPTIONS o Maximum functions found b
- Page 1306:
OPTIONS • Shift+Cursor always cha
- Page 1310:
OPTIONS o Wrap at beginning/end - S
- Page 1314:
OPTIONS Note that the Global Aliase
- Page 1318:
OPTIONS is also used to determine t
- Page 1322:
OPTIONS For GNU C/C++, click Add to
- Page 1326:
OPTIONS The debuggers in this list
- Page 1330:
OPTIONS • Mode name - Allows you
- Page 1334:
OPTIONS The options are described a
- Page 1338:
OPTIONS The options are described a
- Page 1342:
OPTIONS • Compiler Name - Contain
- Page 1346:
OPTIONS The name of the file that c
- Page 1350:
OPTIONS Comment block These setting
- Page 1354:
OPTIONS a line directly above a fun
- Page 1358:
OPTIONS o Automatic width - If sele
- Page 1362:
OPTIONS • Details - Detailed opti
- Page 1366:
OPTIONS • Show comments - If sele
- Page 1370:
OPTIONS The following options are a
- Page 1374:
OPTIONS o ####h (Intel assembler) -
- Page 1378:
OPTIONS • Single quotes o Two con
- Page 1382:
OPTIONS Unknown languages are color
- Page 1386:
OPTIONS It contains the following o
- Page 1390:
OPTIONS File Options These global f
- Page 1394:
OPTIONS o Load entire file - When s
- Page 1398:
OPTIONS • Add file to project upo
- Page 1402:
OPTIONS The options are described a
- Page 1406:
OPTIONS To add a new filter, click
- Page 1410:
OPTIONS option works best when the
- Page 1414:
OPTIONS The options are described a
- Page 1418:
OPTIONS FTP Default Options General
- Page 1422:
OPTIONS FTP Default Options Firewal
- Page 1426:
OPTIONS To add a new URL mapping, c
- Page 1430:
OPTIONS The following options are m
- Page 1434:
OPTIONS • Configure Error Parsing
- Page 1438:
OPTIONS • SCC providers - This se
- Page 1442: OPTIONS [ $/vslick15 ] • Source S
- Page 1446: OPTIONS • Word help filename(s) -
- Page 1450: OPTIONS The Default Help dialog is
- Page 1454: OPTIONS The number of results retur
- Page 1458: OPTIONS 728 SlickEdit® User Guide
- Page 1462: WINDOW Window Font Dialog The Windo
- Page 1466: WINDOW 732 SlickEdit® User Guide
- Page 1470: HELP Help Menu Item Description Com
- Page 1474: HELP The following options and butt
- Page 1478: HELP 738 SlickEdit® User Guide
- Page 1482: MENU EDITING Menu Editor. Enter eac
- Page 1486: APPENDIX 742 SlickEdit® User Guide
- Page 1490: TUTORIALS For large projects, multi
- Page 1496: 7. Click OK. 8. Close and reopen th
- Page 1500: TUTORIALS 1. From the main menu, cl
- Page 1504: Hello World Tutorial (Java) TUTORIA
- Page 1508: TUTORIALS This will actually add th
- Page 1512: Encoding ENCODING Encodings are use
- Page 1516: Surrogate Support ENCODING Unicode
- Page 1520: Invocation Options INVOCATION OPTIO
- Page 1524: Invocation Option Description INVOC
- Page 1528: Environment Variables ENVIRONMENT V
- Page 1532: • Linux, UNIX, Mac: $HOME/.slicke
- Page 1536: Configuration Variables CONFIGURATI
- Page 1540: Configuration Variable Description
- Page 1544:
Configuration Directories and Files
- Page 1548:
User Config File Description vusrs*
- Page 1552:
File Search Order Search Order for
- Page 1556:
Advanced Help Configuration ADVANCE
- Page 1560:
VLX File and Color Coding VLX FILE
- Page 1564:
Statement Description mlcomment= st
- Page 1568:
Table of style Values Statement Des
- Page 1572:
Value of style Description VLX FILE
- Page 1576:
Editing the Key Binding Source EDIT
- Page 1580:
Using the ISPF and XEDIT Emulations
- Page 1584:
USING THE ISPF AND XEDIT EMULATIONS
- Page 1588:
ISPF Line Command BNDS Insert a col
- Page 1592:
ISPF Insert After A Usage A [n] USI
- Page 1596:
ISPF Insert Lines Usage I [n] Remar
- Page 1600:
USING THE ISPF AND XEDIT EMULATIONS
- Page 1604:
ISPF Uppercase Lines UC, UCC and UC
- Page 1608:
USING THE ISPF AND XEDIT EMULATIONS
- Page 1612:
Glossary 3-Way Merge Typically used
- Page 1616:
Project A group of folders, files,
- Page 1620:
Index A Abbreviate similar files 76
- Page 1624:
CFML Formatting Options 385 CFScrip
- Page 1628:
creating project files 142 creating
- Page 1632:
exit process 68, 645 Exit SlickEdit
- Page 1636:
HTML Beautifier dialog box 388 HTML
- Page 1640:
M Mac OS X 40 format buffer 761 pri
- Page 1644:
paren style 195 Parenthesis matchin
- Page 1648:
evision two 611 REXX Formatting Opt
- Page 1652:
Start wrapping on line 677 starting
- Page 1656:
V Value (Code Templates Add Paramet
- Page 1662:
SlickEdit Inc. 3000 Aerial Center P