- Page 1 and 2: Before attempting to connect or ope
- Page 3: Contents Important Notice before Us
- Page 10: Connecting Hardware Watchdog Insert
- Page 13 and 14: Video Capture Cards 2. Select the c
- Page 15 and 16: Specifications Interface PCI-E Inpu
- Page 19 and 20: Adjusting the Video Settings in the
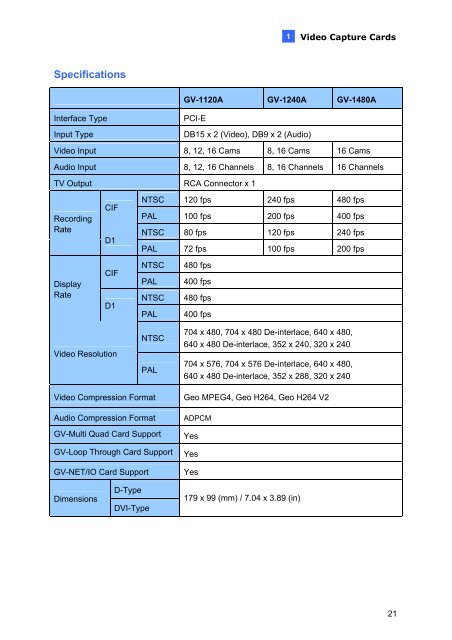
- Page 21: 1.3 GV-1120A, 1240A, 1480A 1 Video
- Page 25: Connecting GV-NET/IO Card to GV-Com
- Page 31 and 32: Figure 1-14 1 Video Capture Cards 2
- Page 33 and 34: 1.5 GV-650A, GV-800A 1 Video Captur
- Page 35: Video Capture Cards For the BNC-typ
- Page 38 and 39: 1.6 GV-600A There are two types of
- Page 40: For the BNC-Type video capture card
- Page 47 and 48: 1.8 Installing Drivers 1 Video Capt
- Page 49 and 50: 1.9 Connecting Hardware Watchdog 1
- Page 51 and 52: 1 Video Capture Cards GV-3008 GV-30
- Page 53 and 54: Video Capture Cards GV-1008 GV-1120
- Page 55: Video Capture Cards GV-1008 x 2 GV-
- Page 60 and 61: Installing the System To install th
- Page 62 and 63: Third page: 21. Authentication Serv
- Page 66 and 67: 3.1 Main Screen 60 Logout / Exit /
- Page 68 and 69: 3.2 Setting Data Storage Locations
- Page 70 and 71: Setting the Event Database Location
- Page 72 and 73: 3. Click the Select Path icon and s
- Page 74 and 75: 3.4 Choosing the Recording Mode You
- Page 76 and 77:
70 4 5 Figure 3-10 For details, see
- Page 78:
3.7 Playing the Video You can play
- Page 81 and 82:
6. Enter the Start Time and End Tim
- Page 83 and 84:
Before attempting to connect or ope
- Page 85 and 86:
Contents Important Notice before Us
- Page 91:
1.1 GV-4008 1 Video Capture Cards T
- Page 95 and 96:
Troubleshooting Power Supply Issues
- Page 97 and 98:
Video Capture Cards 6. To access th
- Page 99:
1.2 GV-3008 1 Video Capture Cards T
- Page 103 and 104:
Specifications Interface PCI-E GV-3
- Page 105:
Packing List (D-Type) 1. GV-Combo A
- Page 110 and 111:
24 TV Monitor 1-8 D-Type Video Cabl
- Page 112:
1.4 GV-1008 26 The GV-1008, as a th
- Page 116 and 117:
Specifications Input Type 30 D-Type
- Page 118 and 119:
Connecting One GV-650A/GV-800A Card
- Page 121 and 122:
Specifications Interface Type PCI,
- Page 123 and 124:
Connecting One GV-600A Card 1 Video
- Page 126 and 127:
Specifications GV-600A Input Type 4
- Page 131 and 132:
1.8 Installing Drivers 1 Video Capt
- Page 133 and 134:
1.9 Connecting Hardware Watchdog 1
- Page 135 and 136:
1 Video Capture Cards GV-3008 GV-30
- Page 137 and 138:
Video Capture Cards GV-1008 GV-1120
- Page 139:
Video Capture Cards GV-1008 x 2 GV-
- Page 144 and 145:
Installing Drivers After you instal
- Page 147 and 148:
Connections with Two Video Capture
- Page 149 and 150:
RS-485 Device Connections 2 Hardwar
- Page 152 and 153:
Overview 66 Relay Out 1 Relay Out 2
- Page 155:
2 Hardware Accessories 2. You can c
- Page 159 and 160:
Extended Connections 2 Hardware Acc
- Page 161 and 162:
2.5 GV-Hub V2 2 Hardware Accessorie
- Page 165 and 166:
2.6 GV-COM V2 2 Hardware Accessorie
- Page 169:
Connections 2 Hardware Accessories
- Page 173:
Specifications Output DC IN DC 5V,
- Page 176 and 177:
Connections to PC 90 There are thre
- Page 178 and 179:
Extending Transmission over the Dis
- Page 182 and 183:
Overview DIP Switch Figure 2-37 The
- Page 184 and 185:
Assigning Addresses to GV-I/O Box 8
- Page 186:
3. Multiple pieces of GV-I/O Box 8
- Page 190 and 191:
Connections to PC 104 There are two
- Page 192:
Extending Transmission over the Dis
- Page 195 and 196:
2.12.1 Fixed IP Connection To assig
- Page 197 and 198:
2 Hardware Accessories 2. In the Us
- Page 203 and 204:
2.12.7 Updating Firmware To update
- Page 205:
2.13 Installing USB Driver 2 Hardwa
- Page 209 and 210:
Installing the System To install th
- Page 211:
Third page: 21. Authentication Serv
- Page 214 and 215:
The controls in the main screen: No
- Page 216 and 217:
The controls in the ViewLog window:
- Page 218 and 219:
4.3 Remote Playback Client 132 13 1
- Page 220 and 221:
4.4 SingleView Viewer 16 15 14 13 1
- Page 222 and 223:
The controls in the MultiView Viewe
- Page 224 and 225:
The controls in the Center V2 windo
- Page 226 and 227:
Troubleshooting
- Page 228 and 229:
A message “Can’t find new xxx M
- Page 230 and 231:
Multicam Digital Surveillance Syste
- Page 233 and 234:
Contents 1 Configuring Main System
- Page 235 and 236:
1.19 Touch Screen Support .........
- Page 237:
4 Video Playback ..................
- Page 240 and 241:
x 8.2.3 Video Settings ............
- Page 242 and 243:
xii 9.4.4 Viewing Host Information
- Page 244:
xiv 11.9.6 Retrieving Recorded File
- Page 247 and 248:
1.6 System Idle Protection.........
- Page 251 and 252:
6 1.1.1 Main Screen The controls in
- Page 255:
10 1.2 System Configuration You can
- Page 261:
16 button to select the mode of scr
- Page 264:
Note: 1 Configuring Main System 1.
- Page 272 and 273:
1.2.6 Selecting Screen Layout This
- Page 279 and 280:
34 1.3.3 Adjusting Video Attributes
- Page 283:
38 1.3.4 Listening to Live Audio Cl
- Page 288 and 289:
1.4 Camera Monitoring Click the Mon
- Page 290 and 291:
1.4.3 Daylight Saving Time Recordin
- Page 292:
1.5 Account and Password The passwo
- Page 297 and 298:
52 1.5.4 Preventing Unauthorized Sy
- Page 299 and 300:
54 1.6 System Idle Protection The S
- Page 301:
56 1.6.3 Auto Start Recording If th
- Page 312 and 313:
1.8.2 Special Days Schedule 1. Clic
- Page 314 and 315:
1.8.4 Center V2 Schedule Set up a s
- Page 317 and 318:
72 After setup is completed, the GV
- Page 319:
74 1.9.2 Merging Video Events You c
- Page 324 and 325:
1.10 Hotline Notification When even
- Page 326 and 327:
d. Select PCM 8,000 Hz, 8-bit Mono,
- Page 328:
5. Start monitoring. When the speci
- Page 335 and 336:
90 1.12.2 PTZ Idle Protection When
- Page 337:
92 1.12.3 Auto Switching PTZ Contro
- Page 342 and 343:
1.14.2 Noise Detection to Reduce Fi
- Page 344 and 345:
1.15 Picture-in-Picture View With t
- Page 349:
104 Note: 1. For GV-FE110, the imag
- Page 353 and 354:
108 5 System Log Opens the System L
- Page 355 and 356:
110 1. Click the Configure button (
- Page 357 and 358:
112 1.20.3 Stopping Video Lost Watc
- Page 359 and 360:
114 1.20.5 Fast Key Lockup If you w
- Page 362 and 363:
1.20.8 Version Information To know
- Page 370:
6. Click Apply. The IP camera is ad
- Page 376 and 377:
2.8 ONVIF & PSIA Connection The GV-
- Page 378 and 379:
5. Repeat steps 3 and 4 to map more
- Page 381 and 382:
136 Note: 1. The Max. Recording Fra
- Page 384 and 385:
Chapter 3 Video Analysis...........
- Page 389 and 390:
144 7. Select Define Object Size fr
- Page 391 and 392:
146 4. Use the mouse to outline a d
- Page 394 and 395:
Starting Object Zooming After the a
- Page 396 and 397:
Setting up Advanced Single Camera T
- Page 400:
3.3.2 Tracking in PIP View The PIP
- Page 404:
3. To test your counting settings,
- Page 410:
3.5.3 Searching Object Index You ca
- Page 414 and 415:
3.6.2 Searching Video Snapshots You
- Page 417:
172 3.8 Face Count The Face Count f
- Page 422 and 423:
Figure 3-32 Object Monitor 5. In th
- Page 427:
182 3.10.2 Granting Access Privileg
- Page 431:
186 The controls on the Panorama Vi
- Page 435:
190 3.14 Video Stabilization Images
- Page 438:
3.16 Crowd Detection Crowd detectio
- Page 447:
202 3.19 Advanced Missing Object De
- Page 451:
206 2. Click the Schedule button in
- Page 454 and 455:
Chapter 4 Video Playback ..........
- Page 456:
Video Playback Recorded files can b
- Page 459:
214 The controls in the Function Pa
- Page 463 and 464:
218 Key Frame Playback If you want
- Page 465 and 466:
220 Viewing a Bookmark 1. Click the
- Page 467 and 468:
222 Advanced Search 1. Click the Ad
- Page 470 and 471:
Setting up the MDB filter: 1. Click
- Page 472:
5. If the video event has the Priva
- Page 478 and 479:
4.1.9 Recycling Option for Video Fi
- Page 480:
[Multi View] You can configure up t
- Page 488 and 489:
4.3 Advanced Log Browser 4 Playing
- Page 490:
4.3.1 Filter Settings You can defin
- Page 493 and 494:
248 9 Transaction Window Displays P
- Page 496 and 497:
4.5 Address Book With Address Book,
- Page 499:
254 4.5.4 Connecting from Address B
- Page 502:
2. Click the Add button to bring up
- Page 505 and 506:
260 4.7.3 Retrieving Images of Obje
- Page 507 and 508:
262 4.8 Remote Playback Server Remo
- Page 509 and 510:
264 [Enable IP White List] Check th
- Page 511:
266 The controls in the RPB Client:
- Page 514:
[Connection List] Indicates the num
- Page 518:
4 Playing Back Video Files 7. Selec
- Page 521:
276 Chapter 5 Backup, Deletion and
- Page 529 and 530:
284 5.3.2 Including the Player in t
- Page 531 and 532:
286 . Tip: If you just want to dele
- Page 533 and 534:
288 Note: 1. The repair and the sea
- Page 535 and 536:
290 5. You may see the distorted im
- Page 538:
6.1 I/O Device Setup To connect the
- Page 543 and 544:
298 6.1.2 Keeping Last Toggle Statu
- Page 546:
6.3 Advanced I/O Applications In th
- Page 550 and 551:
6.3.4 Overlaying Input Name onto Sc
- Page 552 and 553:
6.4 Input State Detection This feat
- Page 559:
314 6.6.4 Setting Up Mode Schedule
- Page 564:
6.6.8 System-Wide Triggers The Syst
- Page 567:
322 6.7 Visual Automation The Visua
- Page 570 and 571:
6.8.1 Setting Up a Module Up to 16
- Page 573:
328 Connection Choose one of these
- Page 578 and 579:
5. Select POS Data Sender from Wind
- Page 580 and 581:
8. Click Start Service to send grap
- Page 585:
340 7.5 POS Field Filter POS Field
- Page 589 and 590:
344 In System Log, the events that
- Page 594:
7.10 POS Color Text 7 Point-of-Sale
- Page 597 and 598:
352 Chapter 8 Remote Viewing.......
- Page 600 and 601:
8.1 Remote Viewing Using a Web Brow
- Page 602:
The following WebCam server feature
- Page 608:
8.2.5 Audio Settings Connecting Aud
- Page 616 and 617:
Enabling UPnP on the WebCam Server
- Page 618 and 619:
8.2.12 Network Port Information The
- Page 620 and 621:
6 Change Camera Selects the desired
- Page 622 and 623:
8.3.2 Server List You can add the c
- Page 625:
380 8.3.5 Video and Audio Configura
- Page 629 and 630:
384 8.3.8 Visual PTZ Control Panel
- Page 632 and 633:
8.3.11 Picture-in-Picture View With
- Page 635 and 636:
390 8.3.14 Remote Configuration Rem
- Page 638 and 639:
8.5 Multi-Window Viewer The Multi W
- Page 640 and 641:
The controls in the Multi View: Fig
- Page 642 and 643:
8.6.2 Host List The Host List displ
- Page 644 and 645:
8.6.4 Adding a Host The Multi View
- Page 646 and 647:
5. Click the Edit tab. This dialog
- Page 648 and 649:
8.6.7 Camera Polling To add cameras
- Page 650 and 651:
8.6.9 PTZ Control 1. Select a PTZ c
- Page 652 and 653:
8.6.11 Output Control 1. Click the
- Page 656 and 657:
8.6.14 Camera Status To show the ca
- Page 658 and 659:
8.6.16 Icon Image Change The icons
- Page 660 and 661:
Note: If you select different netwo
- Page 662 and 663:
8.7.3 Receiving Multicast and Audio
- Page 664 and 665:
8.8 JPEG Image Viewer JPEG Image Vi
- Page 666:
8.10 Remote ViewLog Through WebCam
- Page 669 and 670:
424 8.12 Download Center The Downlo
- Page 671 and 672:
426 Port TCP Port: 8554, UDP Port:
- Page 673 and 674:
428 Connecting to GV-System Once GV
- Page 675 and 676:
430 Other Functions In addition to
- Page 677 and 678:
432 Viewing Input-Triggered Events
- Page 679 and 680:
434 Viewing Camera Status To view t
- Page 681 and 682:
436 2. Click Type and then select L
- Page 683 and 684:
438 4. On the Login screen, enter t
- Page 685 and 686:
440 2. Click Options, and select Li
- Page 687:
442 8.13.4 BlackBerry Phone With th
- Page 690:
4. On the camera list, click the de
- Page 694 and 695:
8.13.7 iPhone GV-iView V2.1 functio
- Page 696 and 697:
Other Functions After you enlarge o
- Page 698 and 699:
My Favorite On the login screen (Fi
- Page 700 and 701:
8.13.8 Android Using the GV-AView V
- Page 703:
458 Access to GV-System To access t
- Page 706 and 707:
Chapter 9 E-Map Application .......
- Page 708 and 709:
9.1.1 The E-Map Editor Window 8 7 1
- Page 710 and 711:
6. To change the icons for I/O devi
- Page 712 and 713:
9.3 Starting E-Map After creating a
- Page 714 and 715:
9.4 Starting E-Map from a Remote Si
- Page 716:
9.4.2 Logging in Different Hosts Wh
- Page 720 and 721:
9.4.5 Accessing Remote ViewLog On t
- Page 722 and 723:
9.5.2 The E-Map Server Window Go to
- Page 724 and 725:
9.5.4 Remote Monitoring via E-Map S
- Page 726 and 727:
Chapter 10 Short Message Service...
- Page 728:
10.2 The SMS Server Window Run the
- Page 733:
488 10.3.3 Account Settings Click t
- Page 737 and 738:
492 SMS Event Log Clicking the SMS
- Page 739:
494 10.6 SMS Notification After set
- Page 742 and 743:
10.6.3 Setting Alert Notification T
- Page 744 and 745:
11.7.1 Installing the FBR Program .
- Page 746 and 747:
Useful Utilities This chapter discu
- Page 748:
11.1.2 Registering Domain Name with
- Page 752 and 753:
11.1.4 Local DDNS Server The Local
- Page 754 and 755:
MultiCast Mode Multicast Network is
- Page 757:
512 11.2.3 Installing TwinDVR The T
- Page 760:
Starting WebCam Server at TwinDVR C
- Page 763 and 764:
518 11.3.2 Running the Watermark Pr
- Page 765 and 766:
520 11.4 Twin View Display You can
- Page 767 and 768:
522 11.5 Windows Lockup This featur
- Page 769 and 770:
524 Settings Click the Settings but
- Page 771 and 772:
526 11.5.3 Token File for Save Mode
- Page 773 and 774:
528 11.6.2 The Server Window Go to
- Page 775:
530 11.6.4 Creating a User Account
- Page 780 and 781:
Note: When the disconnection icon a
- Page 782 and 783:
3. Click Tools on the menu bar, and
- Page 784:
11.7 Fast Backup and Restore With t
- Page 787 and 788:
542 11.7.4 Backing up and Restoring
- Page 789 and 790:
544 11.8 Hot-Swap Recording The pro
- Page 792 and 793:
3 DVR Database Info Indicates the p
- Page 795 and 796:
550 11.8.5 Logging In Automatically
- Page 798 and 799:
11.9 Backup Server The Backup Serve
- Page 800:
11.9.2 Enabling Backup Server Befor
- Page 805 and 806:
560 11.9.5 Viewing Server Status Yo
- Page 807:
562 11.9.6 Retrieving Recorded File
- Page 810:
11.10.3 Performing Queries On the i
- Page 815 and 816:
570 11.11.1 Installing the Bandwidt
- Page 817:
572 11.11.3 Connecting to a WebCam
- Page 829 and 830:
584 11.12.5 Playing Back Video Reco
- Page 831 and 832:
586 11.12.6 Viewing Event Log All R
- Page 834 and 835:
[Video Setting] Figure 11-77 [Spot
- Page 840:
11.14.3 Displaying TV Quad Panel On
- Page 843 and 844:
598 11.15.2 Setting Live View You c
- Page 847:
602 11.15.5 Setting Live View with
- Page 850 and 851:
3. Select the COM Port the GPS rece
- Page 852 and 853:
11.16.3 Recording GPS Locations of
- Page 854 and 855:
Note: 1. If you like to use the map
- Page 856 and 857:
7. To create connection to other GV
- Page 858:
11.17 GV-IP Device Utility The IP D
- Page 861 and 862:
616 11.17.4 Mapping IP Cameras You
- Page 869:
Appendix A. USB Dongle Required for
- Page 874 and 875:
E. Supported IP Device Brands Appen
- Page 876 and 877:
G. Custom Icon Naming Chart for Mul