- Page 1 and 2:
Before attempting to connect or ope
- Page 3:
Contents Important Notice before Us
- Page 10:
Connecting Hardware Watchdog Insert
- Page 13 and 14:
Video Capture Cards 2. Select the c
- Page 15 and 16:
Specifications Interface PCI-E Inpu
- Page 19 and 20:
Adjusting the Video Settings in the
- Page 21:
1.3 GV-1120A, 1240A, 1480A 1 Video
- Page 25:
Connecting GV-NET/IO Card to GV-Com
- Page 28:
1.4 GV-1008 The GV-1008, as a three
- Page 32 and 33:
Specifications Input Type 26 D-Type
- Page 34 and 35:
Connecting One GV-650A/GV-800A Card
- Page 37 and 38:
Specifications Interface Type PCI,
- Page 39 and 40:
Connecting One GV-600A Card 1 Video
- Page 42:
Specifications GV-600A Input Type 3
- Page 48 and 49:
To verify the drivers are installed
- Page 50 and 51:
1.10 Comparison Chart (H/W Compress
- Page 52 and 53:
1.11 Comparison Chart (S/W Compress
- Page 54 and 55:
1.12 Comparison Chart (S/W Compress
- Page 59 and 60:
2.2 Installing the System 2 Softwar
- Page 61 and 62:
2.3 Program List The Surveillance S
- Page 63:
2.4 User’s Manuals 2 Software Ins
- Page 67 and 68:
Start/stop recording Set up recordi
- Page 69 and 70:
Basic Operation 3. Click the Set Lo
- Page 71 and 72:
Setting the System Log Location 3 B
- Page 73 and 74:
3.3 Renaming the Camera You can giv
- Page 75 and 76:
3.5 Changing the Recording Resoluti
- Page 77 and 78:
3.6 Setting a Recording Schedule Yo
- Page 80 and 81:
3.8 Backing up the Video You can ba
- Page 82 and 83:
Playing the Backup Videos Open the
- Page 84 and 85:
© 2010 GeoVision, Inc. All rights
- Page 86:
3.2 Installing the System..........
- Page 93:
Connecting Hardware Watchdog 1 Vide
- Page 96 and 97:
10 2. Select the cameras you want t
- Page 98 and 99:
Specifications Interface PCI-E Inpu
- Page 102 and 103:
Adjusting the Video Settings in the
- Page 104 and 105:
1.3 GV-1120A, 1240A, 1480A 18 GV-Co
- Page 108:
Connecting GV-NET/IO Card to GV-Com
- Page 111 and 112:
Specifications Interface Type PCI-E
- Page 115 and 116:
Figure 1-14 1 Video Capture Cards 2
- Page 117 and 118:
1.5 GV-650A, GV-800A 1 Video Captur
- Page 119:
Video Capture Cards For the BNC-typ
- Page 122 and 123:
1.6 GV-600A 36 There are two types
- Page 124:
38 For the BNC-Type video capture c
- Page 127:
1.7 Installing Two Cards 1 Video Ca
- Page 132 and 133:
46 To verify the drivers are instal
- Page 134 and 135:
1.10 Comparison Chart (H/W Compress
- Page 136 and 137:
1.11 Comparison Chart (S/W Compress
- Page 138 and 139:
1.12 Comparison Chart (S/W Compress
- Page 143 and 144:
Connections with Two Video Capture
- Page 145:
2.2 GV-Loop Through Card 2 Hardware
- Page 148 and 149:
2.3 GV-NET Card V3.1 The GV-NET Car
- Page 150:
3. You can connect a 3-Pin Internal
- Page 153:
2 Hardware Accessories 4. Ensure to
- Page 157:
2 Hardware Accessories 2. You can c
- Page 160 and 161:
Specifications Input Output Interfa
- Page 162:
Connections Following provides two
- Page 166:
Extending Transmission over the Dis
- Page 172 and 173:
Connections 86 Insert the GV-I/O 12
- Page 175 and 176:
Overview DIP Switch Figure 2-30 3 E
- Page 177 and 178:
Assigning Addresses to GV-I/O Box 1
- Page 179:
2 Hardware Accessories 3. Multiple
- Page 183 and 184:
Connections There are three ways to
- Page 185 and 186:
Extending Transmission over the Dis
- Page 189 and 190:
Overview DIP Switch 1 ON To change
- Page 191 and 192:
Assigning Addresses to GV-I/O Box 4
- Page 194 and 195:
2.12 Accessing GV-I/O Box over Netw
- Page 196 and 197:
2.12.2 DHCP Connection 110 DDNS (Dy
- Page 198:
112 2.12.2.2 Configuring GV-I/O Box
- Page 204 and 205:
2.12.8 Changing Login ID and Passwo
- Page 208 and 209:
3.2 Installing the System When you
- Page 210 and 211:
3.3 Program List 124 The Surveillan
- Page 213 and 214:
4.1 Main System 4 Screen Overview 1
- Page 215 and 216:
4.2 ViewLog 1 2 19 18 17 16 15 14 2
- Page 217 and 218:
Functional Panel The controls in th
- Page 219 and 220:
The controls in the RPB Client wind
- Page 221 and 222:
4.5 MultiView Viewer 4 Screen Overv
- Page 223 and 224:
4.6 Center V2 14 1 15 17 16 17 18 1
- Page 225 and 226:
4.7 Control Center Toolbar The cont
- Page 227 and 228:
Troubleshooting GV-System is design
- Page 229 and 230:
Troubleshooting 143
- Page 231:
© 2010 GeoVision, Inc. All rights
- Page 234 and 235:
iv 1.5.5 Setting Double Password fo
- Page 236 and 237:
vi 3.3.2 Tracking in PIP View......
- Page 239 and 240:
6.6.9 The “Advanced Logical Input
- Page 241 and 242:
8.6.11 Output Control..............
- Page 243 and 244:
11.2.3 Installing TwinDVR..........
- Page 246 and 247:
Chapter 1 Configuring Main System .
- Page 248:
1.16 Picture-and-Picture View .....
- Page 252:
11 Network Enables the connection t
- Page 258:
4. To switch between the mini and n
- Page 263 and 264:
18 Setting the Event Database Locat
- Page 269:
24 1.2.4 Setting Day and Night Reco
- Page 273:
28 1.2.7 Launching from System Tray
- Page 280:
In the Auto Gain Control window, cl
- Page 287 and 288:
42 Activating Turbo Mode 1. Click t
- Page 289 and 290:
44 1.4.2 Associate Monitoring You c
- Page 291 and 292:
46 In ViewLog, a separate DST subfo
- Page 295:
50 1.5.2 Changing Password on Login
- Page 298 and 299:
1.5.5 Setting Double Password for V
- Page 300 and 301:
1.6.2 Auto Login User without Acces
- Page 309:
64 1.7.3 Searching Event Logs To se
- Page 313 and 314:
68 1.8.3 I/O Schedule Set up a sche
- Page 315:
70 1.9 Schedule Center The Schedule
- Page 318 and 319:
Viewing Compacted Video Files After
- Page 322:
1.9.3 Setting Backup Schedule You c
- Page 325 and 326:
80 [Hotline Alert x] The event can
- Page 327 and 328: 82 1.10.2 Setting Alert Notificatio
- Page 331: 86 1.11.2 Setting Alert Notificatio
- Page 336 and 337: 1. Select Tour Schedule on the Came
- Page 341 and 342: 96 2. To set the recording mode to
- Page 343 and 344: 98 1.14.3 Noise Filter The Noise Fi
- Page 345: 100 1.16 Picture-and-Picture View W
- Page 351: 106 1.19 Touch Screen Support The G
- Page 354 and 355: 1.20 System Tools 1.20.1 Colorful M
- Page 356 and 357: 1.20.2 Image Quality of DirectDraw
- Page 358 and 359: 1.20.4 Deactivating Video Lost Beep
- Page 360: 1.20.6 Fast Key Reference This opti
- Page 363: 118 Chapter 2 Hybrid and NVR Soluti
- Page 373: 128 2.6 PTZ IP Camera To set up the
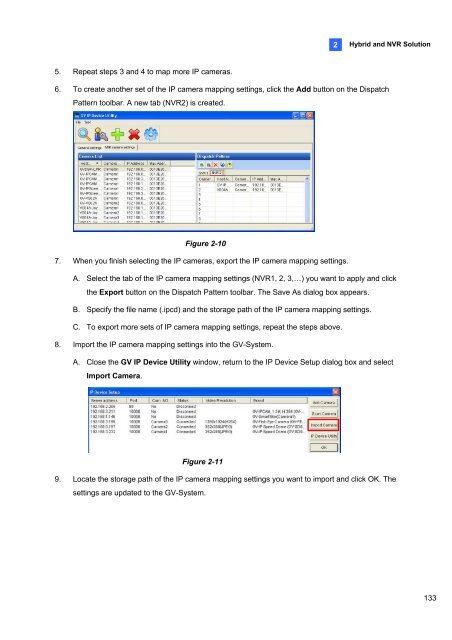
- Page 377: 132 2.9 Camera Mapping through GV I
- Page 382: 2.11 On Demand Display 2 Hybrid and
- Page 385: 140 3.12 Panorama View.............
- Page 390 and 391: Starting Object Tracking After the
- Page 392: 3.1.2 Object Zooming If only one PT
- Page 395 and 396: 150 3.2 Advanced Single Camera Trac
- Page 397: 152 6. Select Support Zoom Function
- Page 402: 3.4 Object Counting and Intrusion A
- Page 407: 162 3.5 Object Index The Object Ind
- Page 412: 3.6 Automatic Video Snapshots The V
- Page 415: 170 5. To play images with Quick Se
- Page 421 and 422: 176 3.9 Unattended and Missing Obje
- Page 423: 178 3.9.2 Detecting Missing Objects
- Page 430 and 431:
3.12 Panorama View Spliced from mul
- Page 434 and 435:
3.13 Video Defogging Smoky environm
- Page 437 and 438:
192 5. To set detection sensitivity
- Page 444:
3.18 Advanced Unattended Object Det
- Page 450 and 451:
3.20 Video Analysis Schedule A sche
- Page 453 and 454:
208 Note: To use two or more of the
- Page 455 and 456:
210 4.11 Fast Key Reference .......
- Page 458 and 459:
The controls in the ViewLog window:
- Page 461:
216 The option of Thumbnail View is
- Page 464 and 465:
4.1.3 Bookmarking a Frame 4 Playing
- Page 466 and 467:
4.1.4 Searching a Video Event 4 Pla
- Page 468:
List Mode and Line Mode 4 Playing B
- Page 471 and 472:
226 4.1.5 Merging and Exporting Vid
- Page 476:
4.1.7 Saving Images You can save th
- Page 479 and 480:
234 4.1.10 Advanced Settings The Se
- Page 486:
4.2 Object Search This feature allo
- Page 489 and 490:
244 The buttons on the Advanced Log
- Page 492 and 493:
4.4 Quick Search Quick Search is a
- Page 494:
4.4.1 Event Query Settings Click th
- Page 497:
252 3. Type the connection informat
- Page 501 and 502:
256 4.6 LAN ViewLog Using LAN ViewL
- Page 504 and 505:
4.7.2 Retrieving Recordings from Mu
- Page 506 and 507:
4.7.4 Resuming Backup 4 Playing Bac
- Page 508 and 509:
To stop a connection, click the End
- Page 510 and 511:
4.8.2 Running Remote Playback Clien
- Page 513 and 514:
268 [Advanced] Select Advanced from
- Page 516:
Preference Settings Figure 4-52 4 P
- Page 520 and 521:
4.11 Fast Key Reference 4 Playing B
- Page 523:
278 5. Click OK. The Backup dialog
- Page 530 and 531:
5.4 Deleting Recorded Files To dele
- Page 532 and 533:
5.5 Repairing Damaged File Paths 5
- Page 534 and 535:
5.6 Repairing Damaged Video Files 5
- Page 536:
Chapter 6 I/O Applications.........
- Page 542 and 543:
Following illustrations can help yo
- Page 544:
2. Input (N/O + Latch Trigger) + Ou
- Page 548:
6.3.2 Setting Momentary and Maintai
- Page 551 and 552:
306 6.3.5 Other Applications [Video
- Page 553:
308 6.5 I/O Enable Setting You can
- Page 563 and 564:
318 6.6.7 Editing Background Image
- Page 566 and 567:
6.6.10 Managing a Group of I/O Devi
- Page 569 and 570:
324 6.8 Virtual I/O Control Through
- Page 571:
326 Chapter 7 Point-Of-Sale (POS) A
- Page 576:
7.1.2 Data Capture Box Integration
- Page 579 and 580:
334 7.2.2 Network Connection 1. Con
- Page 581:
336 7.3 POS Device Setup To set up
- Page 587:
342 7.6 Abnormal Transaction Alerts
- Page 590:
7.7 Codepage Mapping 7 Point-of-Sal
- Page 596 and 597:
7 Point-of-Sale (POS) Application 5
- Page 598:
8.6.2 Host List....................
- Page 601 and 602:
356 3. On any remote computer, open
- Page 605:
360 8.2.2 Server Settings Figure 8-
- Page 615 and 616:
370 3. Click the Settings tab, and
- Page 617 and 618:
372 8.2.11 FTP Server Settings You
- Page 619 and 620:
374 8.3 Single View Viewer After yo
- Page 621 and 622:
376 8.3.1 Control Panel A control p
- Page 623:
378 8.3.3 Video Recording Click the
- Page 628 and 629:
8.3.7 PTZ Control Click the Camera
- Page 630:
8.3.9 I/O Control The new interface
- Page 633:
388 8.3.12 Picture-and-Picture View
- Page 636:
[Monitor] Enable I/O and Schedule m
- Page 639 and 640:
394 8.6 Multi View Viewer Multi Vie
- Page 641 and 642:
396 9 Configure 10 Edit Host 11 Cam
- Page 643 and 644:
398 8.6.3 Channel Status Informatio
- Page 645 and 646:
400 8.6.5 Combining Multiple Hosts
- Page 647 and 648:
402 8.6.6 Video Recording You can s
- Page 649 and 650:
404 8.6.8 Hardware-Compressed or Me
- Page 651 and 652:
406 8.6.10 Visual PTZ Control Panel
- Page 653:
408 8.6.12 Remote ViewLog More than
- Page 657 and 658:
412 8.6.15 Host Information To show
- Page 659 and 660:
414 8.7 Multicast and Audio Broadca
- Page 661 and 662:
416 8.7.2 Sending Audio Broadcast Y
- Page 663 and 664:
418 Through the Web Interface of We
- Page 665 and 666:
420 8.9 Remote Playback With the Re
- Page 668 and 669:
8. To export the search results, se
- Page 670 and 671:
8.13 Mobile Phone Applications With
- Page 672 and 673:
8.13.1 Windows PDA GV-GView V2 is a
- Page 674 and 675:
Playing Back the Recordings To play
- Page 676 and 677:
Accessing I/O Devices To access the
- Page 678 and 679:
Controlling PTZ Cameras To control
- Page 680 and 681:
8.13.2 Windows Smartphone With the
- Page 682 and 683:
4. Once the connection is establish
- Page 684 and 685:
8.13.3 Symbian Smartphone With the
- Page 686 and 687:
Playing Back the Recordings To play
- Page 689 and 690:
444 8.13.5 3G Mobile Phone Without
- Page 693 and 694:
448 2. Enter the IP address of your
- Page 695 and 696:
450 Accessing Live View To access l
- Page 697 and 698:
452 PTZ Speed Control for PTZ Camer
- Page 699 and 700:
454 3. Select the desired recording
- Page 701:
456 Access to a GV-IP device: 1. Do
- Page 705 and 706:
460 8. In the single view mode, pre
- Page 707 and 708:
E-Map Application E-Map displays th
- Page 709 and 710:
464 9.2 Creating an E-Map File To c
- Page 711 and 712:
466 9.2.1 Creating an E-Map File fo
- Page 713 and 714:
468 9.3.1 Setting the Pop-up Map Fu
- Page 715 and 716:
470 The controls in the Remote E-Ma
- Page 719 and 720:
474 9.4.4 Viewing Host Information
- Page 721 and 722:
476 9.5 E-Map Server The E-Map Serv
- Page 723 and 724:
478 9.5.3 Setting E-Map Server Befo
- Page 725 and 726:
480 9.5.5 Accessing Authentication
- Page 727 and 728:
Short Message Service Via a GSM/GPR
- Page 731:
486 [Message Filter] Figure 10-4 Se
- Page 736 and 737:
10.4.2 Viewing SMS Log Click the SM
- Page 738 and 739:
10.5 Password Security To prevent u
- Page 741 and 742:
496 10.6.2 Setting Mobile Numbers T
- Page 743 and 744:
498 Chapter 11 Useful Utilities ...
- Page 745 and 746:
500 11.12.4 E-Mail Attachment Setti
- Page 747 and 748:
502 11.1.1 Installing Dynamic DNS T
- Page 751 and 752:
506 Setting up E-mail Notification
- Page 753 and 754:
508 11.2 TwinDVR System TwinServer
- Page 755:
510 11.2.1 Starting TwinServer 1. I
- Page 759 and 760:
514 Testing Video Stream This funct
- Page 762 and 763:
11.3 Watermark Viewer The GV-System
- Page 764 and 765:
11.3.3 The Watermark Proof Window 1
- Page 766 and 767:
4. Run DMPOS. exe. This dialog box
- Page 768 and 769:
11.5.2 GV-Desktop Features The five
- Page 770 and 771:
[Desktop Type] Select Windows or GV
- Page 772 and 773:
11.6 Authentication Server The Auth
- Page 774 and 775:
11.6.3 Creating a Client DVR You mu
- Page 779 and 780:
534 2. Click the Setup Server butto
- Page 781 and 782:
536 11.6.7 Remote Access from Contr
- Page 783 and 784:
538 Accessing from Multi View Viewe
- Page 786 and 787:
11.7.3 Customizing the Features Not
- Page 788 and 789:
Restoring the System You can restor
- Page 790:
11.8.1 The Media Man Tool Window Th
- Page 793:
548 11.8.3 Adding a Disk Drive 1. C
- Page 796:
11.8.6 Setting Up LED Panel A LED p
- Page 799 and 800:
554 Note: Figure 11-46 1. It is rec
- Page 804 and 805:
11.9.4 Manually Adding Files for Ba
- Page 806 and 807:
[Backup File List] This tab display
- Page 809 and 810:
564 11.10.2 Starting Backup Viewer
- Page 813:
568 11.10.5 Using Remote ViewLog Us
- Page 816 and 817:
11.11.2 Allowing Remote Control at
- Page 822:
11.12 Report Generator With the Rep
- Page 830 and 831:
4. Type the IP or domain name, ID a
- Page 832:
11.13 Spot Monitor Controller GV-Co
- Page 835:
590 11.13.2 Spot Monitor Panel With
- Page 842 and 843:
2. Click the Display list. If you d
- Page 844:
11.15.3 Setting Scanned Pages You c
- Page 849 and 850:
604 11.16 GIS Recording GV-System c
- Page 851 and 852:
606 11.16.2 Recording GPS Locations
- Page 853 and 854:
608 11.16.4 Viewing GPS Locations d
- Page 855 and 856:
610 11.16.5 Sending GPS Data to the
- Page 857 and 858:
612 6. In the Account for GPS Recei
- Page 860 and 861:
11.17.3 Setting up IP Devices 1. Do
- Page 862:
11.18 MCamCtrl Utility The MCamCtrl
- Page 872:
C. Certified PTZ Models for Object
- Page 875 and 876:
630 F. Supported GPRS Models Brand
- Page 877:
632 H. Display Ratio Supported by P