

CLICKER® - Smarthome
CLICKER® - Smarthome
CLICKER® - Smarthome

Create successful ePaper yourself
Turn your PDF publications into a flip-book with our unique Google optimized e-Paper software.
KG<br />
KG<br />
12<br />
11<br />
10<br />
9<br />
8<br />
6<br />
5<br />
4<br />
10 11 12<br />
9<br />
8<br />
6<br />
5<br />
4<br />
1 2<br />
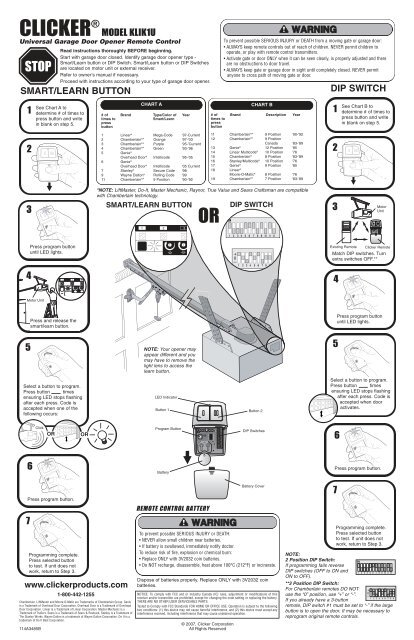
CLICKER ® MODEL KLIK1U<br />
Universal Garage Door Opener Remote Control<br />
STOP<br />
Read instructions thoroughly BEFORE beginning.<br />
Start with garage door closed. Identify garage door opener type -<br />
Smart/Learn button or DIP Switch. Smart/Learn button or DIP Switches<br />
are located on motor unit or external receiver.<br />
Refer to owner’s manual if necessary.<br />
Proceed with instructions according to your type of garage door opener.<br />
SMART/LEARN BUTTON<br />
To prevent possible SERIOUS INJURY or DEATH from a moving gate or garage door:<br />
• ALWAYS keep remote controls out of reach of children. NEVER permit children to<br />
operate, or play with remote control transmitters.<br />
• Activate gate or door ONLY when it can be seen clearly, is properly adjusted and there<br />
are no obstructions to door travel.<br />
• ALWAYS keep gate or garage door in sight until completely closed. NEVER permit<br />
anyone to cross path of moving gate or door.<br />
DIP SWITCH<br />
1<br />
See Chart A to<br />
determine # of times to<br />
press button and write<br />
in blank on step 5.<br />
CHART A<br />
# of Brand Type/Color of Year<br />
times to<br />
Smart/Learn<br />
press<br />
button<br />
CHART B<br />
# of Brand Description Year<br />
times to<br />
press<br />
button<br />
1<br />
See Chart B to<br />
determine # of times to<br />
press button and write<br />
in blank on step 5.<br />
2<br />
1 Linear ® Mega-Code ‘97-Current<br />
2 Chamberlain ® * Orange ‘97-’03<br />
3 Chamberlain ® * Purple ‘95-’Current<br />
4 Chamberlain ® * Green ‘93-’96<br />
5 Genie ®<br />
Overhead Door ® Intellicode ‘95-’05<br />
6 Genie ®<br />
Overhead Door ® Intellicode ‘05 Current<br />
7 Stanley ® Secure Code ‘98<br />
9 Wayne Dalton ® Rolling Code ‘99<br />
11 Chamberlain ® * 9 Position ‘90-’92<br />
11 Chamberlain ® * 9 Position ‘90-’92<br />
12 Chamberlain ® * 9 Position<br />
Canada ‘83-’89<br />
13 Genie ® 12 Position ‘85<br />
14 Linear Multicode ® 10 Position ‘76<br />
15 Chamberlain ® 8 Position ‘83-’89<br />
16 Stanley/Multicode ® 10 Position ‘76<br />
17 Genie ® 9 Position ‘85<br />
18 Linear ®<br />
Moore-O-Matic ® 8 Position ‘76<br />
19 Chamberlain ® * 7 Position ‘83-’89<br />
2<br />
3<br />
*NOTE: LiftMaster, Do-It, Master Mechanic, Raynor, True Value and Sears Craftsman are compatible<br />
with Chamberlain technology.<br />
SMART/LEARN BUTTON<br />
1<br />
2 3<br />
OR<br />
ON<br />
DIP SWITCH<br />
3<br />
Motor<br />
Unit<br />
3 7<br />
Press program button<br />
until LED lights.<br />
KG<br />
KG<br />
Existing Remote Clicker Remote<br />
Match DIP switches. Turn<br />
extra switches OFF.**<br />
4<br />
1<br />
2 3<br />
4<br />
Motor Unit<br />
Press and release the<br />
smart/learn button.<br />
Press program button<br />
until LED lights.<br />
5<br />
Select a button to program.<br />
Press button times<br />
ensuring LED stops flashing<br />
after each press. Code is<br />
accepted when one of the<br />
following occurs:<br />
NOTE: Your opener may<br />
appear different and you<br />
may have to remove the<br />
light lens to access the<br />
learn button.<br />
LED Indicator<br />
Button 1 Button 2<br />
5<br />
Select a button to program.<br />
Press button times<br />
ensuring LED stops flashing<br />
after each press. Code is<br />
accepted when door<br />
activates.<br />
Click<br />
OR<br />
OR<br />
Program Button<br />
3 7<br />
DIP Switches<br />
6<br />
1 2<br />
6<br />
Battery<br />
Press program button.<br />
Press program button.<br />
7<br />
Programming complete.<br />
Press selected button<br />
to test. If unit does not<br />
work, return to Step 3.<br />
www.clickerproducts.com<br />
114A3485B<br />
1-800-442-1255<br />
Chamberlain, LiftMaster and Moore-O-Matic are Trademarks of Chamberlain Group. Genie<br />
is a Trademark of Overhead Door Corporation. Overhead Door is a Trademark of Overhead<br />
Door Corporation. Linear is a Trademark of Linear Corporation. Master Mechanic is a<br />
Trademark of TruServ. Sears is a Trademark of Sears & Roebuck. Stanley is a Trademark of<br />
The Stanley Works. Wayne Dalton is a trademark of Wayne Dalton Corporation. Do It is a<br />
trademark of Do It Best Corporation.<br />
REMOTE CONTROL BATTERY<br />
To prevent possible SERIOUS INJURY or DEATH:<br />
• NEVER allow small children near batteries.<br />
• If battery is swallowed, immediately notify doctor.<br />
To reduce risk of fire, explosion or chemical burn:<br />
• Replace ONLY with 3V2032 coin batteries.<br />
• Do NOT recharge, disassemble, heat above 100°C (212°F) or incinerate.<br />
Dispose of batteries properly. Replace ONLY with 3V2032 coin<br />
batteries.<br />
NOTICE: To comply with FCC and or Industry Canada (IC) rules, adjustment or modifications of this<br />
receiver and/or transmitter are prohibited, except for changing the code setting or replacing the battery.<br />
THERE ARE NO OTHER USER SERVICEABLE PARTS.<br />
Tested to Comply with FCC Standards FOR HOME OR OFFICE USE. Operation is subject to the following<br />
two conditions: (1) this device may not cause harmful interference, and (2) this device must accept any<br />
interference received, including interference that may cause undesired operation.<br />
© 2007, Clicker Corporation<br />
All Rights Reserved<br />
Battery Cover<br />
7<br />
Programming complete.<br />
Press selected button<br />
to test. If unit does not<br />
work, return to Step 3.<br />
NOTE:<br />
2 Position DIP Switch:<br />
ON<br />
If programming fails reverse<br />
DIP switches (OFF to ON and<br />
ON to OFF).<br />
**3 Position DIP Switch:<br />
For Chamberlain remotes DO NOT<br />
use the “0” position, use “+” or “-”.<br />
If you already have a 3-button<br />
remote, DIP switch #1 must be set to “-” if the large<br />
button is to open the door. It may be necessary to<br />
reprogram original remote controls.
KG<br />
KG<br />
12<br />
11<br />
10<br />
9<br />
8<br />
6<br />
5<br />
4<br />
10 11 12<br />
9<br />
8<br />
6<br />
5<br />
4<br />
1 2<br />
CLICKER ® Modelo KLIK1U de CLICKER<br />
Control remoto universal para abridores de puertas de garajes<br />
ALTO<br />
Lea completamente ls instrucciones ANTES de empezar.<br />
Empiece con la puerta del garaje cerrada. Identifique el tipo de abridor de puerta<br />
de garaje – botón Smart/Learn o interruptor DIP. El botón Smart/Learn o los<br />
interruptores DIP están ubicados en la unidad del motor o receptor externo.<br />
Consulte el manual del propietario si es necesario. Pase a las instrucciones que<br />
correspondan al tipo de abridor de puerta de garaje.<br />
BOTÓN SMART/LEARN<br />
1<br />
2<br />
Vea la Tabla A para<br />
determinar el número<br />
de veces que se debe<br />
oprimir el botón y<br />
escriba en el espacio<br />
en blanco del paso 5.<br />
TABLA A<br />
Veces que Marca Tipo/Color de Año<br />
hay que<br />
Smart/Learn<br />
oprimir el botón<br />
1 Linear ® Mega-Code ‘97-actual<br />
2 Chamberlain ® * Anaranjado ‘97-’03<br />
3 Chamberlain ® * Violeta ‘05-actual<br />
4 Chamberlain ® * Verde ‘93-’96<br />
5 Genie ®<br />
Overhead Door ® Intellicode ‘95-‘05<br />
6 Genie ®<br />
Overhead Door ® Intellicode ‘05-actual<br />
7 Stanley ® Código seguro ‘98<br />
9 Wayne Dalton ® Código variable ‘99<br />
11 Chamberlain ® * 9 Position ‘90-’92<br />
ADVERTENCIA<br />
Para impedir posibles LESIONES GRAVES o MORTALES debido al movimiento de una<br />
compuerta o puerta de garaje:<br />
• Mantenga SIEMPRE los controles remotos fuera del alcance de los niños. No permita<br />
NUNCA a niños que las operen ni que jueguen con los transmisores de control remoto<br />
• Active la compuerta o la puerta SÓLO cuando la pueda ver claramente, esté bien ajustada<br />
y no haya obstrucciones en el recorrido de la puerta.<br />
• Mantenga SIEMPRE la compuerta o la puerta del garaje a la vista hasta que esté<br />
completamente cerrada. No deje NUNCA que nadie cruce la trayectoria de la compuerta o<br />
puerta en movimiento.<br />
TABLA B<br />
Veces que Marca Descripción Año<br />
hay que<br />
oprimir el botón<br />
11 Chamberlain ® * 9 Posiciones ‘90-’92<br />
12 Chamberlain ® * 9 Posiciones<br />
Canada ‘83-’89<br />
13 Genie ® 12 Posiciones ‘85<br />
14 Linear Multicode ® 10 Posiciones ‘76<br />
15 Chamberlain ® 8 Posiciones ‘83-’89<br />
16 Stanley/Multicode ® 10 Posiciones ‘76<br />
17 Genie ® 9 Posiciones ‘85<br />
18 Linear ®<br />
Moore-O-Matic ® 8 Posiciones ‘76<br />
19 Chamberlain ® * 7 Posiciones ‘83-’89<br />
ADV<br />
A<br />
PREC<br />
INTERRUPTOR DIP<br />
1<br />
2<br />
Vea la Tabla B para<br />
determinar el número de<br />
veces que se debe<br />
oprimir el botón y escriba<br />
en el espacio en blanco<br />
del paso 5.<br />
3<br />
*NOTA: LiftMaster, Do-It, Master Mechanic, Raynor, True Value y Sears Craftsman son compatibles con la<br />
tecnología Chamberlain .<br />
BOTÓN SMART/LEARN<br />
O<br />
INTERRUPTOR DIP<br />
ON<br />
3<br />
Unidad del<br />
motor<br />
Oprima el botón de<br />
programación hasta que se<br />
enciendan las luces LED.<br />
4<br />
1<br />
2 3<br />
1<br />
2 3<br />
KG<br />
KG<br />
Control remoto<br />
existente<br />
Control remoto<br />
Clicker<br />
Haga corresponder los<br />
interruptores DIP. Ponga los<br />
interruptores adicionales en OFF.<br />
3 7<br />
Unidad del motor<br />
4<br />
5<br />
Oprima y suelte el botón<br />
Smart/Learn<br />
NOTA: Su abridor puede<br />
tener un aspecto diferente y<br />
tal tenga que quitar la lente<br />
de la luz para tener acceso<br />
al botón learn.<br />
Oprima el botón de<br />
programación hasta que se<br />
enciendan las luces LED.<br />
5<br />
Seleccione un botón para<br />
programar. Oprima el botón<br />
veces asegurándose de que el<br />
LED deje de destellar después<br />
de cada pulsación. El código se<br />
acepta cuando se produce una<br />
de las cosas siguientes:<br />
Chasquidos<br />
O<br />
O<br />
Indicador LED<br />
Botón 1<br />
Botón de programación<br />
3 7<br />
Botón 1<br />
Interruptores DIP<br />
Seleccione un botón para<br />
programar. Oprima el botón<br />
veces asegurándose de que el<br />
LED deja de destellar<br />
después de cada pulsación.<br />
Se acepta el código cuando<br />
se activa la puerta.<br />
1 2<br />
6<br />
6<br />
Pila<br />
Cubierta de las pilas<br />
Oprima el botón de<br />
programación.<br />
7<br />
114A3485B<br />
Oprima el botón de<br />
programación.<br />
La programación está completa.<br />
Oprima el botón seleccionado<br />
para probar. Si la unidad no<br />
funciona, vuelva al paso 3.<br />
www.clickerproducts.com<br />
1-800-442-1255<br />
Chamberlain, LiftMaster y Moore-O-Matic son marcas comerciales de<br />
Chamberlain Group. Genie es una marca comercial de Overhead Door<br />
Corporation. Overhead Door es una marca comercial de Overhead Door<br />
Corporation. Linear es una marca comercial de Linear Corporation. Stanley<br />
es una marca comercial de The Stanley Works. Wayne Dalton es una marca<br />
comercial de Wayne Dalton Corporation. Do It es una marca comercial de<br />
Do It Best Corporation.<br />
Pila del control remoto<br />
ADVERTENCIA<br />
Para evitar la posibilidad de LESIONES GRAVES O incluso LA MUERTE:<br />
• NUNCA permita que los niños pequeños estén cerca de las baterías.<br />
• Si alguien se traga una batería, llame al médico de inmediato.<br />
Para reducir el riesgo de incendio, explosión o combustión química:<br />
• Reemplace ÚNICAMENTE con baterías planas 3V2032.<br />
• NO recargue, desarme, caliente por encima de 212 °F (100 °C) o incinere.<br />
Deschacerse de su pila de la manera adecuada. Dispose of<br />
batteries properly. Reemplace las pilas solamente por pilas de<br />
botón 3V2032.<br />
AVISO: Para cumplir con las reglas de la FCC y/o de Canadá (IC), ajustes o modificaciones de este receptor y/o<br />
transmisor están prohibidos, excepto por el cambio de la graduación del código o el reemplazo de la pila. NO<br />
HAY OTRAS PIEZAS REPARABLES DEL USUARIO.<br />
Se ha probado para cumplir con las normas de la FCC para USO DEL HOGAR O DE LA OFICINA. La operación<br />
está sujeta a las dos condiciones siguientes:(1) este dispositivo no puede causar interferencia perjudicial, y (2)<br />
este dispositivo debe aceptar cualquier interferencia recibida, incluyendo la interferencia que puede causar una<br />
operación no deseable.<br />
© 2007, Clicker Corporation<br />
Todos los derechos reservados<br />
7<br />
ADVERTENCIA<br />
ADVERTENCIA<br />
NOTA:<br />
Interruptor DIP de 2 posiciones:<br />
Si falla la programación invierta las<br />
posiciones de los interruptores dip (OFF a<br />
ON y ON a OFF).<br />
PRECAUCIÓN<br />
La programación está completa.<br />
Oprima el botón seleccionado<br />
para probar. Si la unidad no<br />
funciona, vuelva al Paso 3.<br />
**3 Coloque el interruptor DIP:<br />
Para controles remotos Chamberlain NO use la<br />
posición “0”, use “+” o “-”. Si ya tiene un control<br />
remoto de 3 botones, el interruptor DIP 1 debe fijarse en “-” si el<br />
botón grande es para abrir la puerta. Tal vez sea necesario<br />
reprogramar los controles remotos originales.<br />
ON


