

TempLinc Owners Manual - Insteon
TempLinc Owners Manual - Insteon
TempLinc Owners Manual - Insteon

Create successful ePaper yourself
Turn your PDF publications into a flip-book with our unique Google optimized e-Paper software.
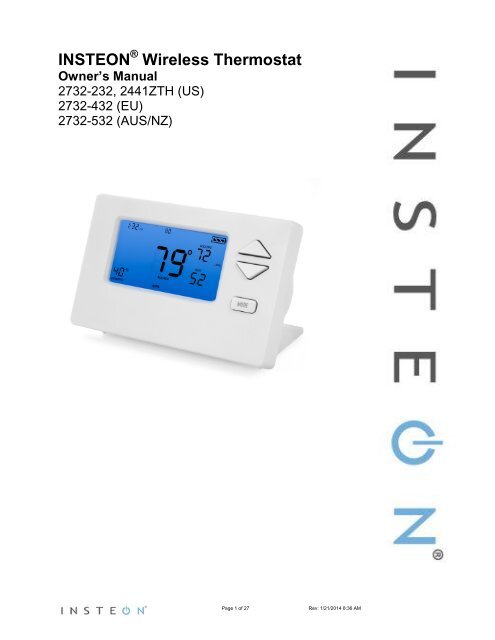
INSTEON ® Wireless Thermostat<br />
Owner’s <strong>Manual</strong><br />
2732-232, 2441ZTH (US)<br />
2732-432 (EU)<br />
2732-532 (AUS/NZ)<br />
Page 1 of 27 Rev: 1/21/2014 8:36 AM
What’s in the Box? 3<br />
INSTEON Wireless Thermostat Button Overview 4<br />
INSTEON Wireless Thermostat Operation and Programming 5<br />
Mode Button Operation 5<br />
Energy Button Operation 6<br />
Set Button Operation 7<br />
Time/Sensor Button Operations 7<br />
Program Button Operation 8<br />
Fan and Hold Button Operations 9<br />
Master Button Operation 10<br />
Optional Accessories 11<br />
Waterproof Temperature Sensor (2433A3) 11<br />
Power Supply 11<br />
Installation 11<br />
Preparation 11<br />
Test Operation 12<br />
Adding INSTEON Wireless Thermostat to an INSTEON Thermostat 12<br />
INSTEON Programming 13<br />
Add INSTEON Wireless Thermostat as a Controller 13<br />
Remove INSTEON Wireless Thermostat as a Controller 14<br />
User Setup Mode Overview 15<br />
User Setup Mode 16<br />
Temperature and Humidity Calibration Modes 18<br />
Advanced 2-Stage Heating or Cooling Systems 20<br />
Factory Reset 20<br />
Specifications 21<br />
Troubleshooting 23<br />
Certification and Warranty 26<br />
FCC and Industry Canada Compliance Statement 26<br />
Limited Warranty 27<br />
Limitations 27<br />
Page 2 of 27 Rev: 1/21/2014 8:36 AM
What’s in the Box?<br />
• INSTEON Wireless Thermostat<br />
• Quick Start Guide<br />
• Tabletop stand (removable for wall-mounting)<br />
Page 3 of 27 Rev: 1/21/2014 8:36 AM
INSTEON Wireless Thermostat Button Overview<br />
Temperature(s) of external<br />
sensor and/or wireless<br />
thermostat<br />
INSTEON Wireless Thermostat<br />
Current<br />
temperature<br />
Cool setpoint<br />
Programmed<br />
auto state<br />
Time<br />
1<br />
Humidity level<br />
Heat setpoint<br />
2<br />
Current<br />
thermostat<br />
mode:<br />
Off, Auto,<br />
Heat or Cool<br />
The gray buttons<br />
are under the<br />
INSTEON<br />
Thermostat door<br />
9 8 7 6 5 4<br />
3<br />
1) Up/Down adjusts the temperature setpoint based on the current mode<br />
2) Mode allows the user to select the current operational mode of the HVAC system. It cycles<br />
between Off, Heat, Cool, Auto and Programmed Auto.<br />
3) Energy button is a quick option that saves energy (and money). When pressed, it sets back the<br />
setpoint by a specified value. The default value is 4° from the current setting. To change the<br />
default offset value to be a value other than 4°, you must use software, such as HouseLinc.<br />
4) Hold overrides a pre-programmed mode<br />
5) Fan cycles between Auto and Always On<br />
6) Master makes this device the master temperature controller. Pressing and holding “Master” does<br />
not alter any scene or screen settings. It just defines this INSTEON Wireless Thermostat as the<br />
master temperature controller.<br />
7) Time/Sensor button allows you to set the date and time. It cycles between hour, minute and time<br />
format.<br />
8) Program button allows you to setup the various pre-programmed user modes<br />
9) Set button adds and removes INSTEON Wireless Thermostat from scenes. It functions like the<br />
Set button on other INSTEON devices.<br />
Page 4 of 27 Rev: 1/21/2014 8:36 AM
INSTEON Wireless Thermostat Operation and Programming<br />
Mode Button Operation<br />
Off Mode:<br />
• No setpoints are shown<br />
• Up/Down arrows do not do anything<br />
Heat Mode:<br />
• Only Heat setpoint is shown<br />
• Up/Down arrows change Heat setpoint<br />
• Heat setpoint range: 35°-95°F (2°C-36°C)<br />
Cool Mode:<br />
• Only Cool setpoint is shown<br />
• Up/Down arrows change Cool setpoint<br />
• Cool setpoint range: 37°-97°F (4°C-38°C)<br />
Auto Mode:<br />
• Both Cool and Heat setpoints are shown<br />
• Up/Down arrows increase or decrease<br />
values by the same amount<br />
Programmed Auto Mode:<br />
• The active program mode is indicated by<br />
one of four annotations: Wake, Leave,<br />
Return or Sleep<br />
• The annotation (Wake, Leave, Return or<br />
Sleep) is not displayed in the other four<br />
modes (Off, Heat, Cool or Auto)<br />
• Both Cool and Heat setpoints are shown<br />
• Up/Down arrows increase or decrease<br />
values by the same amount<br />
• When the thermostat moves to the next<br />
time period, the setpoints will be adjusted<br />
accordingly<br />
Note:<br />
• To adjust the gap between setpoints in Auto mode, press Mode to select Heat and set the<br />
temperature you desire. Press Mode again to select Cool and set the temperature you desire.<br />
Press Mode a third time to return to Auto; the settings will reflect your changes.<br />
Page 5 of 27 Rev: 1/21/2014 8:36 AM
• If you set Heat and Cool to the same temperature setpoint, Heat will automatically move<br />
down 2° (the minimum allowable gap).<br />
Energy Button Operation<br />
The Energy button (designated with the leaf) is a quick, efficient energy-saving option. When you press<br />
the Energy button, INSTEON Wireless Thermostat will adjust the Heat and Cool setpoints by a specified<br />
value. The default value is 4° from the current setting, but can be changed via home control software<br />
such as HouseLinc.<br />
• When you exit Energy mode, it will revert back the 4° that was changed upon entry.<br />
• The unit remains in Energy mode until the Energy button is pressed again.<br />
• Up/Down arrows adjust the temperature setpoint based on the mode you are in.<br />
From Off Mode:<br />
• Energy button does nothing because the<br />
system is off (at maximum energy savings<br />
already)<br />
• When “Energy” appears on the screen for<br />
Auto, Cool and Heat Modes, the 4°<br />
setback is engaged<br />
From Heat Mode:<br />
• Heat setback as specified<br />
• Default setback is 4° less<br />
• Notice that “Heating” is active on the left,<br />
but not on the right since the setpoint is<br />
lower that the actual temperature; the<br />
element reads “Heat”<br />
From Cool Mode:<br />
• Cool setback as specified<br />
• Default setback is 4° more<br />
From Auto Mode:<br />
• Both Heat and Cool setpoints changed as<br />
specified<br />
• Default setback is 4° more for Cooling and<br />
4° less for Heating<br />
• Notice that “Heating” is active on the left,<br />
but not on the right since the setpoint is<br />
lower that the actual temperature; the<br />
element reads “Heat”<br />
Page 6 of 27 Rev: 1/21/2014 8:36 AM
From Programmed Auto Mode:<br />
• Both Heat and Cool setpoints changed as<br />
specified<br />
• Default setback is 4°<br />
• Notice that ”Heating” is active on the left,<br />
but not on the right since the setpoint is<br />
lower than the current temperature; the<br />
element reads “Heat”<br />
Note: Onscreen text displaying “Heat” changes to “Heating” and “Cool” changes to “Cooling” to indicate<br />
HVAC system is active.<br />
Set Button Operation<br />
The Set button adds and removes INSTEON Wireless Thermostat from INSTEON scenes. It functions<br />
like the Set button on other INSTEON devices.<br />
Time/Sensor Button Operations<br />
• The Time/Sensor button allows the user to set the time and clock format.<br />
• Button cycles among hour, minute and 12-/24-hour format. Note: When added to a scene with<br />
INSTEON Thermostat, INSTEON Wireless Thermostat automatically retrieves time settings from<br />
INSTEON Thermostat.<br />
• Up/Down arrows cycle through the available options.<br />
• Go to the next Time/Sensor step by pressing Time/Sensor button again.<br />
• Exit Time/Sensor setup by:<br />
- Letting it time out after 4 minutes.<br />
- Pressing Mode button<br />
IMPORTANT! Once you have added INSTEON Wireless Thermostat to a scene in INSTEON Thermostat<br />
as a wireless temperature zone, the Time/Sensor button will allow you to change time format (12- or 24-<br />
hour) but time information will be provided by INSTEON Thermostat.<br />
Note: Colors indicate element that is presently blinking during setting procedure.<br />
First press of Time/Sensor:<br />
Hours settings<br />
• Up/Down arrows cycle through time in 1-<br />
hour increments<br />
• Pressing and holding Up/Down arrows<br />
cycles through faster<br />
Note: AM/PM changes automatically as needed.<br />
Second press of Time/Sensor:<br />
Minutes settings<br />
• Up/Down arrows cycle through time in 1-<br />
minute increments<br />
• Pressing and holding Up/Down arrows<br />
cycles through faster<br />
Page 7 of 27 Rev: 1/21/2014 8:36 AM
Third press of Time/Sensor:<br />
Clock Format setting (12- or 24-Hour clock)<br />
• Entire time line blinks<br />
• Up/Down arrows cycle between 12- and 24-hour clock format<br />
Note: AM/PM is not displayed when in 24-hour format.<br />
Program Button Operation<br />
• The Program button allows you to set up the various preprogrammed modes (Wake, Leave, Return<br />
and Sleep).<br />
• Go to the next step by pressing Program again.<br />
• Exit Program setup by:<br />
- Letting it time out after 4 minutes.<br />
- Pressing Mode button<br />
IMPORTANT! Once you have added INSTEON Wireless Thermostat to a scene in INSTEON Thermostat<br />
as a wireless temperature zone, the Program button will no longer function. All program controls will be<br />
performed on the INSTEON Thermostat.<br />
Note: Text colors below indicate element that is presently blinking during setting procedure.<br />
First press of Program:<br />
Selects from available pre-program modes<br />
Up/Down arrows cycle through Wake, Leave, Return and Sleep.<br />
NOTE:<br />
• Energy is not a part of this option<br />
• Once a preprogrammed mode is selected, that item remains displayed throughout to<br />
indicate the mode you are programming<br />
• The current mode settings are displayed on the thermostat at each setup step<br />
Second press of Program:<br />
Start Time<br />
• Up/Down arrows cycle through time in 15-minute increments. Note: when pressing the Down arrow, if<br />
you come within 15 minutes of another preprogrammed mode time, you will not be able to increase<br />
the time any further.<br />
• Pressing and holding Up/Down arrows cycles through faster<br />
Note: AM/PM changes automatically as needed.<br />
Page 8 of 27 Rev: 1/21/2014 8:36 AM
Note: The start of one program mode is also the end of the previous program mode.<br />
Third press of Program:<br />
Cool setpoint<br />
• Up/Down arrows cycle through temperature<br />
• Press and hold scrolls through temperatures<br />
Fourth press of Program:<br />
Heat setpoint<br />
• Up/Down arrows cycle through temperature<br />
• Press and hold scrolls through temperatures<br />
Fifth press of Program:<br />
Restarts the process to program another Mode/Day.<br />
NOTE: The four modes come preprogrammed. The defaults are for all days:<br />
Day<br />
Modes<br />
Start Time<br />
Thermostat<br />
Mode<br />
Heat<br />
Setting<br />
Cool<br />
Setting<br />
Wake 6:00AM Auto 65°F 18°C 75°F 24°C<br />
Leave 8:30AM Auto 60°F 16°C 80°F 27°C<br />
Return 5:00PM Auto 65°F 18°C 75°F 24°C<br />
Sleep 11:00PM Auto 60°F 16°C 80°F 27°C<br />
Note: To exit program setup mode, press Mode button once.<br />
Fan and Hold Button Operations<br />
Fan button operations<br />
• The Fan button is only functional when INSTEON Wireless Thermostat is linked to an INSTEON<br />
Thermostat<br />
• The Fan button cycles between Auto and Always On<br />
• On the display, it simply indicates the text “Fan Always” when selected. There is no text for Auto.<br />
Page 9 of 27 Rev: 1/21/2014 8:36 AM
Hold button operations<br />
• The Hold button is only functional in Auto Program mode<br />
• The Hold button overrides a preprogrammed mode until Hold is turned off<br />
IMPORTANT:<br />
• While Hold is enabled, the next preprogrammed time that comes in Preprogrammed Auto Mode will<br />
be ignored.<br />
• While Hold is enabled, the preprogrammed time notations are not shown (i.e. Wake, Leave, Return<br />
and Sleep).<br />
• Hold can be remotely enabled/disabled from an INSTEON controller.<br />
Master Button Operation<br />
First press and hold:<br />
Makes the local INSTEON Wireless Thermostat the master temperature controller<br />
• To perform this, press and hold Master button for 3 seconds.<br />
INSTEON Wireless Thermostat will beep once.<br />
• Release.<br />
Note: This is only valid if INSTEON Wireless Thermostat is linked to a INSTEON Thermostat.<br />
Before pressing Master button:<br />
• Notice that the left remote sensor is currently<br />
the Master temperature controller<br />
After pressing and holding Master button:<br />
• Notice that the left remote sensor is no<br />
longer the Master temperature controller<br />
• The local INSTEON Wireless Thermostat is<br />
now the Master controlling temperature<br />
Note: If no INSTEON scene is programmed to an INSTEON Wireless Thermostat, pressing and holding<br />
for 3 seconds will have no function.<br />
Page 10 of 27 Rev: 1/21/2014 8:36 AM
Optional Accessories<br />
Waterproof Temperature Sensor (2433A3)<br />
INSTEON Waterproof Temperature Sensor is an<br />
external sensor that wires to your INSTEON<br />
Wireless Thermostat. When connected, the<br />
thermostat’s LCD display will show the sensor<br />
readings in small digits above the thermostat’s<br />
temperature.<br />
Waterproof Temperature Sensor can be extended<br />
up to 100’ with 22 AWG wire. It’s ideal for<br />
monitoring and maintaining constant temperatures<br />
in environments like pools, spas, aquariums and<br />
ponds.<br />
Power Supply<br />
INSTEON Wireless Thermostat includes a connection for an AC power supply. Any generic AC/DC<br />
adapter that has a 5-7.5V and 200mA output will work. (Do not use an adapter greater than 7.5V to avoid<br />
damaging the thermostat.) When connected to external power, INSTEON Wireless Thermostat will<br />
automatically switch from battery power to external power (batteries can remain installed) and will stay on<br />
and awake all the time. If external power is lost, INSTEON Wireless Thermostat will switch back to battery<br />
power. Install power supply as follows:<br />
1) Open the back of INSTEON Wireless Thermostat<br />
2) Locate the wiring block for the power supply. It should be the two left screws.<br />
3) Use a flathead screwdriver to loosen screws<br />
4) Route power supply cable through hole in back of thermostat case<br />
5) Connect power supply’s exposed copper wire strands to terminal block,<br />
making sure the wires are in the correct positive/negative polarities<br />
6) Tighten screws<br />
7) Close back case<br />
INSTEON Wireless Thermostat will automatically turn on and switch to<br />
external power<br />
Installation<br />
CAUTIONS AND WARNINGS<br />
Read and understand these instructions before installing and retain them for future reference.<br />
Preparation<br />
Follow these steps to properly install INSTEON Wireless Thermostat. This thermostat will mainly be used<br />
on a tabletop; wall mounting is optional.<br />
1) Make sure the location that you have selected for INSTEON Wireless Thermostat will not be affected<br />
by daily sun movement or be in direct line of sight of a nearby HVAC vent or fan<br />
2) Insert 2 AA batteries into INSTEON Wireless Thermostat (high quality alkaline batteries<br />
recommended)<br />
3) Close the INSTEON Wireless Thermostat cover<br />
Page 11 of 27 Rev: 1/21/2014 8:36 AM
- After a few seconds INSTEON Wireless Thermostat will display ambient temperature and<br />
humidity<br />
- Mode will default to OFF<br />
- Battery segment should show full with fresh batteries<br />
- Time will become active and show 12:00PM (default)<br />
4) Snap INSTEON Wireless Thermostat into the supplied tabletop stand or mount safely to a wall<br />
Test Operation<br />
INSTEON Wireless Thermostat does not directly control the HVAC system. Instead, INSTEON Wireless<br />
Thermostat communicates via RF to INSTEON Thermostat which is directly in contact to the wiring<br />
controlling the HVAC system.<br />
Before adding INSTEON Wireless Thermostat as a responder or controller of INSTEON Thermostat,<br />
perform the following tests; these will help familiarize you with INSTEON Wireless Thermostat. Keep in<br />
mind you are not yet sending any communication to any INSTEON device. The INSTEON Wireless<br />
Thermostat is presently a standalone device.<br />
Note: While testing, the display will change but no HVAC operations will take place.<br />
INSTEON Wireless Thermostat defaults 5 minutes delay between cycling the AC compressor.<br />
Heating Mode Test<br />
1) Press Mode button once to enter Heat mode<br />
2) Tap the up or down arrow several times until setpoint is 1° above ambient<br />
INSTEON Wireless Thermostat will call for Heat<br />
“Heat” will change to “Heating,” blink for 3 seconds and then turn on steady<br />
No furnace activity will take place at this time, only display changes<br />
3) Tap the Up or Down arrow until you reach a desirable heat temperature setpoint below ambient<br />
Cooling Mode Test<br />
1) Tap Mode button once again to enter Cool mode<br />
2) Tap the Up or Down arrow several times until setpoint is 1° below ambient<br />
INSTEON Wireless Thermostat will call for Cooling<br />
“Cool” will change to “Cooling,” blink for 3 seconds and then turn on steady<br />
No A/C activity will take place at this time, only display changes<br />
3) Tap the Up or Down arrow until you reach a desirable cool temperature setpoint<br />
Auto Mode Test<br />
1) Tap Mode button once to enter Auto mode<br />
Note that your Heat and Cool setpoints were set in previous steps, unless you did not have a<br />
minimum 2° gap between settings<br />
2) Tap Up once to increase both Heat and Cool setpoints by 1°<br />
3) Tap Down once to decrease both Heat and Cool setpoints by 1°<br />
4) Tap Mode once to enter Programmed Auto mode<br />
Indicated by Auto at bottom and relevant time of day to right of Heat/Cool set temps<br />
5) Tap Mode twice to return to Off mode<br />
Adding INSTEON Wireless Thermostat to an INSTEON Thermostat<br />
Link INSTEON Wireless Thermostat to INSTEON Thermostat to provide a portable thermostat wherever<br />
you want temperature control. You can add up to two INSTEON Wireless Thermostats to an INSTEON<br />
Thermostat.<br />
1) Press and hold INSTEON Wireless Thermostat Set button<br />
INSTEON Wireless Thermostat will beep and its Set LED will blink green<br />
2) Press and hold INSTEON Thermostat Set button<br />
Page 12 of 27 Rev: 1/21/2014 8:36 AM
INSTEON Thermostat will beep, then double-beep<br />
INSTEON Wireless Thermostat will double-beep<br />
3) Test the scene by pressing and holding INSTEON Wireless Thermostat’s Master button.<br />
- When properly synchronized, pressing the Master button on one INSTEON Wireless Thermostat<br />
will illuminate the “Master” segment on that same screen. Additionally, the present room<br />
temperature of the Wireless Thermostat will be displayed in position 1 as temperature segments<br />
at the display’s top center.<br />
- A visual inspection of each display will reveal Master status of INSTEON Thermostat or<br />
INSTEON Wireless Thermostat<br />
Note: Only INSTEON Thermostat is directly wired to the HVAC system. If you plan on operating multiple<br />
INSTEON Wireless Thermostats, you must have an INSTEON Thermostat installed to control the HVAC.<br />
INSTEON Programming<br />
Add INSTEON Wireless Thermostat as a Controller<br />
INSTEON Wireless Thermostat can be set up to control other INSTEON devices or trigger software<br />
events when there is a change. The following INSTEON Wireless Thermostat changes can be configured<br />
as a controller (note that when linked to an INSTEON Thermostat, these commands will not function):<br />
• Group 1 - Cooling mode change (scene control)<br />
• Group 2 - Heating mode change (scene control)<br />
• Group 3 - Dehumidification, high humidity setpoint (scene control)<br />
• Group 4 - Humidification, low humidity setpoint (scene control)<br />
• Group EF - Broadcast on any change (notification group for linked software controllers) 1<br />
NOTE: An INSTEON Wireless Thermostat can also be added to a scene as a controller to Groups 1 - 4.<br />
When it is added as a controller of an INSTEON Thermostat, the setpoints between INSTEON Wireless<br />
Thermostat and INSTEON Thermostat will always be matched. When it is not added as a controller to a<br />
INSTEON Thermostat, the setpoints are local only.<br />
Note: Humidity levels are taken from the local device only; they are not shared or matched among<br />
thermostats.<br />
1) Press and hold INSTEON Wireless Thermostat Set button until it beeps.<br />
INSTEON Wireless Thermostat Set LED will blink green<br />
2) Tap Up or Down arrows to select from Groups 1-4 to add to a scene.<br />
• Group 1 – Cooling mode change (default)<br />
• Group 2 – Heating mode change<br />
• Group 3 – Dehumidification, high humidity setpoint<br />
• Group 4 – Humidification, low humidity setpoint<br />
3) Adjust scene responder (such as OutletLinc with connected humidifier) to the state you want when<br />
scene is activated (e.g., 50%, 25% or even off) 2<br />
4) Press and hold responder Set button until it double-beeps or its LED flashes<br />
INSTEON Wireless Thermostat will double-beep upon completion<br />
LED will turn off<br />
5) Confirm scene addition was successful by raising or lowering INSTEON Wireless Thermostat<br />
setpoint<br />
After INSTEON Wireless Thermostat changes to active mode set in step 2 above, responder will<br />
toggle between the scene on-level and off<br />
6) To add more responders to the scene, repeat steps 1-5 for each additional responder<br />
1 Group EF is a hexadecimal representation of Group 254 and can only be configured using software<br />
2 If the responder is a multi-scene device such as a KeypadLinc, tap the scene button you wish to control until its LED is in the desired scene state (on or off)<br />
Page 13 of 27 Rev: 1/21/2014 8:36 AM
Upon entering Scene mode this screen will display for ~2 seconds<br />
LCD display if Up button is tapped<br />
LCD displays when using Up or Down buttons to select from among the 4 controller groups<br />
Remove INSTEON Wireless Thermostat as a Controller<br />
If you want to remove INSTEON Wireless Thermostat from a scene as a controller, follow instructions<br />
below. Whenever possible, use software for managing scene memberships.<br />
Note: If you choose to remove INSTEON Wireless Thermostat from use, it is important that you remove<br />
scene memberships from all responders. Follow the instructions below for each responder of which<br />
INSTEON Wireless Thermostat is a member.<br />
1) Press and hold INSTEON Wireless Thermostat Set button until it beeps<br />
INSTEON Wireless Thermostat Set LED will blink green<br />
2) Press and hold INSTEON Wireless Thermostat Set button again to put it in scene mode<br />
INSTEON Wireless Thermostat Set LED will blink red<br />
LCD display indicates the group from which you are removing the scene<br />
3) Tap Up and Down arrows to select appropriate group to remove from:<br />
• Group 1 - Cooling mode change, default<br />
Page 14 of 27 Rev: 1/21/2014 8:36 AM
• Group 2 - Heating mode change<br />
• Group 3 - Dehumidifiation, high humidity setpoint<br />
• Group 4 - Humidification, low humidity setpoint<br />
4) Press and hold responder Set button<br />
INSTEON Wireless Thermostat will double-beep upon completion<br />
LED will turn off<br />
Upon entering Add a Scene mode<br />
Upon entering Remove a Scene mode (defaults to Cooling mode)<br />
LCD displays when using Up or Down buttons to select from among the 4 controller groups<br />
User Setup Mode Overview<br />
IMPORTANT! Once you have added INSTEON Wireless Thermostat to INSTEON Thermostat, the<br />
Program and Time/Sensor buttons will no longer perform their initial functions. All program and time<br />
controls will be performed on the INSTEON Thermostat. To access the Program and Time/Sensor<br />
buttons again, you must remove INSTEON Wireless Thermostat from INSTEON Thermostat.<br />
Program and Time/Sensor buttons can be used to wake INSTEON Wireless Thermostat up from its<br />
Page 15 of 27 Rev: 1/21/2014 8:36 AM
attery-saving mode to retrieve any updates from INSTEON Thermostat.<br />
Press and hold Program button for 3 seconds or more to enter User Setup Mode:<br />
User Setup Mode<br />
1) Press and hold Program button to access the following options:<br />
Page 16 of 27 Rev: 1/21/2014 8:36 AM
• Press Mode to step between menu items (sub-mode number will appear on top of the screen).<br />
o Sub-mode 01: Display LED on-time select (default is 10 seconds)<br />
o Sub-mode 02: Humidity low setpoint (default is 30%)<br />
o Sub-mode 03: Humidity high setpoint (default is 90%)<br />
o Sub-mode 04: Temperature format select (default is Fahrenheit)<br />
o Sub-mode 05: Internal or External temperature sensor (default is Internal)<br />
o Sub-mode 06: Beep on button press (default is off)<br />
o Sub-mode 07: Button lock (default is off)<br />
o Sub-mode 08: Programming lock (default is off)<br />
o Sub-mode 09: Activation delay (default is 5 minutes)<br />
2) Press the Up or Down arrow to change a setting<br />
• Sub-mode 01: LED backlight ON time (10–second default)<br />
a. Tap up or Down arrow to step between OFF, 10 seconds, 60 seconds and ON<br />
Note: Do not set to ON unless you are connected to a power supply or the batteries will<br />
drain very rapidly.<br />
• Sub-mode 02: Humidity low setpoint (humidification, 30% default)<br />
a. Up arrow = Increase humidity % setpoint<br />
b. Down arrow = Decrease humidity % setpoint<br />
c. Press and hold arrow buttons to scroll<br />
d. Range = 0 to 79% (humidity high setpoint will automatically adjust to be +20% than<br />
humidity low setpoint)<br />
• Sub-mode 03: Humidity high setpoint (dehumidification, 90% default)<br />
a. Up arrow = Increase humidity % setpoint<br />
b. Down arrow = Decrease humidity % setpoint<br />
c. Press and hold arrow buttons to scroll<br />
d. Range = 20 to 99% (cannot come within 20% of humidity low setpoint)<br />
• Sub- mode 04: Temperature format select (C or F, F default)<br />
a. Up arrow = C<br />
b. Down arrow = F<br />
Page 17 of 27 Rev: 1/21/2014 8:36 AM
• Sub-mode 05: Chose whether the Internal or External temperature sensor initiates commands<br />
(Internal default)<br />
a. Up arrow = External<br />
b. Down arrow = Internal<br />
c. Note that when using two INSTEON Wireless Thermostats with External temperature<br />
sensor enabled, each INSTEON Wireless Thermostat will only display its local<br />
reading and the INSTEON Thermostat’s reading. (INSTEON Thermostat will display<br />
both INSTEON Wireless Thermostats’ readings.)<br />
• Sub-mode 06: Beep on button press (enable/disable, OFF default)<br />
a. Up arrow = ON<br />
b. Down arrow = OFF<br />
• Sub-mode 07: Button lock (enable/disable, OFF default)<br />
a. Up arrow = ON<br />
b. Down arrow = OFF<br />
• Sub-mode 08: Programming lock (enable/disable, OFF default)<br />
a. Up arrow = ON<br />
b. Down arrow = OFF<br />
• Sub-mode 09: Activation delay (default is 5 minutes)<br />
a. Up arrow = Increase activation delay time<br />
b. Down arrow = Decrease activation delay time<br />
c. Range = 2 to 20 minutes<br />
3) When finished, press and hold Program button to exit<br />
Temperature and Humidity Calibration Modes<br />
Note: Use a calibrated temperature or humidity source when adjusting INSTEON Wireless Thermostat.<br />
1) Press and hold the Program button<br />
2) Tap Time/Sensor to enter Temperature Calibration Mode<br />
3) Tap Mode to step among internal temperature calibration (I), humidity calibration and external<br />
Page 18 of 27 Rev: 1/21/2014 8:36 AM
temperature calibration modes (E)<br />
Internal Temperature Calibration<br />
• I appears on right side of screen<br />
• The top left number (77 in example) is the current reading according to the temperature sensor<br />
• The top right number (14 in example) is the current offset (represents 1.4)<br />
• These numbers can change while this screen is displayed even though the primary temperature<br />
does not change; they are floating point calculations.<br />
1) Tap Up or Down arrows to adjust the displayed temperature to match the calibrated source<br />
i. Each press results in a 1° F (0.5° C) change<br />
ii. The calculation using example numbers below is 78 = 77 + 1.4<br />
iii. The offset range is from –10 to +10 actual °s<br />
Humidity Calibration Mode<br />
1) Once in Setup Mode for temperature calibration (step 1 above), tap Mode button to step between<br />
temperature calibration and humidity calibration<br />
2) Press the Up or Down arrow to select the current humidity level<br />
• The top left number (40 in example) is the current reading according to the humidity sensor<br />
• The top right number (-92 in example) is the current offset (represents -9.2)<br />
• These numbers can change while this screen is displayed even though the primary humidity level<br />
does not change. they are floating point calculations<br />
o Each press results in a 1% humidity change<br />
o The calculation using example numbers below is (31 = 40 – 9.2) and 42 = 40 + 1.7<br />
o The offset is from -10 to +10<br />
3) Press the MODE button to calibrate the external temperature sensor or press Program to exit<br />
calibration mode<br />
External Temperature Calibration<br />
• If you are using a Waterproof Temperature Sensor, use this mode to calibrate its external<br />
temperature readings<br />
• E appears on right side of screen<br />
1) Tap Up or Down arrows to adjust the displayed temperature to match the calibrated source<br />
i. Each press results in a 1° F (0.5° C) change<br />
ii. The calculation using example numbers below is 78 = 77 + 1.4<br />
iii. The offset range is from –10 to +10 actual °s<br />
iv. If no external sensor is installed, EE will be displayed instead<br />
Page 19 of 27 Rev: 1/21/2014 8:36 AM
2) Press Program to exit calibration mode<br />
Advanced 2-Stage Heating or Cooling Systems<br />
INSTEON Wireless Thermostat does not have the ability to operate first or second stages of Heat or Cool<br />
directly but can instruct INSTEON Thermostat to operate the HVAC. First and second stage of Heat or<br />
Cool engages under the following conditions when INSTEON Thermostat is connected to the HVAC:<br />
• INSTEON Thermostat setpoint is set at 5°(F or C) or more below ambient in Cool mode and 5°(F<br />
or C) or more above ambient in Heat mode<br />
- Heat mode setpoint is 80°, ambient is 72° = first and second stage engaged<br />
- Cool mode setpoint is 78°, ambient is 84° = first and second stage engaged<br />
• INSTEON Thermostat has been active in Heat or Cool for longer than 10 minutes and did not<br />
reach setpoint<br />
- Heat mode ran for 10 minutes and did not reach setpoint = second stage engaged<br />
- Cool mode ran for 10 minutes and did not reach setpoint = second stage engaged<br />
Note: It is possible for INSTEON Thermostat to occasionally engage and disengage second stage during<br />
a single heating or cooling cycle as variables are met.<br />
Factory Reset<br />
If you want to reset INSTEON Wireless Thermostat to its factory default settings, follow instructions<br />
below.<br />
Note: If you choose to reset INSTEON Wireless Thermostat to its factory default settings, it is important<br />
that you remove scene memberships from all controllers. Otherwise, controllers will retry commands<br />
repetitively, creating network delays. Follow the instructions in Removing INSTEON Wireless Thermostat<br />
as an INSTEON Responder above for each scene controller of which INSTEON Wireless Thermostat is a<br />
member.<br />
Factory reset changes:<br />
• INSTEON is reset (all scene memberships are removed)<br />
• Day/time is changed to 12:00PM<br />
• Programming times, temperatures and other settings are reset to their default values<br />
Factory reset does not change:<br />
• Temperature offset<br />
• Humidity offset<br />
Factory Reset<br />
1) Open INSTEON Wireless Thermostat and remove a battery<br />
2) Wait 10 seconds<br />
3) While pressing and holding the Set button, reinsert the removed battery. Do not let go of Set button.<br />
Device will blink all segments and emit a long beep for about 10 seconds<br />
Page 20 of 27 Rev: 1/21/2014 8:36 AM
4) When blinking/beeping stops, release Set button<br />
Device goes into factory reset for ~10 seconds and will perform a series of self tests<br />
Device will return to normal operations and display screen returns to normal<br />
5) If INSTEON Wireless Thermostat displays a two-digit error code instead of the ambient temperature,<br />
remove batteries, wait a few seconds, then reinstall<br />
If problem persists, call INSTEON Support Line at 800-762-7845<br />
Factory Reset Option 2<br />
1) Press and hold INSTEON Wireless Thermostat Set button until it beeps<br />
INSTEON Wireless Thermostat will beep<br />
INSTEON Wireless Thermostat Set LED will blink green<br />
2) Press and hold INSTEON Wireless Thermostat Set button again until it beeps<br />
INSTEON Wireless Thermostat will beep<br />
INSTEON Wireless Thermostat Set LED will blink red<br />
LCD display indicates the group you are removing a scene from (default is Cooling)<br />
3) Double-tap Set button<br />
4) Press and hold Set button again. Do not let go of Set button.<br />
Device will blink all segments and emit a long beep<br />
5) When blinking/beeping stops, release Set button<br />
Device goes into factory reset for about 10 seconds and will perform a series of self tests<br />
Device will return to normal operations and display screen returns to normal<br />
6) If INSTEON Wireless Thermostat displays a two-digit error code instead of the ambient temperature,<br />
remove batteries, wait a few seconds, then reinstall<br />
If problem persists, call INSTEON Support Line at 800-762-7845<br />
Specifications<br />
General<br />
Product name<br />
INSTEON Wireless Thermostat<br />
Brand/manufacturer<br />
INSTEON<br />
2441ZTH US/Can<br />
Manufacturer product number 2732-432 EU<br />
2732-532 AUS/NZ<br />
813922-010824 US/Can<br />
UPC<br />
813922-012873 EU<br />
813922-012880 AUS/NZ<br />
Warranty<br />
2 years, limited<br />
INSTEON<br />
INSTEON powerline mesh repeater No<br />
INSTEON RF mesh repeater Yes (only if using external power supply)<br />
INSTEON controller<br />
Yes<br />
INSTEON responder<br />
No<br />
Maximum links/scenes 400<br />
Page 21 of 27 Rev: 1/21/2014 8:36 AM
LED<br />
LED brightness<br />
Local control<br />
Dual-color, blinks red or green during setup<br />
N/A<br />
Yes<br />
Commands supported as controller On Off<br />
Commands supported as responder<br />
Software configurable<br />
RF range<br />
Phase bridge detect beacon<br />
INSTEON device category<br />
INSTEON device subcategory<br />
X10<br />
X10 address<br />
X10 transmitter<br />
X10 receiver<br />
X10 status response<br />
X10 resume dim<br />
X10 minimum transmit level<br />
X10 minimum receive level<br />
X10 messages repeated<br />
Mechanical<br />
Mounting<br />
Wires<br />
Screw clamp connections<br />
Case color<br />
N/A<br />
Yes<br />
Up to 150-Feet (50m) open air<br />
No, RF-only device<br />
0x05 (all frequencies)<br />
2441ZTH (915 MHz)<br />
0x0A<br />
2732-432 (869 MHz) 0x11<br />
2732-532 (921 MHz) 0x12<br />
N/A<br />
N/A<br />
N/A<br />
N/A<br />
N/A<br />
N/A<br />
N/A<br />
N/A<br />
Tabletop stand or wall-mount<br />
N/A<br />
Yes, 4 position<br />
White<br />
Set button 1<br />
Plastic<br />
Beeper<br />
Beep on button press<br />
LED<br />
Dimensions<br />
Weight<br />
Operating environment<br />
UV stabilized ABS<br />
Yes<br />
Optional (off by default)<br />
1 red/green dual-color<br />
5.7” x 3.6” x 1.3” (14.5cm x 9.1cm x 3.4cm)<br />
0.53 lbs, 8.4 oz, 240g (without batteries)<br />
Indoors<br />
Operating temperature range 4 o to 40 o C (39 o to 104 o F)<br />
Operating humidity range<br />
0-90% relative humidity<br />
Storage temperature range -20 o to 70 o C (-4 o to 158 o F)<br />
Electrical<br />
Page 22 of 27 Rev: 1/21/2014 8:36 AM
Battery<br />
External Power Supply<br />
Load type(s)<br />
Maximum load<br />
Minimum load<br />
User replaceable fuse<br />
Hardwired remote control<br />
Retains all settings without power<br />
Standby power consumption<br />
Certifications<br />
FCC ID<br />
Marks<br />
Safety approval(s)<br />
2 AA cells (quality alkaline recommended)<br />
4.5 to 7.5 volts DC, 200mA<br />
N/A<br />
N/A<br />
N/A<br />
No<br />
N/A<br />
Yes, saved in non-volatile EEPROM<br />
22 micro-Amps (on battery power)<br />
20mA (on external power, not in sleep mode)<br />
FCC ID Pat 15B & 15C and IC: RSS-210 Issue 8 (US/Can)<br />
ETSI EN 300 220-1 & 220-2, ETSI EN 301 489-1 & 489-3 (Eu)<br />
AS/NZ 4268 (C-Tick N16509)<br />
SBP2441ZT<br />
WEEE, RoHS (All models)<br />
C-Tick N16509 (Aus/NZ model)<br />
N/A, low voltage device<br />
Troubleshooting<br />
Problem Possible cause Solution<br />
After powering up or a factory<br />
reset, INSTEON Wireless<br />
Thermostat displays a two-digit<br />
error code instead of the ambient<br />
temperature.<br />
I replaced my INSTEON Wireless<br />
Thermostat with a new one, but<br />
now the INSTEON for Hub app<br />
doesn’t recognize it.<br />
My INSTEON Wireless<br />
Thermostat temperature reading<br />
is taking a long time to update on<br />
my INSTEON Thermostat<br />
display.<br />
INSTEON Wireless Thermostat’s<br />
battery life seems very short.<br />
It didn’t boot up fully.<br />
The INSTEON for Hub app<br />
communicates via INSTEON<br />
I.D.s. They are still trying to<br />
communicate to the old<br />
thermostat’s I.D.<br />
At the top of each hour and, :15,<br />
:30, and :45 past, the INSTEON<br />
Wireless Thermostat will wake up<br />
and synchronize the readings<br />
with the INSTEON Thermostat<br />
display.<br />
Battery life depends on individual<br />
settings (such as LED backlight<br />
display on-time, notifying<br />
Remove batteries from INSTEON<br />
Wireless Thermostat, wait a few<br />
seconds, then reinstall. If<br />
problem persists, call the<br />
INSTEON Support Line.<br />
Update the INSTEON I.D. on<br />
both the Hub and the INSTEON<br />
for Hub app with your new<br />
thermostat’s I.D.<br />
For an immediate update, press<br />
the temperature up or down<br />
button<br />
Change INSTEON Wireless<br />
Thermostat settings to reduce<br />
battery consumption.<br />
Page 23 of 27 Rev: 1/21/2014 8:36 AM
The displayed temperature and<br />
humidity don’t seem accurate.<br />
When the Wireless thermostat is<br />
placed near the Wired<br />
Thermostat, the temperature and<br />
humidity readings are different.<br />
When the power is removed, the<br />
clock settings are lost<br />
When you change the Master<br />
mode from the INSTEON<br />
Wireless Thermostat to the<br />
INSTEON Thermostat, the<br />
Wireless Thermostat still reads<br />
master.<br />
When the Wireless Thermostat is<br />
linked to a Wired Thermostat, it<br />
will not directly control other<br />
linked devices based on<br />
temperature or humidity<br />
When an AC adapter is used, the<br />
temperature and humidity<br />
settings are changing rapidly.<br />
When I move the Wireless<br />
Thermostat to a cold room, the<br />
temperature does not update<br />
The Wireless Thermostat will not<br />
go into Master Mode.<br />
The Wireless Thermostat or<br />
Wired Thermostat goes out of<br />
software of all changes, etc.).<br />
Both units were calibrated at the<br />
factory prior to shipment. Other<br />
factors could contribute to<br />
different readings.<br />
The Wireless Thermostat does<br />
not have a back-up clock that<br />
keeps the time<br />
The Wireless Thermostat will<br />
wake up and synchronize data<br />
with the Wired Thermostat:<br />
• Every 15 minutes.<br />
• If it detects a temperature<br />
change.<br />
• If the up/down temperature<br />
buttons are pressed.<br />
This is normal.<br />
Noise from the AC adapter is<br />
affecting the Wireless<br />
Thermostat’s electronics.<br />
The unit will update the display<br />
every minute. Also, the case and<br />
electronics of the unit will hold<br />
the warmth of the previous room<br />
for up to an hour.<br />
The air flow into the Wireless<br />
Thermostat may be blocked<br />
The Wired Thermostat only<br />
allows up to two Wireless<br />
Thermostats and will reject three<br />
or more.<br />
The two units are too far from<br />
each other and unable to<br />
communicate with each other<br />
Use an AC adapter (sold<br />
separately) to power INSTEON<br />
Wireless Thermostat.<br />
Use the Calibration feature to<br />
adjust either the temperature and<br />
humidity so the two unit match<br />
and the temperature feels about<br />
right.<br />
If linked to an INSTEON Wired<br />
Thermostat, the Wireless<br />
Thermostat will pull the current<br />
time, temperature, and settings<br />
every 15 minutes.<br />
During the synchronization, the<br />
“Master” icon will clear on the<br />
Wireless Thermostat.<br />
Have your Wired Thermostat be<br />
the controller of other devices<br />
based on temperature and<br />
humidity.<br />
Be sure that your AC adapter is<br />
outputting between 5 to 7.5 volts.<br />
Change to a better quality AC<br />
adapter.<br />
After about one hour, the<br />
temperature display will stabilize<br />
and show an accurate figure.<br />
Be sure to use the included stand<br />
or mount the unit on a wall to get<br />
good air flow.<br />
Unlink the Wireless<br />
Thermostat(s) or reset all units<br />
and re-link.<br />
Use INSTEON Range Extenders,<br />
Access Points, or Dual-Band<br />
modules between the two<br />
Page 24 of 27 Rev: 1/21/2014 8:36 AM
Master Mode<br />
The temperature setpoints and<br />
the Mode changes from what it<br />
was set to.<br />
and check in for updates. If the<br />
two units can’t communicate,<br />
each will go out of the Mater<br />
mode after 30 to 60 minutes<br />
The Wired Thermostat is the<br />
Master (or perhaps a different<br />
Wireless Thermostat) so the<br />
setpoint levels and mode<br />
changes (Heat, Cool, etc.) made<br />
at the Wired Thermostat<br />
(manually, following the Autoschedule,<br />
or via another<br />
INSTEON controller) are being<br />
sent to the Wireless for display.<br />
locations.<br />
Press the Master button on the<br />
Wireless Thermostat so that it<br />
becomes the master and its<br />
mode and setpoints are<br />
controlling the Wired Thermostat.<br />
Computer software or other<br />
controller can’t retrieve the<br />
Wireless Thermostat’s data<br />
(Temperature, Humidity,<br />
Setpoints).<br />
The Wireless Thermostat seems<br />
slow to update the sensed<br />
temperature and humidity.<br />
When using only batteries, the<br />
Wireless Thermostat will go to<br />
sleep and not responded to<br />
signals from other INSTEON<br />
devices.<br />
The unit wakes up every minute<br />
and checks for changes. If<br />
differences are detected, the<br />
display is updated and<br />
communicated to linked devices.<br />
Add an AC adapter and the unit<br />
will stay on and awake all the<br />
time.<br />
Use an AC adapter for<br />
continuous temperature and<br />
humidity monitoring.<br />
Page 25 of 27 Rev: 1/21/2014 8:36 AM
Certification and Warranty<br />
FCC and Industry Canada Compliance Statement<br />
This device complies with part 15 of the FCC Rules and Industry Canada license-exempt RSS-210. Operation is subject to the following two<br />
conditions:<br />
(1) This device may not cause harmful interference, and<br />
(2) This device must accept any interference, including interference that may cause undesired operation of the device.<br />
Le present appareil est conforme aux CNR d'Industrie Canada applicables aux appareils radio exempts de licence. L'exploitation est autorise aux deux<br />
conditions suivantes:<br />
(1) l'appareil ne doit pas produire de brouillage, et<br />
(2) l'utilisateur de l'appareil doit accepter tout brouillage radiolectrique subi, mme si le brouillage est susceptible d'en compromettre le<br />
fonctionnement.<br />
The digital circuitry of this device has been tested and found to comply with the limits for a Class B digital device, pursuant to Part 15B of the FCC<br />
Rules. These limits are designed to provide reasonable protection against harmful interference in residential installations. This equipment generates,<br />
uses, and can radiate radio frequency energy and, if not installed and used in accordance with the instructions, may cause harmful interference to radio<br />
and television reception. However, there is no guarantee that interference will not occur in a particular installation. If this device does cause such<br />
interference, which can be verified by turning the device off and on, the user is encouraged to eliminate the interference by one or more of the following<br />
measures:<br />
- Re-orient or relocate the receiving antenna of the device experiencing the interference<br />
- Increase the distance between this device and the receiver<br />
- Connect the device to an AC outlet on a circuit different from the one that supplies power to the receiver<br />
- Consult the dealer or an experienced radio/TV technician<br />
WARNING: Changes or modifications to this device not expressly approved by the party responsible for compliance could void the user’s authority to<br />
operate the equipment.<br />
DECLARATION OF CONFORMITY<br />
Hereby, INSTEON declares that this device is in compliance with the essential requirements and other relevant provisions of the following Directives:<br />
1) Electromagnetic Compatibility Directive 2004/108/EC<br />
2) Hazardous Substance Directive 2005/95/EC<br />
Technical data and copies of the original Declaration of Conformity are available and can be obtained from INSTEON; 16542 Millikan Ave, Irvine, CA,<br />
USA.<br />
User Information for Consumer Products Covered by EU Directive 2002/96/EC on Waste Electric and Electronic Equipment (WEEE)<br />
This document contains important information for users with regards to the proper disposal and recycling of INSTEON products. Consumers are<br />
required to comply with this notice for all electronic products bearing the following symbol:<br />
Environmental Information for Customers in the European Union<br />
European Directive 2002/96/EC requires that the equipment bearing this symbol on the product and/or its packaging must not be disposed of with<br />
unsorted municipal waste. The symbol indicates that this product should be disposed of separately from regular household waste streams.<br />
It is your responsibility to dispose of this and other electric and electronic equipment via designated collection facilities appointed by the government or<br />
local authorities. Correct disposal and recycling will help prevent potential negative consequences to the environment and human health.<br />
For more detailed information about the disposal of your old equipment, please contact your local authorities, waste disposal service, or the shop<br />
where you purchased the product.<br />
DECLARATION OF CONFORMITY TO R&TTE DIRECTIVE 1999/5/EC for the European Community, Switzerland, Norway, Iceland and<br />
Liechtenstein<br />
Product category: general consumer (category 3).<br />
English: This equipment is in compliance with the essential requirements and other relevant provisions of the European R&TTE Directive 1999/5/EC<br />
Deutsch [German]: Dieses Gerät entspricht den grundlegenden Anforderungen und den weiteren entsprechenden Vorgaben der Richtlinie 1999/5/EU.<br />
Nederlands [Dutch]: Dit apparaat voldoet aan de essentiele eisen en andere van toepassing zijnde bepalingen van de Richtlijn 1999/5/EC.<br />
Svenska [Swedish]: Denna utrustning står I överensstämmelse med de väsentliga egenskapskrav och övriga relevanta bestämmelser som framgår av<br />
direktiv 1999/5/EG.<br />
Français [French]: Cet appareil est conforme aux exigences essentielles et aux autres dispositions pertinentes de la Directive 1999/5/EC<br />
Español [Spanish]: Este equipo cumple con los requisitos esenciales asi como con otras disposiciones de la Directiva 1999/5/CE.<br />
Page 26 of 27 Rev: 1/21/2014 8:36 AM
Português [Portuguese]: Este equipamento está em conformidade com os requisitos essenciais e outras provisões relevantes da Directiva 1999/5/EC.<br />
Italiano [Italian]: Questo apparato é conforme ai requisiti essenziali ed agli altri principi sanciti dalla Direttiva 1999/5/CE.<br />
Norsk [Norwegian]: Dette utstyret er i samsvar med de grunnleggende krav og andre relevante bestemmelser i EU-direktiv 1999/5/EF.<br />
Suomi [Finnish]:Tämä laite tÿttää direktiivin 1999/5/EY olennaiset vaatimukset ja on siinä asetettujen muiden laitetta koskevien määräysten mukainen.<br />
Dansk [Danish]: Dette udstyr er i overensstemmelse med de væsentlige krav og andre relevante bestemmelser i Direktiv 1999/5/EF.<br />
Polski [Polish]: Urządzenie jest zgodne z ogólnymi wymaganiami oraz szczególnymi warunkami okreslonymi Dyrektywą UE: 1999/5/EC<br />
Limited Warranty<br />
Seller warrants to the original consumer purchaser of this product that, for a period of two years from the date of purchase, this product will be free<br />
from defects in material and workmanship and will perform in substantial conformity to the description of the product in this Owner’s <strong>Manual</strong>. This<br />
warranty shall not apply to defects or errors caused by misuse or neglect. If the product is found to be defective in material or workmanship, or if the<br />
product does not perform as warranted above during the warranty period, Seller will either repair it, replace it, or refund the purchase price, at its<br />
option, upon receipt of the product at the address below, postage prepaid, with proof of the date of purchase and an explanation of the defect or error.<br />
The repair, replacement, or refund that is provided for above shall be the full extent of Seller’s liability with respect to this product. For repair or<br />
replacement during the warranty period, call the INSTEON Support Line at 866-243-8022 with the Model # and Revision # of the device to receive an<br />
RMA# and send the product, along with all other required materials to:<br />
INSTEON<br />
ATTN: Receiving<br />
16542 Millikan Ave.<br />
Irvine, CA 92606-5027<br />
Limitations<br />
The above warranty is in lieu of and Seller disclaims all other warranties, whether oral or written, express or implied, including any warranty or<br />
merchantability or fitness for a particular purpose. Any implied warranty, including any warranty of merchantability or fitness for a particular purpose,<br />
which may not be disclaimed or supplanted as provided above shall be limited to the two-year of the express warranty above. No other representation<br />
or claim of any nature by any person shall be binding upon Seller or modify the terms of the above warranty and disclaimer.<br />
Home automation devices have the risk of failure to operate, incorrect operation, or electrical or mechanical tampering. For optimal use, manually verify<br />
the device state. Any home automation device should be viewed as a convenience, but not as a sole method for controlling your home.<br />
In no event shall Seller be liable for special, incidental, consequential, or other damages resulting from possession or use of this device, including<br />
without limitation damage to property and, to the extent permitted by law, personal injury, even if Seller knew or should have known of the possibility of<br />
such damages. Some states do not allow limitations on how long an implied warranty lasts and/or the exclusion or limitation of damages, in which case<br />
the above limitations and/or exclusions may not apply to you. You may also have other legal rights that may vary from state to state.<br />
Protected under U.S. and foreign patents (see www.insteon.com/patents)<br />
© Copyright 2013 INSTEON, 16542 Millikan Ave., Irvine, CA 92606, 866-243-8022, www.insteon.com<br />
Page 27 of 27 Rev: 1/21/2014 8:36 AM


