IDEXX Quanti-Tray Sealer Model 2X User Manual - Friends of ...
IDEXX Quanti-Tray Sealer Model 2X User Manual - Friends of ...
IDEXX Quanti-Tray Sealer Model 2X User Manual - Friends of ...
- No tags were found...

Create successful ePaper yourself
Turn your PDF publications into a flip-book with our unique Google optimized e-Paper software.
<strong>IDEXX</strong> <strong>Quanti</strong>-<strong>Tray</strong> * <strong>Sealer</strong><strong>Model</strong> <strong>2X</strong> <strong>User</strong> <strong>Manual</strong>CAUTION!CAUTION: RISK OF ELECTRICAL SHOCKDo not open the cover <strong>of</strong> this <strong>Sealer</strong>.Do not allow water to spill into this <strong>Sealer</strong>.Pour water samples into <strong>Quanti</strong>-<strong>Tray</strong>s as described in the <strong>Quanti</strong>-<strong>Tray</strong> insert.CAUTION: RISK OF SKIN BURNSYour company/institution may qualify personnel for cleaning the inside <strong>of</strong> the <strong>Sealer</strong>. Qualified personnel should refer to the PreventiveMaintenance Instructions for directions on how to clean the inside <strong>of</strong> the <strong>Sealer</strong>.<strong>IDEXX</strong> Laboratories, Inc. One <strong>IDEXX</strong> Drive, Westbrook, Maine 04092 USA • Tel.: 1-207-856-0496 or 1-800-321-0207 Fax: 1-207-856-0630www.idexx.com3
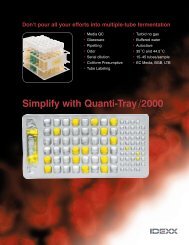
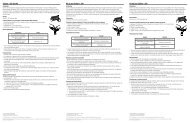
DescriptionThe <strong>IDEXX</strong> <strong>Quanti</strong>-<strong>Tray</strong>* <strong>Sealer</strong> <strong>Model</strong> <strong>2X</strong> is a motor-driven, heated roller instrument designed to seal <strong>IDEXX</strong> <strong>Quanti</strong>-<strong>Tray</strong>s(including <strong>Quanti</strong>-<strong>Tray</strong>* /2000s). This <strong>Sealer</strong>, used with <strong>Quanti</strong>-<strong>Tray</strong>s and any <strong>IDEXX</strong> Defined Substrate Technology* reagent,like Colilert*, Colilert*-18, Colisure* and Enterolert*, automates the sample handling <strong>of</strong> bacterial enumeration. Together, theyproduce counts as accurate as membrane filtration with the ease <strong>of</strong> a presence/absence test.Diagram 1Reverse ButtonAmber Power LightGreen Ready Light<strong>Quanti</strong>-<strong>Tray</strong>Rubber InsertInput ShelfAccess PanelInput SlotDiagram 2Product labelFuse BoxFanCycle Counter (approximate counts)Exit SlotPower switchPower CordContentsEach <strong>Model</strong> <strong>2X</strong> <strong>Sealer</strong> comes with the base <strong>Sealer</strong> unit, an input shelf, one <strong>Quanti</strong>-<strong>Tray</strong>* Rubber Insert, MPN tables, this <strong>User</strong><strong>Manual</strong>, and Preventive Maintenance Instructions. The 115V model also comes with a standard US, 3-prong grounding powercord. The 230V model also comes with 3 cords: a UK cord, a European/Shuko cord, and a Swiss cord.Note: <strong>Quanti</strong>-<strong>Tray</strong>/2000 Rubber Inserts (WQTSRBR-2k) are available separately. Extra <strong>Quanti</strong>-<strong>Tray</strong> Rubber Inserts (WQTSRBR-51) are also available separately.Setting Up• Unpack contents and save packaging for future shipping.• Position <strong>Sealer</strong> on a level surface with adequate space for <strong>Tray</strong>s to be inserted and ejected. <strong>Sealer</strong> can be used in any orientation(left-to-right or right-to-left).• Attach Input Shelf to <strong>Sealer</strong> by inserting shelf tabs into the two slots on the front <strong>of</strong> the <strong>Sealer</strong> and clipping firmly in place.• Ensure that Power Switch is turned <strong>of</strong>f.• Plug power cord into <strong>Sealer</strong> and then into a grounded outlet <strong>of</strong> proper voltage (see Product Label).4
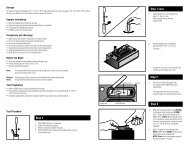
Operating DirectionsWarning: Personal injury, <strong>Sealer</strong> damage, property damage and/or inaccurate test results may occurunless <strong>Sealer</strong> is used according to these instructions.• Turn Power Switch on. The amber Power Light should illuminate.• Allow the <strong>Sealer</strong> to warm up and the green Ready Light to come on (up to 10 minutes). <strong>Sealer</strong> will not operate until both the amberpower light and the green Ready Light are illuminated, indicating that the unit has reached operating temperature.• Place an empty <strong>Quanti</strong>-<strong>Tray</strong> or <strong>Quanti</strong>-<strong>Tray</strong>/2000 Rubber Insert on the Input Shelf with the large cutout facing away from the <strong>Sealer</strong>.• Place a <strong>Quanti</strong>-<strong>Tray</strong> or <strong>Quanti</strong>-<strong>Tray</strong>/2000 filled with sample and DST* reagent onto the Rubber Insert, making sure that the <strong>Tray</strong> isproperly seated in the Rubber Insert, and with each well <strong>of</strong> the <strong>Tray</strong> in its corresponding Rubber Insert hole.• Slide the Rubber Insert with <strong>Tray</strong> into the <strong>Sealer</strong> until the motor grabs the Rubber Insert and begins to draw it into the <strong>Sealer</strong>.• In approximately 15 seconds, the <strong>Tray</strong> will be sealed and partially ejected from the rear <strong>of</strong> the <strong>Sealer</strong>. Remove the Rubber Insert and<strong>Tray</strong> from the rear <strong>of</strong> the <strong>Sealer</strong>.• If at any time you wish to reverse the motor drawing the Rubber Insert into the <strong>Sealer</strong> (for example, if a misaligned <strong>Tray</strong> isaccidentally fed into the <strong>Sealer</strong>), press and hold the Reverse Button. However, do not reverse the motor once the Rubber Inserthas been drawn fully into the Input Slot.• Multiple Rubber Inserts can be run consecutively without pausing.• Turn <strong>of</strong>f <strong>Sealer</strong> when not in use.Technical SpecificationsWeight35 lbs16 kgDimensions12" H x 11" D x 16" W30cm H x 27cm D x 39cm WAmbient Temperature32-90°F0-32°CPower115V, 60Hz, 6Amp (model 99-10893-00)230V, 50Hz, 3Amp (model 99-10896-00)CleaningThe Rubber Insert may be autoclaved, or it may be cleaned with isopropyl alcohol or household bleach, taking the usual precautionswhen handling such liquids. Be sure to clean the rubber insert if it shows any signs <strong>of</strong> built up grime.Clean the outside <strong>of</strong> the <strong>Sealer</strong> with a s<strong>of</strong>t, dry cloth. A s<strong>of</strong>t cloth moistened with water, household bleach, or isopropyl alcohol may also beused, taking the usual precautions when handling such liquids.The Access Panel should only be opened by personnel qualified to clean the inside <strong>of</strong> the <strong>Sealer</strong>. Refer to the Preventive MaintenanceInstructions for directions on how to clean the inside <strong>of</strong> the <strong>Sealer</strong>. Cleaning should only be performed by trained personnelat your facility. Do not open the Access Panel or tilt the <strong>Sealer</strong> if sample is dripping from the unit.Changing FusesFuses are located in the fuse holder just above the Power Switch. If it is necessary to change a fuse, turn <strong>of</strong>f the <strong>Sealer</strong> andunplug the Power Cord from the <strong>Sealer</strong> before opening fuse holder. Use 6 Amp Buss MDL-6 fuses or equivalent in the 115Vunit and 4 Amp Buss GDC-4 fuses or equivalent in the 230V unit.5
TroubleshootingSymptomAmber Power Light doesn't illuminate.Amber Power Light comes on, but theGreen Ready Light takes more than 20minutes to turn on or goes <strong>of</strong>f duringoperation.Motor won't start when a <strong>Quanti</strong>-<strong>Tray</strong>is inserted.Motor starts when <strong>Quanti</strong>-<strong>Tray</strong> isinserted, but doesn't pull <strong>Tray</strong> through.<strong>Quanti</strong>-<strong>Tray</strong> and Rubber Insert getstuck in <strong>Sealer</strong>.<strong>Sealer</strong> makes loud hissing noise whensealing or liquid is dripping from thebottom <strong>of</strong> the <strong>Sealer</strong>.<strong>Tray</strong>s appear to have blistered, or paperbacking is yellowed, after sealing.Recommended Action• Verify that the <strong>Sealer</strong> is plugged into a live outlet.• Ensure that the power switch is on.• Check fuses and replace if necessary.• Call <strong>IDEXX</strong> Technical Support or your local distributor.• Be sure that <strong>Sealer</strong> has warmed up and that the greenReady Light is illuminated.• Be sure that the <strong>Quanti</strong>-<strong>Tray</strong> is face down in the RubberInsert with the white <strong>Tray</strong> backing facing upward.• Be sure <strong>Tray</strong> is in the Rubber Insert.• Ensure that Rubber Insert is pushed firmly into rolleruntil motor engages it.• Clean Rubber Insert.• Press and HOLD the Reverse Button to reverse the motor untilthe <strong>Tray</strong> is ejected from the Input Slot. NOTE: If the <strong>Tray</strong> hasgone all the way into the <strong>Sealer</strong>, do not use Reverse Buttonbecause the <strong>Tray</strong> may become lodged in the <strong>Sealer</strong>. Instead,pull the Rubber Insert out the Exit Slot.• This is part <strong>of</strong> normal operation when trays are over filled. Donot fill <strong>Tray</strong>s with more than 100ml <strong>of</strong> sample. The <strong>Sealer</strong> isdesigned to automatically remove excess sample from the<strong>Tray</strong> and discard it into the bottom <strong>of</strong> the <strong>Sealer</strong>.• Call <strong>IDEXX</strong> Technical Support or your local distributor. <strong>Sealer</strong>heated roller may be running too hot.LIMITED WARRANTY<strong>IDEXX</strong> Laboratories, Inc. (“<strong>IDEXX</strong>”) warrants this product to conform to our published specifications, when stored under appropriate conditions and given normal, proper andintended usage, until the expiration <strong>of</strong> its stated shelf life, or, if none is stated, for one year from the date <strong>of</strong> delivery <strong>of</strong> this product to the original end user purchaser (“Buyer”).<strong>IDEXX</strong> agrees during the applicable warranty period to replace all non-conforming products within 30 days after date <strong>of</strong> return to <strong>IDEXX</strong> and without cost to Buyer. <strong>IDEXX</strong> shall nothave any obligation under this Limited Warranty to make replacements which result, in whole or in part, from catastrophe, fault or negligence <strong>of</strong> the Buyer, or anyone claiming throughor on behalf <strong>of</strong> the Buyer, or from improper use <strong>of</strong> the products, or use <strong>of</strong> the products in a manner for which they were not designed, or by causes external to the products.Buyer shall notify <strong>IDEXX</strong> <strong>of</strong> any products which it believes to be non-conforming during the warranty period. At <strong>IDEXX</strong>’s option, such products shall be returned by Buyer,transportation and insurance prepaid, to <strong>IDEXX</strong>’s designated facility for examination and testing. <strong>IDEXX</strong> shall repair or replace, within 30 days <strong>of</strong> receipt by <strong>IDEXX</strong>, any such productfound to be so non-conforming and promptly return such products to Buyer, transportation and insurance prepaid. Should <strong>IDEXX</strong>’s examination and testing not disclose any nonconformitycovered by the foregoing warranty, <strong>IDEXX</strong> shall so advise Buyer and dispose <strong>of</strong> or return the product in accordance with Buyer’s instructions and at Buyer’s sole expense.THE PROVISIONS OF THE FOREGOING LIMITED WARRANTY ARE IN LIEU OF ANY OTHER WARRANTY, WHETHER EXPRESS OR IMPLIED, WRITTEN OR ORAL (INCLUDING ANY WARRANTYOF MERCHANTABILITY OR FITNESS FOR A PARTICULAR PURPOSE). <strong>IDEXX</strong>’S LIABILITY ARISING OUT OF THE MANUFACTURE, SALE OR SUPPLYING OF THE PRODUCTS OR THEIR USEOR DISPOSITION, WHETHER BASED UPON WARRANTY, CONTRACT, TORT OR OTHERWISE, SHALL NOT EXCEED THE ACTUAL PURCHASE PRICE PAID BY BUYER FOR THE PRODUCTS. INNO EVENT SHALL <strong>IDEXX</strong> BE LIABLE TO BUYER OR ANY OTHER PERSON OR ENTITY FOR SPECIAL, INCIDENTAL, CONSEQUENTIAL, INDIRECT OR EXEMPLARY DAMAGES (INCLUDING,BUT NOT LIMITED TO, LOSS OF PROFITS OR LOSS OF USE DAMAGES) ARISING OUT OF THE MANUFACTURE, SALE OR SUPPLY OF THE PRODUCTS. THE FOREGOING WARRANTIESEXTEND TO BUYER ONLY AND SHALL NOT BE APPLICABLE TO ANY OTHER PERSON OR ENTITY INCLUDING, WITHOUT LIMITATION, CUSTOMERS OF BUYER.<strong>IDEXX</strong> US/Canada Technical SupportTelephone 1-800-321-0207 or 1-207-856-0496 Fax 1-207-856-0630Manufactured under one or more <strong>of</strong> the following U.S. patents: 4,925,789; 5,429,933; 5,518,892; 5,610,029;5,620, 865; 5,620,895; 5,753,456 and 5,780,259. Other U.S. and/or foreign patents issued or pending.*<strong>Quanti</strong>-<strong>Tray</strong>, Defined Substrate Technology, Colilert, Colisure, Enterolert and DST are either trademarks orregistered trademarks <strong>of</strong> <strong>IDEXX</strong> Laboratories, Inc. in the United States and/or other countries.© 2002 <strong>IDEXX</strong> Laboratories, Inc.6
*<strong>IDEXX</strong> <strong>Quanti</strong>-<strong>Tray</strong> <strong>Sealer</strong> Modèle<strong>2X</strong> Manuel de l’utilisateurATTENTION!ATTENTION : RISQUE DE DECHARGES ÉLECTRIQUESN’ouvrez pas le couvercle de votre sealer.Ne renversez jamais d’eau à l’intérieur de votre sealer.Versez les échantillons d’eau dans les plaques <strong>Quanti</strong>-<strong>Tray</strong>sconformément aux instructions du protocole.ATTENTION : RISQUE DE BRÛLURESVotre société/institution peut former du personnel pour le nettoyage de l’intérieur du sealer. Le personnel qualifié doit consulter les instructions demaintenance préventive pour ce qui concerne la manière de nettoyer l’intérieur du sealer.<strong>IDEXX</strong> Laboratories, Inc. One <strong>IDEXX</strong> Drive, Westbrook, Maine 04092 USA • Tel.: 1-207-856-0496 1-800-321-0207 Fax: 1-207-856-0630www.idexx.com7
DescriptionLe modèle <strong>2X</strong> du <strong>Quanti</strong>-<strong>Tray</strong>* <strong>Sealer</strong> de <strong>IDEXX</strong> est un instrument motorisé, à rouleau chauffé, conçu pour sceller les plaques<strong>Quanti</strong>-<strong>Tray</strong>s <strong>IDEXX</strong>, ainsi que les <strong>Quanti</strong>-<strong>Tray</strong>*/2000s. Ce sealer, utilisé avec des <strong>Quanti</strong>-<strong>Tray</strong>s et tout réactif Defined SubstrateTechnology* de <strong>IDEXX</strong>, comme le Colilert*, le Colilert*-18, Colisure* ou l’Enterolert*, automatise l’introduction de l’échantillonpour l’énumération bactérienne. Cette combinaison du sealer et des plaques <strong>Quanti</strong>-<strong>Tray</strong> produit des numérations aussiprécises que par filtration sur membrane, avec la facilité d’un test présence/absence.Diagramme 1Plaque <strong>Quanti</strong>-<strong>Tray</strong>Plateau de caoutchoucTablette d'entréeBouton de retourVoyant jaune d'alimentationVoyant vert demarchePanneau d'accèsFented'entréeDiagramme 2Étiquette du produitBoîte à fusiblesVentilateurCompteur de cycles (énumeration approximative)Fente de sortieCommutateur d'alimentationCordon d'alimentationContenuChaque sealer modèle <strong>2X</strong> comprend l’unité de base, une tablette d’entrée, un plateau de caoutchouc <strong>Quanti</strong>-<strong>Tray</strong>, des abaquesde nombre le plus probable, ce manuel de l’utilisateur et des instructions de maintenance préventive. Le modèle 115V comprendégalement un cordon d’alimentation 3 broches avec mise à la terre normalisé US. Le modèle 230V comprend également 3cordons: un cordon RU, un cordon européen/Shuko et un cordon suisse.Note: Les plateaux de caoutchouc <strong>Quanti</strong>-<strong>Tray</strong>/2000 (WQTSRBR-2k) sont vendus séparément. Les plateaux de caoutchouc<strong>Quanti</strong>-<strong>Tray</strong> supplémentaires (WQTSRBR-51) sont aussi vendus séparément.Installation• Déballez le contenu et conservez l’emballage pour toute expédition ultérieure.• Placez votre sealer sur une surface horizontale, avec suffisamment d’espace pour permettre d’insérer et d’éjecter les <strong>Quanti</strong>-<strong>Tray</strong>s. Vous pouvez utiliser votre sealer dans n’importe quel sens (de gauche à droite ou de droite à gauche).• Fixez la tablette d’entrée à votre sealer en insérant les taquets de la tablette dans les deux fentes situées à l’avant de lamachine et en les fixant solidement en place en appuyant sue la tablette.• Assurez-vous que le commutateur d’alimentation soit bien en position “OFF” (hors tension).• Branchez le cordon d’alimentation à votre sealer, puis à une prise de voltage adéquat avec mise à la terre (consultezl’étiquette du produit).8
FonctionnementAvertissement : Vous risquez de vous blesser, d’endommager votre sealer, de causer des dommagesmatériels et d’obtenir des résultats de test erronés si vous ne vous conformez pas aux présentesinstructions quand vous utilisez votre sealer.• Mettez le commutateur en position “ON” (sous tension). Le voyant jaune s’allume.• Laissez chauffer votre sealer. Le voyant vert s’allume (cela peut prendre jusqu’à 10 minutes) ce qui indique quel’appareil a atteint sa température de fonctionnement. Votre sealer ne peut fonctionner que lorsque le voyant jaune et levoyant vert sont tous deux allumés.• Placez un plateau de caoutchouc vide pour <strong>Quanti</strong>-<strong>Tray</strong> ou pour <strong>Quanti</strong>-<strong>Tray</strong>/2000 sur la tablette d’entrée, la plusgrande alvéole vers vous.• Placez un <strong>Quanti</strong>-<strong>Tray</strong> ou un <strong>Quanti</strong>/<strong>Tray</strong>/2000 rempli de mélange échantillon/réactif DST* sur le plateau de caoutchouc.Assurez-vous que le <strong>Quanti</strong>-<strong>Tray</strong> repose bien sur le plateau de caoutchouc et que chaque puits du <strong>Quanti</strong>-<strong>Tray</strong> setrouve bien dans le trou du plateau de caoutchouc correspondant.• Faites coulisser le plateau de caoutchouc avec la plaque dans le sealer jusqu’à ce que le moteur saisisse le plateau etcommence à l’entraîner à l’intérieur.• Au bout d’environ 15 secondes, le plateau est scellé et partiellement éjecté de votre sealer. Enlevez le plateau decaoutchouc et le <strong>Quanti</strong>-<strong>Tray</strong> de l’arrière de votre sealer.• Vous pouvez récupérer la plaque <strong>Quanti</strong>-<strong>Tray</strong> et son support en maintenant enforcé le bouton noir de retour (si, parexemple, vous avez mal aligné le plateau en le mettant dans votre sealer). Cependant, ne faites jamais retourner leplateau de caoutchouc s’il a pénétré entièrement dans la machine.• Vous pouvez traiter consécutivement sans vous arrêter plusieurs plateaux de caoutchouc.• Mettez votre sealer hors tension quand vous ne l’utilisez pas.Caractéristiques techniquesPoids35 lbs16 kgDimensions12" H x 11" P x 16" L30cm H x 27cm P x 39cm LTempérature ambiante32-90°F0-32°CAlimentation115V, 60Hz, 6Amp (modèle 99-10893-00)230V, 50Hz, 3Amp (modèle 99-10896-00)NettoyageVous pouvez nettoyer le plateau de caoutchouc à l’autoclave, ou bien à l’alcool isopropylique ou à l’eau de javeldomestique, en prenant les précautions d’usage. Assurez-vous de bien nettoyer le plateau de caoutchouc si vous voyezdes signes d’encrassement.Nettoyez l’extérieur de votre sealer avec un chiffon doux, sec. Vous pouvez également utiliser un chiffon doux imbibé d’eau,d’eau de javel domestique ou d’alcool isopropylique en prenant les précautions d’usage.Le panneau d’accès ne doit être ouvert que par du personnel qualifié pour nettoyer l’intérieur du sealer. Consultez lesinstructions de maintenance préventive pour ce qui concerne la manière de nettoyer l’intérieur du sealer. Le nettoyagene doit être effectué que par du personnel formé sur les lieux. N’ouvrez pas le panneau d’accès ou n’inclinezpas le sealer si l’échantillon s’écoule de l’unité.Changement des fusiblesLes fusibles sont situés dans la boîte à fusibles, juste au-dessus du commutateur. Si vous devez changer un fusible, mettezvotre sealer hors tension et débranchez le cordon d’alimentation avant d’ouvrir la boîte à fusibles. Utilisez des fusibles de 6Amp Buss MDL-6 ou leur équivalent dans un sealer de 115V et des fusibles de 4 Amp Buss GDC-4 ou leur équivalent dansun sealer de 230V.9
En cas de panne (Troubleshooting)Symptômes Mesures recommandéesLe voyant jaune d’alimentation ne s’allume pas.Le voyant jaune d’alimentation s’allume, mais levoyant vert de marche prend plus de 20 minutespour s’allumer ou s’éteint alors que votre sealerest en fonctionnement.Le moteur ne se met pas en marche quand vousinsérez un <strong>Quanti</strong>-<strong>Tray</strong>.Le moteur se met en marche quand vous insérezle <strong>Quanti</strong>-<strong>Tray</strong>, mais ne l’entraîne pascomplètement.• Vérifiez que votre sealer est bien branché.• Assurez-vous que le commutateur soit en position “ON” (sous tension).• Vérifiez les fusibles et changez-les si nécessaire.• Appelez le service technique <strong>IDEXX</strong> ou votre distributeur local.• Assurez-vous que votre sealer ait atteint sa température defonctionnement et que le voyant vert soit allumé.• Assurez-vous que l’arriére blanc de la plaque <strong>Quanti</strong>-<strong>Tray</strong> soit tournéevers vous.• Vérifiez que la plaque est dans le plateau de caoutchouc.• Assurez-vous de bien pousser le plateau de caoutchouc dans la fente,jusqu’à ce que le moteur l’entraîne.• Nettoyez le plateau de caoutchouc.Le <strong>Quanti</strong>-<strong>Tray</strong> et le plateau de caoutchouc sontcoincés dans votre sealer.Votre sealer émet des sifflements quand il scelleou du liquide coule du fond de la machine.• APPUYEZ sur le bouton de retour et tenez-le enfoncé pour mettre enmarche arrière le moteur, jusqu’à ce que le <strong>Quanti</strong>-<strong>Tray</strong> soit éjecté par lafente d’entrée. NOTE : Si le <strong>Quanti</strong>-<strong>Tray</strong> est complètement entré dansvotre sealer, n’utilisez pas le bouton de retour, parce que cela risque decoincer le <strong>Quanti</strong>-<strong>Tray</strong> à l’intérieur. Par contre, faites sortir le plateaude caoutchouc par la fente de sortie en tirant dessus.• Ceci fait partie de l’utilisation normale lorsque les plaques sont tropremplies. Ne remplissez pas les plaques avec plus de 100 mld’échantillon. Le sealer est conçue pour enlever automatiquement de laplaque tout excès d’échantillon et le déverser au fond du sealer.Les <strong>Quanti</strong>-<strong>Tray</strong>s se boursouflent, ou leur papierprotecteur jaunit après le scellement.• Appelez le service technique d’<strong>IDEXX</strong> ou votre distributeur local. Lerouleau de votre sealer chauffe peut-être trop.GARANTIE LIMITÉE<strong>IDEXX</strong> Laboratories, Inc. («<strong>IDEXX</strong>») garantit que ce produit est conforme aux caractéristiques décrites dans nos publications jusqu’à la date de péremption indiquée ou, en l’absence de toute mention, pendantune durée de un an à compter de la date de réception dudit produit par l’acheteur original et l’utilisateur final («Acheteur») lorsque les conditions de conservation requises sont respectées et dans desconditions normales d’utilisation conformes à l’usage auquel le produit est destiné. Pendant toute la période où cette garantie est en vigueur, <strong>IDEXX</strong> s’engage à remplacer tout produit non conforme dans les 30jours qui suivent la date de réexpédition à <strong>IDEXX</strong>, et ce sans aucun frais pour l’Acheteur. Dans le cadre de cette garantie limitée, <strong>IDEXX</strong> ne peut en aucune façon être tenue de procéder à des échangesrésultant, en totalité ou en partie, de toute catastrophe, faute ou négligence de la part de l’Acheteur ou de toute personne effectuant une réclamation pour le compte de l’Acheteur, ou de l’utilisation impropre desproduits, ou encore pour des raisons indépendantes aux produits.L’Acheteur doit notifier <strong>IDEXX</strong> de tout produit présumé non conforme pendant la période de garantie. À la discrétion d’<strong>IDEXX</strong>, lesdits produits seront retournés par l’Acheteur, frais d’envoi et d’assuranceprépayés, à l’établissement désigné par <strong>IDEXX</strong> pour y être examinés et testés. <strong>IDEXX</strong> réparera ou remplacera tout produit s’avérant non conforme sous 30 jours après réception par <strong>IDEXX</strong> et retournerapromptement lesdits produits à l’Acheteur, frais d’envoi et d’assurance prépayés. Dans l’éventualité où <strong>IDEXX</strong> établirait, à la suite des tests et examens nécessaires, que lesdits produits ne présententaucune non-conformité couverte par la susdite garantie, <strong>IDEXX</strong> en notifiera l’Acheteur et détruira ou retournera les produits conformément aux instructions de l’Acheteur et aux frais de ce dernier.LES DISPOSITIONS DE LA SUSDITE GARANTIE LIMITÉE TIENNENT LIEU DE TOUTE AUTRE GARANTIE, QU’ELLE SOIT EXPLICITE, IMPLICITE, ÉCRITE OU VERBALE (Y COMPRISTOUTE GARANTIE DE QUALITÉ MARCHANDE OU D’ADAPTATION À UN USAGE PARTICULIER). LA RESPONSABILITÉ D’<strong>IDEXX</strong>’S CONCERNANT LA FABRICATION, LA VENTE OUL’APPROVISIONNEMENT EN PRODUITS, DE MÊME QUE LEUR UTILISATION OU ÉLIMINATION, QUE CELA SOIT BASÉ SUR LA GARANTIE, UN CONTRAT, DES DOMMAGES-INTÉRÊTS OUAUTRE, NE PEUT EXCÉDER LE PRIX D’ACHAT RÉEL DÉBOURSÉ PAR L’ACHETEUR POUR LES PRODUITS. EN AUCUN CAS <strong>IDEXX</strong> NE PEUT ÊTRE TENUE POUR RESPONSABLE ENVERSL’ACHETEUR OU TOUTE AUTRE PERSONNE OU ENTITÉ DE TOUT DOMMAGE PARTICULIER, ACCESSOIRE, INDIRECT OU IMMATÉRIEL NI PASSIBLE DE DOMMAGES-INTÉRÊTSEXEMPLAIRES (Y COMPRIS, MAIS SANS S’Y LIMITER, LES PERTES DE PROFITS OU LA PRIVATION DE JOUISSANCE) SURVENANT POUR DES RAISONS RELEVANT DE LA FABRICATION,LA VENTE OU L’APPROVISIONNEMENT DES PRODUITS. LA SUSDITE GARANTIE EST LIMITÉE À L’ACHETEUR UNIQUEMENT ET NE PEUT S’APPLIQUER À TOUTE AUTRE PERSONNE OUENTITÉ, Y COMPRIS, ET SANS S’Y LIMITER, LES CLIENTS DE L’ACHETEUR.Service technique aux États-Unis/CanadaTéléphone: 1-207-856-0496 ou 1-800-321-0207 Fax 1-207-856-0630Manufacturé sous un ou plusieurs du suivant brevets U.S. nos 4,925,789; 5,429,933; 5,518,892; 5,610,029; 5,620, 865;5,620,895; 5,753,456 et 5,780,259. Autres brevets américains et/ou étrangers enregistrés ou en cours d’enregistrement.*<strong>Quanti</strong>-<strong>Tray</strong>, Defined Substrate Technology, Colilert, Colisure, Enterolert et DST sont soit des marques de fabrique soit desmarques déposées d’<strong>IDEXX</strong> Laboratories, Inc. aux États-Unis et/ou dans d’autres pays.10© 2002 <strong>IDEXX</strong> Laboratories, Inc.
<strong>Manual</strong> del usuario del Sellador<strong>Quanti</strong>-<strong>Tray</strong> * <strong>Model</strong>o <strong>2X</strong>PRECAUCION!PRECAUCIÓN: RIESGO DE ELECTROCUCIÓNNo abrir la tapa de este sellador.Impedir el derrame de agua en este sellador.Poner las muestras de agua en los <strong>Quanti</strong>-<strong>Tray</strong>, tal como se describe en las instrucciones.PRECAUCIÓN: RIESGO DE QUEMADURAS DE LA PIELSu compañía o institución podría disponer de personal cualificado para la limpieza del interior del sellador. El personal cualificado deberá consultarlas Instrucciones de mantenimiento preventivo como guía para limpiar el interior del sellador.<strong>IDEXX</strong> Laboratories, Inc. One <strong>IDEXX</strong> Drive, Westbrook, Maine 04092 USA • Tel.: 1-207-856-0496 1-800-321-0207 Fax: 1-207-856-0630www.idexx.com11
DescripciónEl Sellador <strong>IDEXX</strong> <strong>Quanti</strong>-<strong>Tray</strong>* <strong>Model</strong>o <strong>2X</strong> es un instrumento motorizado con rodillo calentado, diseñado para sellar <strong>IDEXX</strong><strong>Quanti</strong>-<strong>Tray</strong>* (incluyendo <strong>Quanti</strong>-<strong>Tray</strong>*/2000). El sellador se usa con <strong>Quanti</strong>-<strong>Tray</strong>* y con cualquier reactivo <strong>IDEXX</strong> DefinedSubstrate Technology*, como Colilert*, Colilert*-18, Colisure* y Enterolert*, para automatizar el manejo de muestras pararecuento bacterial. Con esta combinación, se pueden obtener recuentos tan precisos como los obtenidos con filtración conmembrana y con la facilidad de una prueba de presencia/ausencia.Diagrama 1Botón de inversiónLuz ámbar de encendidoLuz verde de preparado<strong>Quanti</strong>-<strong>Tray</strong>Suplemento de gomaEstante de entradaPanel de accesoRanura de entradaDiagrama 2Caja de fusiblesEtiqueta de productoVentiladorContador de ciclos (recuento aproximado)Ranura de salidaInterruptor de encendidoCordón de alimentación eléctricaContenido de la unidadCada sellador <strong>Model</strong>o <strong>2X</strong> viene con la unidad selladora básica, un estante de entrada, un suplemento de goma del <strong>Quanti</strong>-<strong>Tray</strong>,tablas MPN, este <strong>Manual</strong> del usuario, y el conjunto de Instrucciones de mantenimiento preventivo. El modelo de 115 V tambiénviene con un cordón eléctrico de 3 patas con puesta a tierra (estándar de EE.UU). El modelo de 230 V también viene con 3cordones eléctricos para uso en: el Reino Unido, Europa (Shuko) y Suiza.Nota: Los suplementos de goma de <strong>Quanti</strong>-<strong>Tray</strong>/2000 (WQTSRBR-2k) se suministran por separado. También se pueden pedirseparadamente suplementos de goma adicionales de <strong>Quanti</strong>-<strong>Tray</strong> (WQTSRBR-51).Instalación• Sacar el contenido del embalaje y guardar el embalaje en caso de que deba ser enviado en el futuro.• Colocar el sellador sobre una superficie nivelada, donde haya suficiente espacio para las bandejas que deban serintroducidas y sacadas. El sellador se puede usar con cualquier orientación (izquierda a derecha o derecha a izquierda).• Acoplar el estante de entrada al sellador, introduciendo las pestañas del estante en las dos ranuras frontales del sellador ypresionando para que quede firmemente en posición.• Verificar que el interruptor esté en posición de apagado.• Enchufar el cordón de alimentación eléctrica en el sellador y el otro extremo en un tomacorriente con pata de puesta a tierray el voltaje que corresponda (véase la Etiqueta del Producto).12
Instrucciones de usoAdvertencia: Si el sellador no se usa de acuerdo con estas instrucciones, se pueden producirlesiones personales, averías al sellador, rotura de otros objetos y/o se podría perder precisión enlos resultados.• Encender la unidad con el interruptor. La luz ámbar de encendido debe quedar iluminada.• Dejar que el sellador se precaliente y que la luz verde de preparado se encienda, indicando que la unidad haalcanzado la temperatura de servicio.• Colocar un suplemento de goma de <strong>Quanti</strong>-<strong>Tray</strong> o <strong>Quanti</strong>-<strong>Tray</strong>/2000 en el estante de entrada, con la abertura grandeorientada hacia el lado opuesto al sellador.• Colocar una <strong>Quanti</strong>-<strong>Tray</strong> o <strong>Quanti</strong>-<strong>Tray</strong>/2000 llena con la muestra y reactivo DST* sobre el suplemento de goma,verificando que quede bien asentada y con cada cavidad de la bandeja en el correspondiente agujero delsuplemento de goma.• Desplazar el suplemento de goma con la bandeja en el sellador hasta que el mecanismo motorizado lo tome ycomience a empujarlo hacia el interior del sellador.• En un período de aproximadamente 15 segundos, la bandeja será sellada y expulsada parcialmente por la partetrasera del sellador. Sacar el suplemento de goma y la bandeja por la parte trasera del sellador.• Si, en cualquier momento dado, es necesario invertir la dirección de tracción del motor que está introduciendo elsuplemento de goma en el sellador (por ejemplo, porque la bandeja se está introduciendo cruzada en el sellador),simplemente oprimir y mantener oprimido el botón de inversión. No invertir la dirección de tracción del motor unavez que el suplemento de goma esté totalmente introducido en la Ranura de Entrada.• Se pueden introducir varios suplementos de goma en forma consecutiva y sin pausas.• Apagar el sellador cuando no sea usado.Especificaciones técnicasPeso35 lbs16 kgDimensiones12" A x 11" L x 16" A30cm A x 27cm L x 39cm ATemperatura ambiente32-90°F0-32°CAlimentación eléctrica115V, 60Hz, 6Amp (model 99-10893-00)230V, 50Hz, 3Amp (model 99-10896-00)LimpiezaEl suplemento de goma se puede desinfectar en autoclave o también se puede limpiar con alcohol isopropílico ohipoclorito de sodio (blanqueador de uso domiciliario), tomando las precauciones necesarias para usar dichos líquidos.Limpiar bien el suplemento de goma si mostrara señales de suciedad sedimentada o pegada.Limpiar el exterior del sellador con un paño blando y seco. También se puede usar un paño blando humedecido conagua, con hipoclorito de sodio (blanqueador) o con alcohol isopropílico, tomando las precauciones necesarias parausar dichos líquidos.Únicamente personal capacitado de mantenimiento debe abrir el panel de acceso para limpiar el interior del sellador. Elpersonal de mantenimiento debe consultar las Instrucciones de mantenimiento preventivo para aplicar losprocedimientos de limpieza interna del sellador. Únicamente personal capacitado debe llevar a cabo lalimpieza en sus instalaciones. No abrir el panel de acceso ni inclinar el sellador, si se notara que la muestra estágoteando.Cambio de fusiblesLos fusibles están en el portafusible ubicado encima del interruptor de encendido. Si fuera necesario cambiar un fusible,apagar el sellador y desenchufar el cordón antes de abrir el portafusible. Usar fusibles de 6 amp. Buss MDL-6 o tipoequivalente en la unidad de 115V, y de 4 amp. Buss GDC-4 o tipo equivalente en la unidad de 230V.13
Diagnóstico de fallasSíntoma Medida correctiva recomendadaLuz ámbar de encendido no se ilumina.Luz ámbar de encendido se ilumina, pero la luzverde de preparado tarda más de20 minutos en iluminarse o se apaga durante el usode la unidad.El motor no arranca cuando se introduce una<strong>Quanti</strong>-<strong>Tray</strong>.El motor arranca cuando se introduce una <strong>Quanti</strong>-<strong>Tray</strong>, pero no traiciona la bandeja hacia adentro.<strong>Quanti</strong>-<strong>Tray</strong> y suplemento de goma se quedanatascadas en el sellador.El sellador hace un ruido silbante fuerte cuandoestá sellando o hay pérdida ogoteo de líquido por la parte inferior del sellador.• Verificar que el sellador esté recibiendo alimentación eléctrica.• Verificar que el interruptor esté en posición de encendido.• Revisar los fusibles y cambiarlos si fuera necesario.• Llamar a Apoyo Técnico de <strong>IDEXX</strong> o al distribuidor local de susproductos.• Verificar que el sellador se haya precalentado y quela luz verde esté encendida.• Verificar que la <strong>Quanti</strong>-<strong>Tray</strong> esté hacia abajo, apoyada sobre elsuplemento de goma, con el papel blanco de fondode la bandeja hacia arriba.• Verificar que la bandeja esté sobre el suplemento de goma.• Asegurarse de empujar firmemente el suplemento de goma contra elrodillo, hasta que el mecanismo motorizado lo tome.• Limpiar el suplemento de goma• Oprimir y MANTENER oprimido el botón de inversión del motor hastaque la bandeja sea expulsada de la ranura de entrada. NOTA: Si labandeja ha entrado completamente en el sellador, no usar el botón deinversión, ya que la bandeja podría quedar atascada adentro. Tirar delsuplemento de goma y sacarlo por la ranura de salida.• Esto es normal cuando se sobrecargan las bandejas. No cargar lasbandejas con más de 100 ml de muestra. El sellador está diseñadopara eliminar automáticamente el exceso de muestra en la bandeja ydesechar dicho exceso por la parte inferior del sellador.Después del sellamiento, la bandeja apareceampollada o con el papel del fondo amarillento.• Llamar a Apoyo Técnico de <strong>IDEXX</strong> o al distribuidor local de susproductos. El rodillo del sellador podría estar trabajando a unatemperatura excesivamente alta.GARANTÍA LIMITADA<strong>IDEXX</strong> Laboratories, Inc. (“<strong>IDEXX</strong>”) garantiza que este producto cumplirá con nuestras especificaciones publicadas cuando se almacene bajo las condiciones apropiadas y se use en la forma normal,apropiada e intentada, hasta la fecha de caducidad de su vida útil declarada o, si no se declara una vida útil, durante un año desde la fecha de entrega de este producto al comprador usuario original(“Comprador”). Durante el período de la garantía correspondiente, <strong>IDEXX</strong> se compromete a reemplazar todos los productos defectuosos dentro de los 30 días después de la fecha de devolución a <strong>IDEXX</strong> ysin costo para el Comprador. Bajo esta garantía limitada, <strong>IDEXX</strong> no estará obligado a efectuar reemplazos que hayan sido el resultado, total o parcialmente, de catástr<strong>of</strong>es, fallas o negligencia delComprador o de cualquiera que presente reclamos a través o a nombre del Comprador, o por el uso impropio de los productos o el uso de los productos de una manera para la cual no han sidodiseñados, o bien, por causas externas a los productos.El Comprador deberá notificar a <strong>IDEXX</strong> sobre cualquier producto que considere no aceptable durante el período de la garantía. A discreción de <strong>IDEXX</strong>, tales productos deberán ser devueltos por elComprador, con el transporte y seguro pago, a las instalaciones indicadas por <strong>IDEXX</strong> para su examen y pruebas. <strong>IDEXX</strong> reparará o reemplazará, dentro de los 30 días de haber sido recibido por <strong>IDEXX</strong>,cualquier producto que se haya demostrado ser no aceptable y devolverá sin demora tales productos al Comprador, con gastos de transporte y seguros prepagos. En caso de que el examen y laspruebas hechos por <strong>IDEXX</strong> no revelen defecto alguno cubierto por la garantía anterior, <strong>IDEXX</strong> informará de esto al Comprador y desechará o devolverá el producto de acuerdo con las instrucciones delComprador, quien será responsable de los gastos consiguientes.LAS PROVISIONES DE LA GARANTÍA LIMITADA ANTERIOR REEMPLAZAN CUALQUIER OTRA GARANTÍA, EXPLÍCITA O IMPLÍCITA, EMITIDA POR ESCRITO U ORALMENTE (INCLUSOCUALQUIER GARANTÍA DE COMERCIABILIDAD O PERTINENCIA PARA UN FIN EN PARTICULAR). LA RESPONSABILIDAD DE <strong>IDEXX</strong> QUE SURJA DE LA FABRICACIÓN, VENTA OABASTECIMIENTO DE LOS PRODUCTOS, SU USO O SU DISPOSICIÓN, SEA QUE SE BASEN EN GARANTÍAS, CONTRATOS, AGRAVIOS U OTROS, NO EXCEDERÁ EL PRECIO DE COMPRAREAL PAGADO POR EL COMPRADOR POR LOS PRODUCTOS. EN NINGÚN CASO SERÁ <strong>IDEXX</strong> RESPONSABLE ANTE EL COMPRADOR O CUALQUIER OTRA PERSONA O ENTIDAD, POR DAÑOSESPECIALES, INCIDENTALES, CONSIGUIENTES, INDIRECTOS O PUNITIVOS (CON INCLUSIÓN, ENTRE OTROS, DE DAÑOS POR PÉRDIDAS DE GANANCIAS O PÉRDIDA DE USO) QUESURJAN DE LA MANUFACTURA, VENTA O ABASTECIMIENTO DE LOS PRODUCTOS. LAS GARANTÍAS MENCIONADAS SE EXTIENDEN SOLAMENTE AL COMPRADOR Y NO SE APLICARÁN ANINGUNA OTRA PERSONA O ENTIDAD, CON INCLUSIÓN Y SIN LIMITARSE A LOS CLIENTES DEL COMPRADOR.Apoyo Técnico de <strong>IDEXX</strong> en EE.UU./CanadáTeléfono 1-207-856-0496 o 1-800-321-0207 Fax 1-207-856-0630Fabricado bajo una o más de las patentes siguientes de los E.U. 4,925,789; 5,429,933; 5,518,892; 5,610,029; 5,620, 865;5,620,895; 5,753,456 y 5,780,259. Otras patentes norteamericanas y/o extranjeras concedidas o pendientes de concesión.*<strong>Quanti</strong>-<strong>Tray</strong>, Defined Substrate Technology, Colilert, Colisure, Enterolert y DST son marcas o marcas registradas de <strong>IDEXX</strong>Laboratories, Inc. en los Estados Unidos de America y/o en otros paises.14© 2002 <strong>IDEXX</strong> Laboratories, Inc.
Sigillatrice <strong>IDEXX</strong> <strong>Quanti</strong>-<strong>Tray</strong>*<strong>Model</strong>lo <strong>2X</strong> <strong>Manual</strong>e d’usoATTENZIONE!ATTENZIONE: PERICOLO DI SCARICHE ELETTRICHENon aprire il coperchio della sigillatrice.Evitare le infiltrazioni d’acqua nella sigillatrice.Versare i campioni d’acqua nella vaschetta <strong>Quanti</strong>-<strong>Tray</strong> seguendo la procedura descritta nell’inserto <strong>Quanti</strong>-<strong>Tray</strong>.ATTENZIONE: PERICOLO DI USTIONILa vostra azienda può preparare del personale specificamente per le operazioni di pulitura all’interno della sigillatrice. Il personale qualificatodovrà consultare le istruzioni per la manutenzione preventiva per informazioni su come pulire l’interno della sigillatrice.<strong>IDEXX</strong> Laboratories, Inc. One <strong>IDEXX</strong> Drive, Westbrook, Maine 04092 USA • Tel.: 1-207-856-0496 1-800-321-0207 Fax: 1-207-856-0630www.idexx.com15
DescrizioneLa Sigillatrice <strong>IDEXX</strong> <strong>Quanti</strong>-<strong>Tray</strong>* <strong>Model</strong>lo <strong>2X</strong> è un apparecchio motorizzato a rullo termico che serve per sigillare le vaschette<strong>IDEXX</strong> <strong>Quanti</strong>-<strong>Tray</strong>* (comprese le vaschette <strong>Quanti</strong>-<strong>Tray</strong>*/2000). Questo apparecchio, che utilizza vaschette <strong>Quanti</strong>-<strong>Tray</strong>* equalsiasi tipo di reagente a tecnologia <strong>IDEXX</strong> Defined Substrate Technology*, come Colilert*, Colilert*-18, Colisure* edEnterolert*, automatizza il processo di gestione dei campioni per la conta batterica. Insieme, questi strumenti forniscono unaconta tanto accurata quanto quella <strong>of</strong>ferta dal metodo della filtrazione a membrana, con il vantaggio delle prove di presenza/assenza.Tasto di inversione di marcia Spia di accensione rossaSchema 1Spia di abilitazione verde<strong>Quanti</strong>-<strong>Tray</strong>Inserto in gommaPiastra di inserimentoSportello di accessoFessura di entrataSchema 2Etichetta di identificazione del prodottoScatola dei fusibiliVentolaContacicli (conteggio approssimato)Fessura di uscitaInterruttore di alimentazioneCavo dialimentazioneContenuto della confezioneTutte le confezioni della Sigillatrice <strong>Model</strong>lo <strong>2X</strong> contengono una sigillatrice, una piastra di inserimento, un inserto in gomma<strong>Quanti</strong>-<strong>Tray</strong>, le tabelle MPN, il presente manuale d’uso e le istruzioni per la manutenzione preventiva. Il modello da 115 V èdotato di cavo tripolare standard U.S.A. con polo di messa a terra. Il modello da 230 V è dotato di 3 cavi di alimentazione: uncavo per la Gran Bretagna, un cavo europeo/Shuko e un cavo per la Svizzera.N.B.: gli inserti in gomma <strong>Quanti</strong>-<strong>Tray</strong>/2000 (WQTSRBR-2k) sono disponibili separatamente. Si possono ordinareseparatamente anche inserti in gomma addizionali <strong>Quanti</strong>-<strong>Tray</strong> (WQTSRBR-51).Installazione• Aprire la confezione e conservarla per future esigenze di trasporto.• Collocare la sigillatrice su una superficie piana, lasciando spazio sufficiente per l’inserimento e l’estrazione delle vaschette.La sigillatrice può essere orientata in qualsiasi direzione (da sinistra a destra o viceversa).• Fissare la piastra di inserimento alla sigillatrice inserendo le linguette nelle due apposite fessure sul pannello anteriore dellasigillatrice, assicurandosi che siano agganciate saldamente.• Assicurarsi che l’interruttore di alimentazione sia spento.• Collegare il cavo di alimentazione alla sigillatrice e inserire la spina in una presa di corrente alimentata alla tensioneopportuna (vedere l’etichetta del prodotto) e dotata di presa di terra.16
Istruzioni d’usoAttenzione: l’uso della sigillatrice in modo non conforme alle presenti istruzioni può provocareinfortuni, danni alla sigillatrice e ad altri oggetti e risultati imprecisi nei test.• Accendere l’interruttore di alimentazione: la spia di accensione si illumina.• Dar tempo alla sigillatrice di scaldarsi e attendere che si accenda la spia verde di abilitazione (possono trascorrerefino a dieci minuti). La sigillatrice non funzionerà fino a quando entrambe le spie, quella rossa di accensione equella verde di abilitazione, non si saranno accese a indicare che l’apparecchio ha raggiunto la temperatura diesercizio necessaria.• Collocare un inserto in gomma vuoto <strong>Quanti</strong>-<strong>Tray</strong> o <strong>Quanti</strong>-<strong>Tray</strong>/2000 sulla piastra di inserimento in modo chel’ampia porzione ritagliata dell’inserto corrisponda all’estremità della piastra più lontana dalla sigillatrice.• Preparare una vaschetta <strong>Quanti</strong>-<strong>Tray</strong> o <strong>Quanti</strong>-<strong>Tray</strong>/2000 con campioni e reagente DST* e collocarla sull’inserto ingomma, assicurandosi che la vaschetta sia alloggiata correttamente e che tutti i pozzetti della vaschetta siano beninseriti nei fori corrispondenti dell’inserto in gomma.• Far scivolare l’inserto in gomma con la piastra all’interno della sigillatrice finché il motore non afferra l’inserto e noncomincia a tirarlo all’interno della sigillatrice.• Trascorsi quindici secondi circa, la vaschetta sarà sigillata e fuoriuscirà in parte sul retro della sigillatrice.Rimuovere l’inserto in gomma e la vaschetta dal retro dell’apparecchio.• Se per qualsiasi motivo si volesse invertire la direzione di marcia del motorino che trascina l’inserto di gomma nellasigillatrice (perché, ad esempio, si è spinta una vaschetta mal allineata all’interno della sigillatrice), si può premere etenere il tasto di inversione di marcia. Tuttavia, questa operazione va evitata se l’inserto in gomma è già statotrascinato interamente nella fessura di entrata.• È possibile inserire diversi inserti in gomma consecutivamente senza interruzione.• Quando non è in funzione, la sigillatrice va spenta.Caratteristiche tecnichePeso35 lbs16 kgDimensionsi (in cm)12" Alt. x 11" Pro. x 16" Lar.30cm Alt. x 27cm Pro. x 39cm Lar.Temperatura ambiente32-90°F0-32°CAlimentazione115V, 60Hz, 6Amp (modello 99-10893-00)230V, 50Hz, 3Amp (modello 99-10896-00)PuliziaL’inserto in gomma può essere sterilizzato in autoclave o pulito con alcol isopropilico o candeggina, prendendo leprecauzioni necessarie per l’uso di detti prodotti. Aver cura di pulire l’inserto in gomma se presenta un accumulo disporco.Per la pulizia della parte esterna della sigillatrice usare un panno s<strong>of</strong>fice e asciutto. Si può anche utilizzare un pannos<strong>of</strong>fice inumidito con acqua, candeggina o alcol isopropilico, prendendo le precauzioni necessarie per l’uso di dettesostanze.Lo sportello di accesso va aperto esclusivamente da personale qualificato per la pulitura all’interno della sigillatrice. Perinformazioni su come pulire l’interno della sigillatrice, consultare le istruzioni per la manutenzione preventiva. Lapulitura va eseguita esclusivamente da personale preparato presso il proprio sito operativo. Nonaprire lo sportello di accesso e non capovolgere la sigillatrice se il campione cola dall’unità.Sostituzione dei fusibiliI fusibili si trovano nella scatola dei fusibili situata sopra l’interruttore di alimentazione. Se occorre sostituire un fusibile,spegnere la sigillatrice e disinserire il cavo di alimentazione dalla sigillatrice prima di aprire la scatola dei fusibili.Utilizzare fusibili Buss MDL-6 da sei ampere, o equivalenti, per il modello a 115 Volt e fusibili Buss GDC-4 da quattroampere, o equivalenti, per il modello a 230 Volt.17
DiagnosticaSintomoLa spia rossa di accensione non si accende.La spia rossa di accensione si accende matrascorrono oltre venti minuti prima che la spiaverde di abilitazione si accenda; oppure la spia diabilitazione si spegne durante il funzionamento.Quando si inserisce una vaschetta <strong>Quanti</strong>-<strong>Tray</strong> ilmotorino non si avvia.Il motore si avvia quando si inserisce unavaschetta <strong>Quanti</strong>-<strong>Tray</strong>, ma non riesce a trascinarecompletamente la vaschetta.La vaschetta <strong>Quanti</strong>-<strong>Tray</strong> e l’inserto in gomma siinceppano nella sigillatrice.La sigillatrice emette un sibilo acuto durantel’operazione di sigillatura o presenta una perdita difluido dal fondo.Le vaschette presentano bolle, oppure la carta dirivestimento è ingiallita dopo l’operazione disigillatura.Rimedio suggerito• Verificare che la sigillatrice sia collegata a una presa alimentata.• Assicurarsi di aver acceso l'interruttore di alimentazione.• Controllare i fusibili e sostituirli se necessario.• Contattare il servizio di assistenza tecnica <strong>IDEXX</strong> oil rivenditore locale.• Assicurarsi che la sigillatrice si sia scaldata e che la spia verdedi abilitazione sia accesa.• Verificare che la vaschetta <strong>Quanti</strong>-<strong>Tray</strong> si trovi rivolta verso ilbasso nell’inserto di gomma, con il rivestimento bianco dellavaschetta rivolto verso l’alto.• Accertarsi che la piastra si trovi nell’inserto in gomma.• Spingere fino in fondo l’inserto in gomma contro il rullo, finché ilmotore non fa presa.• Pulire l’inserto in gomma.• Premere e TENERE PREMUTO il tasto di inversione di marcia perinvertire la direzione del motore fino a quando la vaschetta nonviene espulsa dalla fessura di entrata. N.B.: se la vaschetta èstata trascinata interamente all’interno della sigillatrice, nonusare il tasto di inversione di marcia, per evitare che lavaschetta si incastri all’interno della sigillatrice. Estrarre invecel’inserto in gomma dalla fessura di uscita.• Questo fa parte del funzionamento regolare quando le piastresono eccessivamente piene. Non versare più di 100 ml dicampione nelle piastre. La sigillatrice è concepita per eliminareautomaticamente il campione in eccesso ed eliminarlo nella suaparte inferiore.• Contattare il servizio di assistenza tecnica <strong>IDEXX</strong> o il rivenditorelocale. Il rullo della sigillatrice potrebbe essersi surriscaldato.GARANZIA LIMITATALa <strong>IDEXX</strong> Laboratories, Inc. (“<strong>IDEXX</strong>”) garantisce che i suoi prodotti saranno conformi alle specifiche pubblicate, se conservati in condizioni adeguate e usati nel modo normale, adeguato e inteso, fino alla data di conservazioneindicata, oppure, se non è indicata alcuna data, per un periodo di un anno dalla data di consegna del prodotto all’originale utente finale che lo ha acquistato (“Acquirente”). La <strong>IDEXX</strong>, durante il periodo di garanzia applicabile,concorda di sostituire tutti i prodotti non conformi entro 30 giorni dalla data di restituzione alla <strong>IDEXX</strong> stessa e senza alcun addebito per l’Acquirente. La <strong>IDEXX</strong> non avrà alcun obbligo, secondo i termini di questa garanzialimitata, di effettuare sostituzioni di prodotti i cui difetti derivano, in toto o in parte, da catastr<strong>of</strong>e, colpa o negligenza dell’Acquirente, o di qualsiasi persona che presenti reclamo attraverso o a nome dell’Acquirente, oppurerisultanti da un uso improprio dei prodotti, o l’uso dei prodotti in modi per cui i prodotti non sono stati progettati, o per cause esterne ai prodotti.L’Acquirente avvertirà la <strong>IDEXX</strong> di qualsiasi prodotto che ritiene essere non conforme durante il periodo di garanzia. Ad opzione della <strong>IDEXX</strong>, tali prodotti verranno restituiti dall’Acquirente, con spese di trasporto e assicurazioneprepagate, alla struttura <strong>IDEXX</strong> designata per l’ispezione e la prova. La <strong>IDEXX</strong> riparerà o rimpiazzerà, entro 30 giorni dalla sua ricevuta, qualsiasi prodotto di tal genere trovato essere non conforme, e restituirà prontamente taleprodotto all’Acquirente, con spese di trasporto e assicurazione prepagate. Se l’ispezione e la prova da parte della <strong>IDEXX</strong> non dovesse riscontrare la mancanza di conformità coperto dalla presente garanzia, la <strong>IDEXX</strong> ne notificheràl’Acquirente ed eliminerà o rispedirà il prodotto a sole spese dell’Acquirente.LE CLAUSOLE DELLA PRESENTE GARANZIA LIMITATA SOSTITUISCONO QUALSIASI ALTRA GARANZIA, ESPRESSA O IMPLICITA, SCRITTA OD ORALE (COMPRESE EVENTUALI GARANZIE DI COMMERCIABILITÀ OIDONEITÀ AD UNO SCOPO PARTICOLARE). LA RESPONSABILITÀ DELLA <strong>IDEXX</strong> DERIVANTE DALLA FABBRICAZIONE, DALLA VENDITA O DALLA FORNITURA DEI PRODOTTI, O DAL LORO USO O ELIMINAZIONE,BASATA SU GARANZIA, CONTRATTO, TORTO O ALTRO, NON SUPERERÀ IL PREZZO DI ACQUISTO EFFETTIVO PAGATO DALL’ACQUIRENTE PER I PRODOTTI. IN NESSUN CASO LA <strong>IDEXX</strong> SARÀ RESPONSABILE NEICONFRONTI DELL’ACQUIRENTE O DI QUALSIASI ALTRA PERSONA O ENTITÀ PER QUANTO RIGUARDA DANNI SPECIALI, INCIDENTALI, DERIVATI, INDIRETTI O ESEMPLARI (INCLUSI, SENZA LIMITARSI AD ESSI, LAPERDITA DI PROFITTI O I DANNI DERIVATI DALLA PERDITA DI USO) DERIVANTI DALLA FABBRICAZIONE, DALLA VENDITA O DALLA FORNITURA DEI PRODOTTI. LE PRESENTI GARANZIE SI ESTENDONOESCLUSIVAMENTE ALL’ACQUIRENTE E NON PERTERRANNO A NESSUN’ALTRA PERSONA O ENTITÀ COMPRESI, SENZA LIMITARSI AD ESSI, I CLIENTI DELL’ACQUIRENTE.<strong>IDEXX</strong> US/Canada Asistenza tecnicaTelefono 1-207-856-0496 o 1-800-321-0207Fax 1-207-856-0630Prodotto sotto uno o più di seguenti brevetti USA n. 4,925,789; 5,429,933; 5,518,892; 5,610,029;5,620, 865; 5,620,895; 5,753,456 e 5,780,259. Altri brevetti degli U.S.A. e/o straniericoncessi odomade di brevetto degli U.S.A. e/o stranieri pendenti.*<strong>Quanti</strong>-<strong>Tray</strong>, Defined Substrate Technology, Colilert, Colisure, Enterolert e DST sono marchi diproprietà di, e/o registrati da, <strong>IDEXX</strong> Laboratories, Inc. e protetti negli Stati Uniti e/o in altri paesi.18© 2002 <strong>IDEXX</strong> Laboratories, Inc.
<strong>Quanti</strong>-<strong>Tray</strong> * Versiegelungsgerät<strong>Model</strong>l <strong>2X</strong> BenutzeranleitungVORSICHT!VORSICHT! STROMSCHLAGGEFAHR!Den Deckel des Versiegelungsgerätes nicht öffnen.Das Versiegelungsgerät darf nicht naß werden.Die Wasserproben wie im <strong>Quanti</strong>-<strong>Tray</strong>-Beipackzettel beschrieben in die <strong>Quanti</strong>-<strong>Tray</strong>s füllen.VORSICHT! VERBRENNUNGSGEFAHR!Ihr Unternehmen bzw. Ihre Einrichtung sollte erwägen, Personal speziell in der Reinigung der Innenflächen des Geräts zu schulen. Das qualifiziertePersonal wird auf die Serviceanleitung verwiesen, die die Reinigungsanleitung für die Innenflächen des Versiegelungsgeräts enthält.<strong>IDEXX</strong> Laboratories, Inc. One <strong>IDEXX</strong> Drive, Westbrook, Maine 04092 USA • Tel.: 1-207-856-0496 1-800-321-0207 Fax: 1-207-856-0630www.idexx.com19
BeschreibungDas Versiegelungsgerät <strong>IDEXX</strong> <strong>Quanti</strong>-<strong>Tray</strong>*, <strong>Model</strong>l <strong>2X</strong> ist ein aufheizbares Rollengerät mit Motorantrieb, das zur Versiegelungder <strong>IDEXX</strong> <strong>Quanti</strong>-<strong>Tray</strong>s (einschließlich <strong>Quanti</strong>-<strong>Tray</strong>*/2000s) vorgesehen ist. Dieses Versiegelungsgerät, das zusammen mit<strong>Quanti</strong>-<strong>Tray</strong>s und beliebigen Reagensen von <strong>IDEXX</strong> Defined Substrate Technology* wie z.B. Colilert*, Colilert*-18, Colisure*und Enterolert* verwendet wird, automatisiert die Probenbehandlung bei Bakterienzählungen. Zusammen erbringen sieErgebnisse, die so genau wie die der Membranfiltration, aber so einfach sind wie ein Nachweistest.Diagramm 1<strong>Quanti</strong>-<strong>Tray</strong>GummieinlageEinschubregalRückwärtstasteglebes Licht zur Anzeige desBetriebszustandesgrünes Licht zurAnzeige derBetriebsbereitschaftFrontplatteEinschubschlitzDiagramm 2ProduktetikettSicherungskastenGebläseZykluszähler (ungefähre Angabe)AusgabeschlitzNetzschalterStromkabelLieferumfangZum Lieferumfang jedes Versiegelungsgeräts <strong>Model</strong>l <strong>2X</strong> gehören das Grundgerät, ein Einschubregal, eine <strong>Quanti</strong>-<strong>Tray</strong>Gummieinlage, MPN-Tabellen, diese Benutzeranleitung und Serviceanleitung. Das 115V-<strong>Model</strong>l umfasst ferner ein dreipoligesUS-Norm-Kabel. Das 230V-<strong>Model</strong>l wird auch mit den folgenden drei Kabeln geliefert: je ein Kabel nach GB-, europäischer(Schuko) und Schweizer Norm.Hinweis: Die Gummieinlagen für <strong>Quanti</strong>-<strong>Tray</strong>/2000 (WQTSRBR-2k) sind auch gesondert erhältlich. Gummieinlagen für<strong>Quanti</strong>-<strong>Tray</strong> (WQTSRBR-51) können ebenfalls nachbestellt werden.Aufstellen des Gerätes• Das Gerät auspacken und das Verpackungsmaterial aufbewahren.• Das Versiegelungsgerät auf einer ebenen Fläche aufstellen. Dabei sollte genügend Platz vorhanden sein, daß die <strong>Tray</strong>seingeschoben und ausgestoßen werden können. Das Versiegelungsgerät kann für eine beliebige Richtung ausgerichtetwerden (links nach rechts bzw. rechts nach links).• Nun das Einschubregal durch Einlegen der Stifte am Regal in die zwei Schlitze vorne am Versiegelungsgerät montierenund fest anklemmen.• Der Netzschalter muß ausgeschaltet sein.• Das Kabel zunächst in das Versiegelungsgerät und dann in die entsprechende geerdete Steckdose einstecken. (s. Produktetikett).20
BetriebsanleitungAchtung: Bei unsachgemäßem Gebrauch des Versiegelungsgeräts besteht Verletzungsgefahr, Gefahr vonSchäden am Versiegelungsgerät oder sonstiger Schäden im Arbeitsumfeld und/oder Gerät erbringtungenaue Testergebnisse.• Den Netzschalter einschalten. Das gelbe Licht zur Anzeige des Betriebszustandes muß aufleuchten.• Das Versiegelungsgerät aufwärmen lassen bis das grüne Licht zur Anzeige der Betriebsbereitschaft aufleuchtet(max. 10 min.). Das Versiegelungsgerät ist erst dann betriebsbereit, wenn sowohl das gelbe als auch das grüne Lichtaufleuchten und damit anzeigen, daß das Gerät die Betriebstemperatur erreicht hat.• Eine leere <strong>Quanti</strong>-<strong>Tray</strong>- bzw. <strong>Quanti</strong>-<strong>Tray</strong>/2000-Gummieinlage in das Einschubregal einlegen, wobei der große Ausschnittvom Versiegelungsgerät weg zeigen muß.• Anschließend ein mit Proben und DST* Reagens gefülltes <strong>Quanti</strong>-<strong>Tray</strong> bzw.<strong>Quanti</strong>-<strong>Tray</strong>/2000 auf die Gummieinlage legen,wobei das <strong>Tray</strong> fest auf der Gummieinlage aufliegen, und jede Vertiefung im entsprechenden Loch in der Gummieinlageplaziert sein muß.• Die Gummieinlage mit dem <strong>Tray</strong> in das Versiegelungsgerät einschieben, bis der Motor sie greift und in das Gerät einzieht.• Das <strong>Tray</strong> wird innerhalb von 15 Sekunden versiegelt und teilweise hinten am Versiegelungsgerät wieder ausgeworfen.Die Gummieinlage und das <strong>Tray</strong> von der Rückseite des Versiegelungsgerätes aus entfernen.• Sollte es notwendig sein, den Motor rückwärts laufen zu lassen während die Gummieinlage in das Versiegelungsgeräteingezogen wird (z.B. wenn ein falsch ausgerichtetes <strong>Tray</strong> in das Versiegelungsgerät eingeführt wird), dann einfach dieRückwärtstaste gedrückt halten. Dies darf jedoch nicht geschehen, wenn der Motor die Gummieinlage bereits vollständig inden Einschubschlitz eingezogen hat.• Es können mehrere Gummineinlagen nacheinander ohne Unterbrechung eingegeben werden.• Das Versiegelungsgerät bei Nichtgebrauch ausschalten.Technische DatenGewicht Abmessungen Umgebungstemperatur Stromversorgung35 lbs16 kg12" H x 11" T x 16" B30cm H x 27cm T x 39cm B32-90°F0-32°C115V, 60Hz, 6Amp (<strong>Model</strong>l 99-10893-00)230V, 50Hz, 3Amp (<strong>Model</strong>l 99-10896-00)ReinigungDie Gummieinlage kann autoklaviert oder mit Isopropylalkohol oder einfacher Haushaltsbleiche unter Einhaltung der üblichenSicherheitsvorkehrungen für solche Mittel gereinigt werden. Die Gummieinlage muß gereinigt werden, sobald Ablagerungensichtbar werden.Die Außenseite des Versiegelungsgerätes mit einem weichen, trockenen Tuch reinigen. Es ist auch möglich, ein weiches, mitWasser, Haushaltsbleiche oder Isopropylalkohol getränktes Tuch unter Einhaltung der üblichen Sicherheitsvorkehrungen fürsolche Mittel zu verwenden.Die Frontplatte darf nur von Personal geöffnet werden, das in der Reinigung der Innenflächen des Geräts geschult wurde. DieServiceanleitung enthält die Reinigungsanleitung für die Innenflächen des Versiegelungsgeräts. Die Reinigung des Gerätssollte nur von speziell geschultem Personal an Ihrer Einrichtung vorgenommen werden. Die Frontplatte darfnicht entfernt und das Versiegelungsgerät nicht gekippt werden, wenn Probeflüssigkeit vom Gerät tropft.Auswechseln der SicherungenDie Sicherungen befinden sich im Sicherungskasten über dem Netzschalter. Sollte es notwendig sein, eine Sicherungauszuwechseln, das Versiegelungsgerät vor dem Öffnen des Sicherungskastens abschalten und das Kabel aus dem Gerätabziehen. Für das 115 Volt-Gerät müssen 6 Amp Buss MDL-6 oder gleichwertige Sicherungen, für das 230 Volt-Gerät müssen4 Amp Buss GDC-4 oder gleichwertige Sicherungen verwendet werden.21
Fehlersuche- und behebungProblemDas glebe Licht leuchtet nicht auf.Das gelbe Licht leuchtet auf, aber dasgrüne Licht zur Anzeige derBetriebsbereitschaft braucht mehr als20 Sekunden, um aufzuleuchten bzw.erlischt während des Betriebs.Der Motor startet nicht, wenn ein<strong>Quanti</strong>-<strong>Tray</strong> eingelegt wird.Der Motor startet wenn das<strong>Quanti</strong>-<strong>Tray</strong> eingelegt wird,zieht das <strong>Tray</strong> aber nicht ein.<strong>Quanti</strong>-<strong>Tray</strong> und Bummieinlage bleibenim Versiegelungsgerät stecken.Versiegelungsgerät gibt lauteZischlaute während desVersiegelungsvorgangs von sich oderFlüssigkeit tropft unten aus dem Gerät.Die <strong>Tray</strong>s zeigen Blasen auf oder dieRückenbeschichtung aus Papier istnach dem Versiegelungsvorgang gelb.Lösung• Sicherstellen, daß dem Netzstecker Strom zugeführt wird.• Sicherstellen, daß der Netzschalter eingeschaltet ist.• Die Sicherungen überprüfen und, falls notwendig, auswechslen.• Wenden Sie sich an die technische Unterstützung von <strong>IDEXX</strong>oder an Ihren örtlichen Vertriebshändler.• Sicherstellen, daß das Versiegelungsgerät aufgewärmt ist und das grüne Licht zurAnzeige der Betriebsbereitschaft leuchtet.• Sicherstellen, daß das <strong>Quanti</strong>-<strong>Tray</strong> richtig auf der Gummieinlage aufliegt und dieweiße Rückseite des <strong>Tray</strong>s nach oben zeigt.• Darauf achten, dass das <strong>Tray</strong> in der Gummieinlage aufliegt.• Sicherstellen, daß die Gummieinlage fest in die Rollen eingelegt ist bis der Motorsie einzieht.• Die Gummieinlage reinigen.• Die Rückwärtstaste gedrückt HALTEN bis der Motor rückwärts läuft und das <strong>Tray</strong>durch den Einschubschlitz auswirft.HINWEIS: Ist das <strong>Tray</strong> bereits vollständig in das Versiegelungsgerät eingezogen,darf die Rückwärtstaste nicht mehr benutzt werden, da sonst die Möglichkeit besteht,daß sich das <strong>Tray</strong> im Versiegelungsgerät verklemmt. Ist das <strong>Tray</strong> bereits vollständigeingezogen, die Gummieinlage durch den Ausgabeschlitz ziehen.• Das ist normal, wenn die <strong>Tray</strong>s zu voll sind. Höchstens 100 ml Probeflüssigkeit indie <strong>Tray</strong>s füllen. Das Versiegelungsgerät ist so ausgelegt, dass es automatischüberschüssige Probeflüssigkeit aus dem <strong>Tray</strong> entfernt und diese dann nach unten imGerät abgibt.• Wenden Sie sich an die technische Unterstützung von <strong>IDEXX</strong> oder an Ihren örtlichenVertriebshändler. Die Temperatur der heißen Rollen des Versiegelungsgerätes istwahrscheinlich zu hoch.EINGESCHRÄNKTE GARANTIE<strong>IDEXX</strong> Laboratories, Inc. („<strong>IDEXX</strong>“) garantiert, dass dieses Produkt bis zum aufgedruckten Haltbarkeitsdatum oder, wenn kein solches Verfallsdatum angegeben ist, bis zu einem Jahr ab Datum derLieferung dieses Produkts an den Original-Endverbraucher/Käufer („Käufer“) den angegebenen Spezifikationen entspricht, wenn es unter den vorgeschriebenen Bedingungen gelagert wird und für dennormalen, vorgesehenen Verwendungszweck verwendet wird. <strong>IDEXX</strong> erklärt sich während der anwendbaren Garantiezeit bereit, Produkte, die nicht den angegebenen Spezifikationen entsprechen,innerhalb von 30 Tagen nach dem Datum der Rückgabe an <strong>IDEXX</strong> ohne Kosten für den Käufer zu ersetzen. <strong>IDEXX</strong> ist im Rahmen dieser eingeschränkten Garantie nicht zu Ersatzleistungen verpflichtet, diesich ganz oder teilweise aus Katastrophen, Fehlern oder Fahrlässigkeit des Käufers oder aus Ansprüchen durch Vermittlung oder im Namen des Käufers oder aus einer falschen oder nicht derZweckbestimmung entsprechenden Verwendung des Produkts oder aus produktexternen Ursachen ergeben.Der Käufer ist verpflichtet, <strong>IDEXX</strong> über Produkte in Kenntnis zu setzen, die während der Garantiezeit mutmaßlich nicht den angegebenen Spezifikationen entsprechen. Nach Ermessen von <strong>IDEXX</strong> sindsolche Produkte vom Käufer an die designierte Einrichtung zwecks Prüfung und Test einzusenden. Die Transport- und Versicherungskosten sind im Voraus zu entrichten. Wenn sich das Produkt bei derPrüfung als nicht den angegebenen Spezifikationen entsprechend erweist, wird es von <strong>IDEXX</strong> innerhalb von 30 Tagen nach Eingang bei <strong>IDEXX</strong> repariert oder ersetzt und dem Käufer unverzüglich unterVorausbezahlung der Transport- und Versicherungskosten zugestellt. Sollte die von <strong>IDEXX</strong> durchgeführte Prüfung und der Test keine durch die oben beschriebene Garantie abgedeckte Nichtentsprechungder angegebenen Spezifikationen ergeben, wird der Käufer dahingehend informiert und das Produkt entsorgt oder gemäß den Anweisungen des Käufers auf Kosten des Käufers zurückgesandt.DIE BESTIMMUNGEN DER OBEN BESCHRIEBENEN EINGESCHRÄNKTEN GARANTIE GELTEN ANSTELLE ANDERER AUSDRÜCKLICHER ODER STILLSCHWEIGENDER, SCHRIFTLICHER ODERMÜNDLICHER GARANTIEN (EINSCHLIEßLICH ZUSICHERUNG ALLGEMEINER GEBRAUCHSTAUGLICHKEIT ODER EIGNUNG FÜR EINEN BESTIMMTEN ZWECK). DIE HAFTUNG SEITENS<strong>IDEXX</strong>, DIE AUS DER HERSTELLUNG, DEM VERKAUF ODER DER LIEFERUNG DER PRODUKTE ODER IHRER VERWENDUNG BZW. VERFÜGUNG ENTSTEHT, OB AUF DER GRUNDLAGE VONGARANTIE, VERTRAG, SCHADENSERSATZRECHT ODER EINER ANDEREN GRUNDLAGE, GEHT NICHT ÜBER DEN TATSÄCHLICHEN, VOM KÄUFER FÜR DAS PRODUKT GEZAHLTENKAUFPREIS HINAUS. IN KEINEM FALL IST <strong>IDEXX</strong> DEM KÄUFER ODER EINER ANDEREN PERSON ODER JURISTISCHEN PERSON GEGENÜBER HAFTBAR FÜR SONDER-, NEBEN-, FOLGE-,INDIREKTE ODER ÜBER DEN VERURSACHTEN SCHADEN HINAUSGEHENDE SCHÄDEN (EINSCHLIEßLICH, OHNE AUF DIESE BESCHRÄNKT ZU SEIN, SCHÄDEN DURCH ENTGANGENEGEWINNE ODER ENTGANGENEN NUTZEN), DIE SICH AUS DER HERSTELLUNG, DEM VERKAUF ODER DER LIEFERUNG DER PRODUKTE ERGEBEN. DIE VORSTEHENDEN GARANTIENERSTRECKEN SICH NUR AUF DEN KÄUFER UND GELTEN FÜR KEINE ANDERE PERSON ODER JURISTISCHE PERSON, EINSCHLIEßLICH UND OHNE EINSCHRÄNKUNG, KUNDEN DESKÄUFERS.<strong>IDEXX</strong>/US Technische UnterstützungTelefon 1-207-856-0496 oder 1-800-321-0207 Fax 1-207-856-0630Hergestellt unter einem oder mehr der folgenden US-Patente 4,925,789; 5,429,933; 5,518,892; 5,610,029; 5,620,865; 5,620,895; 5,753,456 und 5,780,259. Andere U.S. und/oder ausländische Patente erteilt oder angemeldet.*<strong>Quanti</strong>-<strong>Tray</strong>, Defined Substrate Technology, Colilert, Colisure, Enterolert und DST sind entweder Schutzmarken odereingetragene Schutzmarken von <strong>IDEXX</strong> Laboratories, Inc. in den Vereinigten Staaten und/oder in anderen Ländern.22© 2002 <strong>IDEXX</strong> Laboratories, Inc.