Axis P3367-VE Installation Guide - Use-IP
Axis P3367-VE Installation Guide - Use-IP
Axis P3367-VE Installation Guide - Use-IP

Create successful ePaper yourself
Turn your PDF publications into a flip-book with our unique Google optimized e-Paper software.
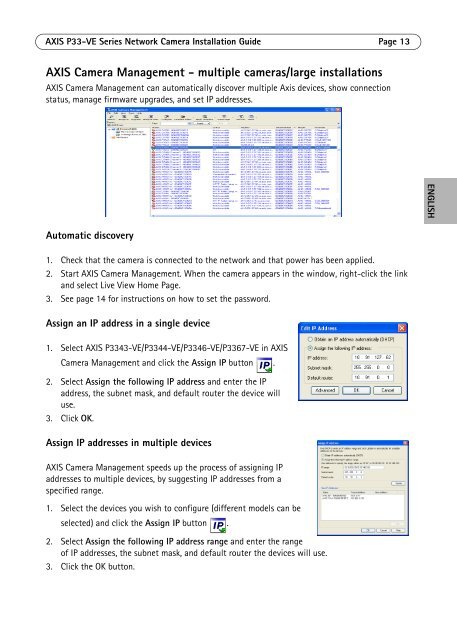
AXIS P33-<strong>VE</strong> Series Network Camera <strong>Installation</strong> <strong>Guide</strong> Page 13AXIS Camera Management - multiple cameras/large installationsAXIS Camera Management can automatically discover multiple <strong>Axis</strong> devices, show connectionstatus, manage firmware upgrades, and set <strong>IP</strong> addresses.ENGLISHAutomatic discovery1. Check that the camera is connected to the network and that power has been applied.2. Start AXIS Camera Management. When the camera appears in the window, right-click the linkand select Live View Home Page.3. See page 14 for instructions on how to set the password.Assign an <strong>IP</strong> address in a single device1. Select AXIS P3343-<strong>VE</strong>/P3344-<strong>VE</strong>/P3346-<strong>VE</strong>/<strong>P3367</strong>-<strong>VE</strong> in AXISCamera Management and click the Assign <strong>IP</strong> button .2. Select Assign the following <strong>IP</strong> address and enter the <strong>IP</strong>address, the subnet mask, and default router the device willuse.3. Click OK.Assign <strong>IP</strong> addresses in multiple devicesAXIS Camera Management speeds up the process of assigning <strong>IP</strong>addresses to multiple devices, by suggesting <strong>IP</strong> addresses from aspecified range.1. Select the devices you wish to configure (different models can beselected) and click the Assign <strong>IP</strong> button .2. Select Assign the following <strong>IP</strong> address range and enter the rangeof <strong>IP</strong> addresses, the subnet mask, and default router the devices will use.3. Click the OK button.