

Brochure Ellistra français / english - Implants International
Brochure Ellistra français / english - Implants International
Brochure Ellistra français / english - Implants International

You also want an ePaper? Increase the reach of your titles
YUMPU automatically turns print PDFs into web optimized ePapers that Google loves.
5 Choix de la taille de la cupule press-fit<br />
La cupule appropriée aura la taille de la fraise utilisée<br />
en dernier.<br />
Le diamètre réel, mesuré à la périphérie de la cupule, a<br />
2,0mm de plus par rapport à la désignation nominale.<br />
Par exemple, une fraise de taille 52 correspond à une<br />
cupule de taille 52 car une cupule de taille 52 a un<br />
diamètre réel à la périphérie de 54mm.<br />
5 Selection of the appropriate press-fit shell<br />
The press-fit shell should have the same size as the last reamer used.<br />
The actual diameter, as measured at the periphery of the shell, is 2 mm larger than the nominal diameter.<br />
For instance, Size 52 reamer corresponds to Size 52 shell (with a peripheral diameter of 54 mm).<br />
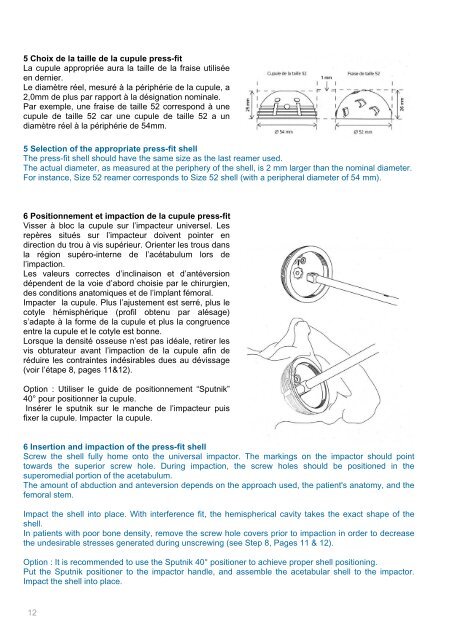
6 Positionnement et impaction de la cupule press-fit<br />
Visser à bloc la cupule sur l’impacteur universel. Les<br />
repères situés sur l’impacteur doivent pointer en<br />
direction du trou à vis supérieur. Orienter les trous dans<br />
la région supéro-interne de l’acétabulum lors de<br />
l’impaction.<br />
Les valeurs correctes d’inclinaison et d’antéversion<br />
dépendent de la voie d’abord choisie par le chirurgien,<br />
des conditions anatomiques et de l’implant fémoral.<br />
Impacter la cupule. Plus l’ajustement est serré, plus le<br />
cotyle hémisphérique (profil obtenu par alésage)<br />
s’adapte à la forme de la cupule et plus la congruence<br />
entre la cupule et le cotyle est bonne.<br />
Lorsque la densité osseuse n’est pas idéale, retirer les<br />
vis obturateur avant l’impaction de la cupule afin de<br />
réduire les contraintes indésirables dues au dévissage<br />
(voir l’étape 8, pages 11&12).<br />
Option : Utiliser le guide de positionnement “Sputnik”<br />
40° pour positionner la cupule.<br />
Insérer le sputnik sur le manche de l’impacteur puis<br />
fixer la cupule. Impacter la cupule.<br />
6 Insertion and impaction of the press-fit shell<br />
Screw the shell fully home onto the universal impactor. The markings on the impactor should point<br />
towards the superior screw hole. During impaction, the screw holes should be positioned in the<br />
superomedial portion of the acetabulum.<br />
The amount of abduction and anteversion depends on the approach used, the patient's anatomy, and the<br />
femoral stem.<br />
Impact the shell into place. With interference fit, the hemispherical cavity takes the exact shape of the<br />
shell.<br />
In patients with poor bone density, remove the screw hole covers prior to impaction in order to decrease<br />
the undesirable stresses generated during unscrewing (see Step 8, Pages 11 & 12).<br />
Option : It is recommended to use the Sputnik 40° positioner to achieve proper shell positioning.<br />
Put the Sputnik positioner to the impactor handle, and assemble the acetabular shell to the impactor.<br />
Impact the shell into place.<br />
12