

Brochure Ellistra français / english - Implants International
Brochure Ellistra français / english - Implants International
Brochure Ellistra français / english - Implants International

Create successful ePaper yourself
Turn your PDF publications into a flip-book with our unique Google optimized e-Paper software.
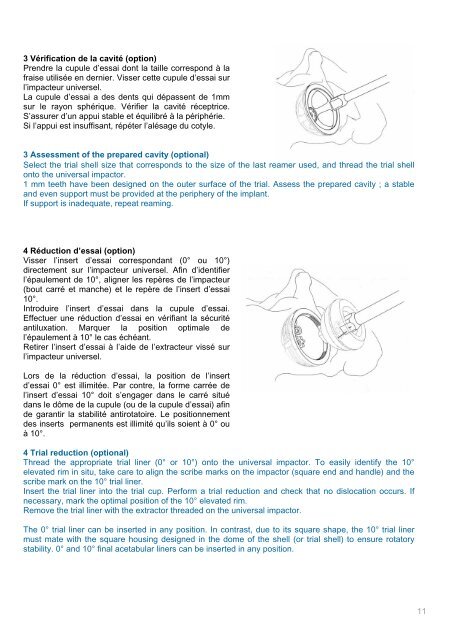
3 Vérification de la cavité (option)<br />
Prendre la cupule d’essai dont la taille correspond à la<br />
fraise utilisée en dernier. Visser cette cupule d’essai sur<br />
l’impacteur universel.<br />
La cupule d’essai a des dents qui dépassent de 1mm<br />
sur le rayon sphérique. Vérifier la cavité réceptrice.<br />
S’assurer d’un appui stable et équilibré à la périphérie.<br />
Si l’appui est insuffisant, répéter l’alésage du cotyle.<br />
3 Assessment of the prepared cavity (optional)<br />
Select the trial shell size that corresponds to the size of the last reamer used, and thread the trial shell<br />
onto the universal impactor.<br />
1 mm teeth have been designed on the outer surface of the trial. Assess the prepared cavity ; a stable<br />
and even support must be provided at the periphery of the implant.<br />
If support is inadequate, repeat reaming.<br />
4 Réduction d’essai (option)<br />
Visser l’insert d’essai correspondant (0° ou 10°)<br />
directement sur l’impacteur universel. Afin d’identifier<br />
l’épaulement de 10°, aligner les repères de l’impacteur<br />
(bout carré et manche) et le repère de l’insert d’essai<br />
10°.<br />
Introduire l’insert d’essai dans la cupule d’essai.<br />
Effectuer une réduction d’essai en vérifiant la sécurité<br />
antiluxation. Marquer la position optimale de<br />
l’épaulement à 10° le cas échéant.<br />
Retirer l’insert d’essai à l’aide de l’extracteur vissé sur<br />
l’impacteur universel.<br />
Lors de la réduction d’essai, la position de l’insert<br />
d’essai 0° est illimitée. Par contre, la forme carrée de<br />
l’insert d’essai 10° doit s’engager dans le carré situé<br />
dans le dôme de la cupule (ou de la cupule d’essai) afin<br />
de garantir la stabilité antirotatoire. Le positionnement<br />
des inserts permanents est illimité qu’ils soient à 0° ou<br />
à 10°.<br />
4 Trial reduction (optional)<br />
Thread the appropriate trial liner (0° or 10°) onto the universal impactor. To easily identify the 10°<br />
elevated rim in situ, take care to align the scribe marks on the impactor (square end and handle) and the<br />
scribe mark on the 10° trial liner.<br />
Insert the trial liner into the trial cup. Perform a trial reduction and check that no dislocation occurs. If<br />
necessary, mark the optimal position of the 10° elevated rim.<br />
Remove the trial liner with the extractor threaded on the universal impactor.<br />
The 0° trial liner can be inserted in any position. In contrast, due to its square shape, the 10° trial liner<br />
must mate with the square housing designed in the dome of the shell (or trial shell) to ensure rotatory<br />
stability. 0° and 10° final acetabular liners can be inserted in any position.<br />
11