FRIDA Diamant-Wandsäge WS75, WS75H - WEKA Elektrowerkzeuge
FRIDA Diamant-Wandsäge WS75, WS75H - WEKA Elektrowerkzeuge
FRIDA Diamant-Wandsäge WS75, WS75H - WEKA Elektrowerkzeuge
Create successful ePaper yourself
Turn your PDF publications into a flip-book with our unique Google optimized e-Paper software.
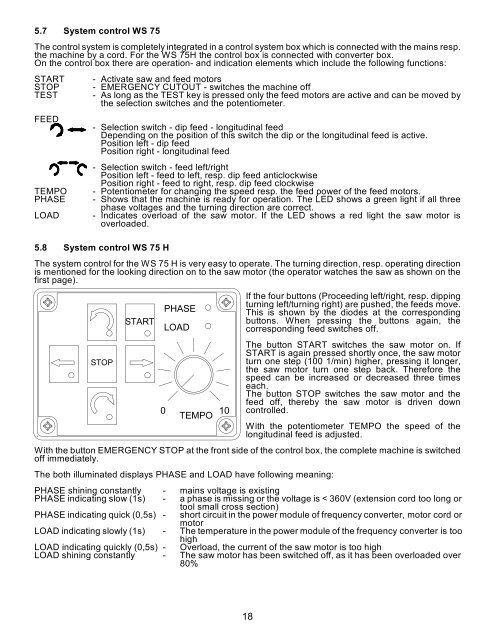
5.7 System control WS 75<br />
The control system is completely integrated in a control system box which is connected with the mains resp.<br />
the machine by a cord. For the WS 75H the control box is connected with converter box.<br />
On the control box there are operation- and indication elements which include the following functions:<br />
START - Activate saw and feed motors<br />
STOP - EMERGENCY CUTOUT - switches the machine off<br />
TEST - As long as the TEST key is pressed only the feed motors are active and can be moved by<br />
the selection switches and the potentiometer.<br />
FEED<br />
- Selection switch - dip feed - longitudinal feed<br />
Depending on the position of this switch the dip or the longitudinal feed is active.<br />
Position left - dip feed<br />
Position right - longitudinal feed<br />
- Selection switch - feed left/right<br />
Position left - feed to left, resp. dip feed anticlockwise<br />
Position right - feed to right, resp. dip feed clockwise<br />
TEMPO - Potentiometer for changing the speed resp. the feed power of the feed motors.<br />
PHASE - Shows that the machine is ready for operation. The LED shows a green light if all three<br />
phase voltages and the turning direction are correct.<br />
LOAD - Indicates overload of the saw motor. If the LED shows a red light the saw motor is<br />
overloaded.<br />
5.8 System control WS 75 H<br />
The system control for the WS 75 H is very easy to operate. The turning direction, resp. operating direction<br />
is mentioned for the looking direction on to the saw motor (the operator watches the saw as shown on the<br />
first page).<br />
If the four buttons (Proceeding left/right, resp. dipping<br />
turning left/turning right) are pushed, the feeds move.<br />
This is shown by the diodes at the corresponding<br />
buttons. When pressing the buttons again, the<br />
corresponding feed switches off.<br />
The button START switches the saw motor on. If<br />
START is again pressed shortly once, the saw motor<br />
turn one step (100 1/min) higher, pressing it longer,<br />
the saw motor turn one step back. Therefore the<br />
speed can be increased or decreased three times<br />
each.<br />
The button STOP switches the saw motor and the<br />
feed off, thereby the saw motor is driven down<br />
controlled.<br />
With the potentiometer TEMPO the speed of the<br />
longitudinal feed is adjusted.<br />
With the button EMERGENCY STOP at the front side of the control box, the complete machine is switched<br />
off immediately.<br />
The both illuminated displays PHASE and LOAD have following meaning:<br />
PHASE shining constantly - mains voltage is existing<br />
PHASE indicating slow (1s) - a phase is missing or the voltage is < 360V (extension cord too long or<br />
tool small cross section)<br />
PHASE indicating quick (0,5s) - short circuit in the power module of frequency converter, motor cord or<br />
motor<br />
LOAD indicating slowly (1s) - The temperature in the power module of the frequency converter is too<br />
high<br />
LOAD indicating quickly (0,5s) - Overload, the current of the saw motor is too high<br />
LOAD shining constantly - The saw motor has been switched off, as it has been overloaded over<br />
80%<br />
18


