Les programmes - Sport-elec.com
Les programmes - Sport-elec.com
Les programmes - Sport-elec.com

You also want an ePaper? Increase the reach of your titles
YUMPU automatically turns print PDFs into web optimized ePapers that Google loves.
STEP 5 : Start your unit following the “Starting the unit” procedure described in paragraph II.<br />
Contractions should be firm but never painful. If you feel an unpleasant sensation around the <strong>elec</strong>trodes : bring the<br />
power-on key back to minimum, move the <strong>elec</strong>trode(s) and gradually increase the power. Once the adjustments<br />
have been optimised in this way, leave your appliance to work for the full duration of the programme.<br />
STEP 6 : Once the program is <strong>com</strong>plete, disconnect the <strong>elec</strong>trodes from the (CEV4 or CEV8) connector, then<br />
the latter from the unit. Then pull off the <strong>elec</strong>trodes gently, dampen them slightly with a few drops of water,<br />
then return them carefully onto their support. Store the adhesive <strong>elec</strong>trodes in a fresh location, in a plastic bag<br />
(e.g. vegetable container in the refrigerator).<br />
B / BELT FUNCTION<br />
The multifunction belt can be used <strong>com</strong>pleter, or separated into 2 to form 2 half-belts.<br />
The full belt must be used on the stomach, buttocks, lower back areas.<br />
Once unfastened, the 2 “half-belts” can be used on the arms, thighs, or calf.<br />
The multifunction belt has built-in <strong>elec</strong>trodes on which the SPORT-ELEC ® cream is applied.<br />
This cream enhances contact between the <strong>elec</strong>trodes and the skin. Its massaging and <strong>elec</strong>tro conducting<br />
properties improve <strong>com</strong>fort of use and enhance stimulation. The cream can be also used by massaging on<br />
the body. If you want to buy the SPORT-ELEC ® cream, please order directly by dialing<br />
00.33.2.32.96.50.50 or go to www.sport-<strong>elec</strong>.<strong>com</strong>, or contact your local supplier.<br />
You may not use the belt without the cream provided.<br />
Do not use any cream other than that provided by SPORT ELEC ® .<br />
PRESENTATION OF THE BELT :<br />
• Front side : (photo III-A page 3)<br />
1 - Central fasteners 2 - Wire storage 3 - Connection terminals 4 - Scratch strip<br />
• Electrodes side : (photo III –B page 3)<br />
4 built-in <strong>elec</strong>trodes<br />
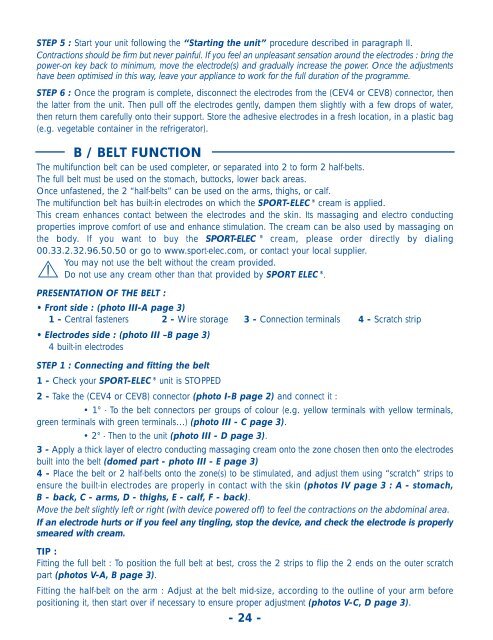
STEP 1 : Connecting and fitting the belt<br />
1 - Check your SPORT-ELEC ® unit is STOPPED<br />
2 - Take the (CEV4 or CEV8) connector (photo I-B page 2) and connect it :<br />
• 1° - To the belt connectors per groups of colour (e.g. yellow terminals with yellow terminals,<br />
green terminals with green terminals…) (photo III - C page 3).<br />
• 2° - Then to the unit (photo III - D page 3).<br />
3 - Apply a thick layer of <strong>elec</strong>tro conducting massaging cream onto the zone chosen then onto the <strong>elec</strong>trodes<br />
built into the belt (domed part - photo III - E page 3)<br />
4 - Place the belt or 2 half-belts onto the zone(s) to be stimulated, and adjust them using “scratch” strips to<br />
ensure the built-in <strong>elec</strong>trodes are properly in contact with the skin (photos IV page 3 : A - stomach,<br />
B - back, C - arms, D - thighs, E - calf, F - back).<br />
Move the belt slightly left or right (with device powered off) to feel the contractions on the abdominal area.<br />
If an <strong>elec</strong>trode hurts or if you feel any tingling, stop the device, and check the <strong>elec</strong>trode is properly<br />
smeared with cream.<br />
TIP :<br />
Fitting the full belt : To position the full belt at best, cross the 2 strips to flip the 2 ends on the outer scratch<br />
part (photos V-A, B page 3).<br />
Fitting the half-belt on the arm : Adjust at the belt mid-size, according to the outline of your arm before<br />
positioning it, then start over if necessary to ensure proper adjustment (photos V-C, D page 3).<br />
- 24 -
![MASSEUR DOS SHIATSU [MC18AH] User Manual ... - Sport-elec.com](https://img.yumpu.com/50566882/1/190x135/masseur-dos-shiatsu-mc18ah-user-manual-sport-eleccom.jpg?quality=85)
![AROMA DIFFUSEUR [KW005] User Manual ... - Sport-elec.com](https://img.yumpu.com/49595450/1/190x135/aroma-diffuseur-kw005-user-manual-sport-eleccom.jpg?quality=85)
![COMBI DENTAIRE [J38COMBI] User Manual - Sport-elec.com](https://img.yumpu.com/45904897/1/190x135/combi-dentaire-j38combi-user-manual-sport-eleccom.jpg?quality=85)
![CEINTURE VIBRANTE [HQM624] User Manual ... - Sport-elec.com](https://img.yumpu.com/41196540/1/182x260/ceinture-vibrante-hqm624-user-manual-sport-eleccom.jpg?quality=85)
![COFFRET MANUCURE [MAN5600] User Manual ... - Sport-elec.com](https://img.yumpu.com/36267354/1/190x135/coffret-manucure-man5600-user-manual-sport-eleccom.jpg?quality=85)