Installation instructions and User guide Instructions ... - Fisher & Paykel
Installation instructions and User guide Instructions ... - Fisher & Paykel
Installation instructions and User guide Instructions ... - Fisher & Paykel

You also want an ePaper? Increase the reach of your titles
YUMPU automatically turns print PDFs into web optimized ePapers that Google loves.
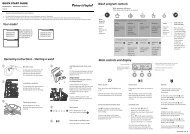
<strong>Installation</strong> <strong>instructions</strong>:<br />
1 Ensure the refrigerator is NOT plugged into a power supply.<br />
2 Locate a cold water supply/feed only suitable for a water<br />
connection. Tee <strong>and</strong> tap fitting is not supplied.<br />
3 Connect the 8” (200 mm) blue tubing to the outlet of the<br />
PRV (blue collet) <strong>and</strong> the inlet connection of the water filter<br />
cartridge as shown in Diagram 1. Gently pull on both ends to<br />
ensure it is locked.<br />
4 Connect the white ¼” (6 mm) tubing to the outlet of the<br />
water filter cartridge as shown in Diagram 2. Gently pull to<br />
ensure it is locked.<br />
5 Measure the required length of tubing to run from the PRV<br />
to the water connection point.<br />
6 Cut the tubing making sure the ends are square <strong>and</strong> clean.<br />
7 Connect the tubing to the faucet connection <strong>and</strong> the base<br />
of the PRV (white collet) <strong>and</strong> then to the faucet as shown in<br />
Diagram 3. Please note that the faucet connection supplied<br />
should fit most installation situations.<br />
8 Connect one locking key to each side of the water filter<br />
cartridge in between the cartridge <strong>and</strong> the locking<br />
collet as shown in Diagram 4.<br />
9 To flush the water filter of any trapped air, harmless<br />
carbon fines <strong>and</strong> to also check for leaks, aim the end<br />
of the tubing into a bucket, turn isolating faucet on<br />
<strong>and</strong> run at least 10 qt (10 L) of water through. Once<br />
complete, turn isolating faucet off.<br />
10 Locate desired position for water filter noting carefully<br />
the following points:<br />
■■ It is recommended to fit the water filter in a<br />
vertical orientation with the water filter head at the<br />
top. This will minimize water leakage when replacing<br />
cartridge.<br />
■■ Ensure the filter is in a convenient location to access<br />
every 6 months for replacement. We suggest that this<br />
location is beside the water filter supply faucet in a<br />
cupboard beside the refrigerator.<br />
■■ A minimum clearance of 2 ½” (64 mm) from the<br />
bottom of the filter cartridge is required to perform<br />
cartridge removal.<br />
■■ Do not screw water filter to refrigerator.<br />
<strong>Installation</strong> <strong>instructions</strong><br />
Diagram 1<br />
Fig.3 PRV connection<br />
Diagram 2<br />
Fig.4 Waterline connection<br />
to refrigerator<br />
Diagram 3<br />
Fig.5 Faucet connection<br />
INLET<br />
Diagram 4<br />
Fig.6 Locking key<br />
9<br />
US<br />
CA