Installation instructions and User guide Instructions ... - Fisher & Paykel
Installation instructions and User guide Instructions ... - Fisher & Paykel
Installation instructions and User guide Instructions ... - Fisher & Paykel

You also want an ePaper? Increase the reach of your titles
YUMPU automatically turns print PDFs into web optimized ePapers that Google loves.
US<br />
CA<br />
22<br />
Water filter<br />
All the water to your fridge is filtered to remove impurities through a cartridge located in a<br />
position of your choice outside the refrigerator. This will need changing approximately every<br />
6 months.<br />
■■ There is a replacement indicator icon on the control panel which will appear when the filter<br />
needs replacing. It will flash, as a reminder, when water is dispensed.<br />
■■ Replacement cartridges are available from your authorized <strong>Fisher</strong> & <strong>Paykel</strong> Dealer. The details of<br />
the replacement cartridge are on the label on the cartridge.<br />
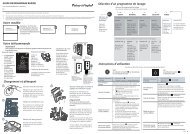
Changing the water filter cartridge<br />
It is not necessary to turn off the water supply before attempting to change the water filter<br />
cartridge.<br />
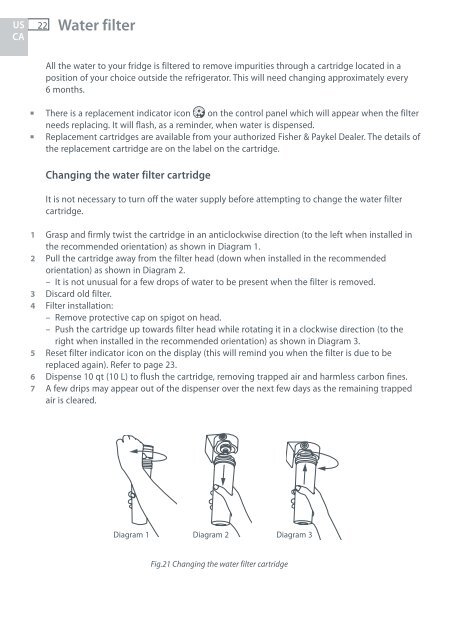
1 Grasp <strong>and</strong> firmly twist the cartridge in an anticlockwise direction (to the left when installed in<br />
the recommended orientation) as shown in Diagram 1.<br />
2 Pull the cartridge away from the filter head (down when installed in the recommended<br />
orientation) as shown in Diagram 2.<br />
– It is not unusual for a few drops of water to be present when the filter is removed.<br />
3 Discard old filter.<br />
4 Filter installation:<br />
– Remove protective cap on spigot on head.<br />
– Push the cartridge up towards filter head while rotating it in a clockwise direction (to the<br />
right when installed in the recommended orientation) as shown in Diagram 3.<br />
5 Reset filter indicator icon on the display (this will remind you when the filter is due to be<br />
replaced again). Refer to page 23.<br />
6 Dispense 10 qt (10 L) to flush the cartridge, removing trapped air <strong>and</strong> harmless carbon fines.<br />
7 A few drips may appear out of the dispenser over the next few days as the remaining trapped<br />
air is cleared.<br />
Diagram 1 Diagram 2<br />
Diagram 3<br />
Fig.21 Changing the water filter cartridge