convection-steam oven operating and maintenance instructions ...
convection-steam oven operating and maintenance instructions ...
convection-steam oven operating and maintenance instructions ...

Create successful ePaper yourself
Turn your PDF publications into a flip-book with our unique Google optimized e-Paper software.
ISTRUZIONI PER L’UTENTE. INSTRUCTIONS FOR THE USER. ANLEITUNGEN FÜR DEN BENUTZER.<br />
NOTICE POUR L'USAGER. INSTRUCCIONES PARA EL USUARIO.<br />
COMPACT Direct combination <strong>oven</strong>s, gas <strong>and</strong> electric models, Electronic <strong>and</strong> Analogic<br />
4.4 COMANDI E CONTROLLI AUSILIARI.<br />
Modelli ANALOGIC<br />
4.4A Sonda al cuore. (Fig. 4.4A)<br />
I modelli “Analogic” possono, su richiesta, essere consegnati corredati del termostato elettronico con sonda a spillone per controllare l’esatta<br />
temperatura al cuore degli alimenti da cuocere. Questo dispositivo è estremamente utile qu<strong>and</strong>o si devono cuocere grosse pezzature di cibo. Per<br />
l’inserimento della sonda procedere come segue: dopo aver programmato il ciclo di cottura come prima descritto, infilare lo spillone al cuore del<br />
prodotto; attivare il termostato elettronico digit<strong>and</strong>o l’interruttore (A). La temperatura visibile nel termostato<br />
elettronico (B) è quella rilevata dallo spillone al nucleo del cibo. Il campo di regolazione varia da 20° a 99°C; i<br />
valori della temperatura vengono selezionati come segue: premere il pulsante SET sulla dx; nel display apparirà<br />
la temperatura precedentemente selezionata; si accende e lampeggia il LED rosso, entro 15 secondi, modificare<br />
il valore impostato us<strong>and</strong>o i tasti e confermare il nuovo valore premendo il tasto SET. Il lampeggio per 2<br />
secondi del nuovo valore conferma la memorizzazione del nuovo dato. Al rilascio del pulsante SET il display<br />
segnalerà la temperatura rilevata dalla sonda a spillone. Selezionare nel timer la posizione (∞), il forno inizierà<br />
la cottura segnalata dall’accensione del LED verde. Al raggiungimento della temperatura impostata nel<br />
termostato elettronico, una suoneria segnalerà la fine della cottura, si accenderà il led rosso e tutte le funzioni<br />
verranno disabilitate automaticamente.<br />
4.4B Selezione velocità motori. (Fig. 4.4B)<br />
I modelli “ANALOGIC” ad eccezione di quello con capacità 7 x 1/1GN, possono essere forniti con il dispositivo<br />
per selezionare la velocità di rotazione dei ventilatori tra 1400 e 2800 giri/min. La velocità va scelta in base ai tipi<br />
di cibo da cuocere, tenendo presente che nella bassa velocità è consigliabile non superare temperature di<br />
cottura di 230°C.<br />
4.4C Luce interna per l’ illuminazione della camera di cottura. (Fig. 4)<br />
Tutti i modelli “ANALOGIC” sono corredati di lampada di illuminazione interna. La sua attivazione viene<br />
com<strong>and</strong>ata dal pulsante (D).<br />
4.4D Preriscaldo camera cottura.<br />
E’ sempre consigliabile eseguire questa operazione prima di introdurre nella camera del forno i cibi da cuocere;<br />
il tempo necessario al preriscaldamento va impostato tenendo in considerazione che, nel ciclo convezione aria<br />
calda, sono necessari 10 minuti circa per raggiungere la temperatura di 220°C.<br />
Selezionate il tempo e la temperatura desiderata, avviate il forno senza introdurre cibo; al termine del tempo<br />
impostato la suoneria segnalerà che si potrà iniziare la cottura. Nel ciclo vapore si consiglia di eseguire sempre<br />
il preriscaldamento con la manopola del regolatore vapore in posizione di MAX per una durata di 10 minuti,<br />
senza aprire la porta.<br />
4.4E Valvola sfiato camera. (Fig. 4.4C)<br />
Tutti i modelli “ANALOGIC” sono dotati di questo sistema che ha la funzione di regolare l’umidità all’interno<br />
della camera di cottura. L’apertura e la chiusura della valvola di sfiato si eseguono ruot<strong>and</strong>o il pomello (A).<br />
4.4 AUXILIARY COMMANDS AND CONTROLS.<br />
ANALOGIC models<br />
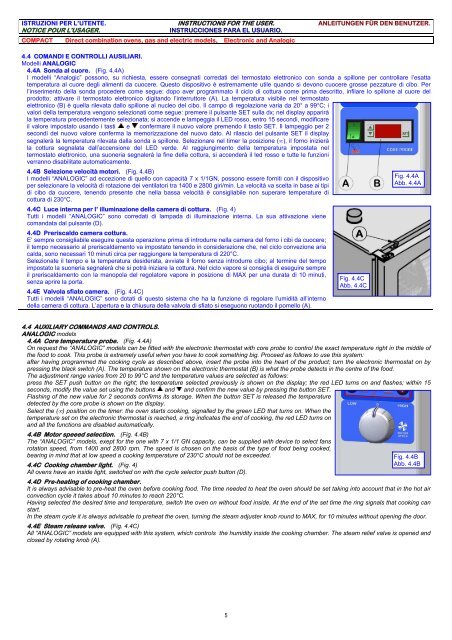
4.4A Core temperature probe. (Fig. 4.4A)<br />
On request the “ANALOGIC” models can be fitted with the electronic thermostat with core probe to control the exact temperature right in the middle of<br />
the food to cook. This probe is extremely useful when you have to cook something big. Proceed as follows to use this system:<br />
after having programmed the cooking cycle as described above, insert the probe into the heart of the product; turn the electronic thermostat on by<br />
pressing the black switch (A). The temperature shown on the electronic thermostat (B) is what the probe detects in the centre of the food.<br />
The adjustment range varies from 20 to 99°C <strong>and</strong> the temperature values are selected as follows:<br />
press the SET push button on the right; the temperature selected previously is shown on the display; the red LED turns on <strong>and</strong> flashes; within 15<br />
seconds, modify the value set using the buttons <strong>and</strong> <strong>and</strong> confirm the new value by pressing the button SET.<br />
Flashing of the new value for 2 seconds confirms its storage. When the button SET is released the temperature<br />
detected by the core probe is shown on the display.<br />
Select the (∞) position on the timer: the <strong>oven</strong> starts cooking, signalled by the green LED that turns on. When the<br />
temperature set on the electronic thermostat is reached, a ring indicates the end of cooking, the red LED turns on<br />
<strong>and</strong> all the functions are disabled automatically.<br />
4.4B Motor speeed selection. (Fig. 4.4B)<br />
The “ANALOGIC” models, exept for the one with 7 x 1/1 GN capacity, can be supplied with device to select fans<br />
rotation speed, from 1400 <strong>and</strong> 2800 rpm. The speed is chosen on the basis of the type of food being cooked,<br />
bearing in mind that at low speed a cooking temperature of 230°C should not be exceeded.<br />
4.4C Cooking chamber light. (Fig. 4)<br />
All <strong>oven</strong>s have an inside light, switched on with the cycle selector push button (D).<br />
4.4D Pre-heating of cooking chamber.<br />
It is always advisable to pre-heat the <strong>oven</strong> before cooking food. The time needed to heat the <strong>oven</strong> should be set taking into account that in the hot air<br />
<strong>convection</strong> cycle it takes about 10 minutes to reach 220°C.<br />
Having selected the desired time <strong>and</strong> temperature, switch the <strong>oven</strong> on without food inside. At the end of the set time the ring signals that cooking can<br />
start.<br />
In the <strong>steam</strong> cycle it is always advisable to preheat the <strong>oven</strong>, turning the <strong>steam</strong> adjuster knob round to MAX, for 10 minutes without opening the door.<br />
4.4E Steam release valve. (Fig. 4.4C)<br />
All “ANALOGIC” models are equipped with this system, which controls the humidity inside the cooking chamber. The <strong>steam</strong> relief valve is opened <strong>and</strong><br />
closed by rotating knob (A).<br />
5<br />
Fig. 4.4C<br />
Abb. 4.4C<br />
Fig. 4.4A<br />
Abb. 4.4A<br />
Fig. 4.4B<br />
Abb. 4.4B