
You also want an ePaper? Increase the reach of your titles
YUMPU automatically turns print PDFs into web optimized ePapers that Google loves.
(10)<br />
Electric Wiring<br />
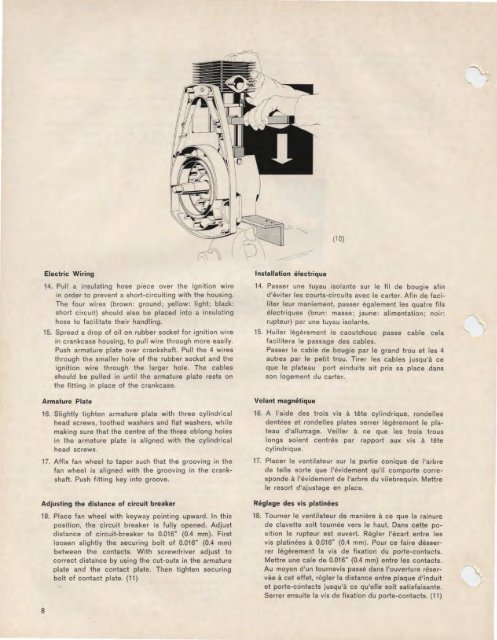
14. Pull a insulating hose piece over the ignition wire<br />
in order to prevent a short-circuiting with the housing.<br />
The four wires (brown: ground; yellow: light; black:<br />
short circuit) should also be placed into a insulating<br />
hose to facilitate their handling.<br />
15. Spread a drop of oil on rubber socket for ignition wire<br />
in crankcase housing, to pull wire through more easily.<br />
Push armature plate over crankshaft. Pull the 4 wires<br />
through the smaller hole of the rubber socket and the<br />
ignition wire through the larger hole. The cables<br />
should be pulled in until the armature plate rests on<br />
the fitting in place of the crankcase.<br />
Armature Plate<br />
16. Slightly tighten armature plate with three cylindrical<br />
head screws, toothed washers and flat washers, while<br />
making sure that the centre of the three oblong holes<br />
in the armature plate is aligned with the cylindrical<br />
head screws.<br />
17. AHix fan wheel to taper such that the g rooving 10 the<br />
fan wheel is aligned with the grooving in the crankshaft.<br />
Push fitting key into groove.<br />
Adjusting the distance of circuit breaker<br />
18. Place fan wheel with keyway pointing upward. In this<br />
position, the circuit breaker is fully opened. Adjust<br />
distance of circuit-breaker to 0.016" (0.4 mm). First<br />
loosen slightly the securing bolt of 0.016" (0.4 mm)<br />
between the contacts. With screwdriver adjust to<br />
correct distance by using the c ut-outs in the armature<br />
plate and the contact plate. Then tighten securing<br />
bolt of contact plate. (11)<br />
Installation electrique<br />
14. Passer une tuyau isolante sur le fil de bougie afin<br />
d'eviter les courts-circuits avec le carter. Afin de faciliter<br />
leur maniement, passer egalement les quatre fils<br />
electriques (brun: masse; jaune: alimentation; noir:<br />
rupteur) po.r une tuyau isolante.<br />
15. Huiler legerement le caoutchouc passe cable cela<br />
facilitera le passage des cables.<br />
Passer le cable de bougie par le grand trou et les 4<br />
autres par le petit trou. Tirer les cables jusqu'a ce<br />
que le plateau port einduits ait pris sa place dans<br />
son logement du carter.<br />
Volant magnt! tique<br />
16. A l'aide des trois vis a tete cylindrique, rondelles<br />
dentees et rondelles plates serrer legerement le plateau<br />
d'allumage. Veiller a ce que les trois trous<br />
longs soiont centres par rapport aux vis a tete<br />
cylindrique.<br />
17. Placer le ventilateur sur Ia partie conique de l'arbre<br />
de telle sorte que l'evidement qu'il comporte corresponde<br />
a l'evidement de l'arbre du vilebrequin. Mettre<br />
le resort d'ajustage en place.<br />
Reglage des vis platinees<br />
18. Tourner le ventilateur de maniere a ce que Ia rainure<br />
de clavette soit tournee vers le haut. Dans cette position<br />
le rupteur est ouvert. Regier l'ecart entre les<br />
vis platinees a 0.016" (0.4 mm). Pour ce faire desserrer<br />
legerement Ia vis de fixation du porte-contacts.<br />
Mett re uno cale de 0.016" (0.4 mm) entre les contacts.<br />
Au moyen d'un tournevis passe dans l'ouverture reservee<br />
a cet effet, regler Ia distance entre plaque d'induit<br />
et porte-contacts jusqu'a ce qu'elle soit satisfaisante.<br />
Serrer ensuite Ia vis de fixation du porte-contacts. (11)<br />
8