Bedienungsanleitung - Champex-Linden
Bedienungsanleitung - Champex-Linden
Bedienungsanleitung - Champex-Linden

You also want an ePaper? Increase the reach of your titles
YUMPU automatically turns print PDFs into web optimized ePapers that Google loves.
click on the symbol at the start<br />
of the switch route. A window<br />
appears:<br />
- Select the number of the<br />
switch route (1-128).<br />
- Name your switch route.<br />
- Confirm the starting point of<br />
the switch route.<br />
3. Select the end point of the<br />
switch route by clicking on the<br />
track layout.<br />
4. Click on the individual members<br />
of the switch route by<br />
clicking on the appropriate<br />
symbols in the track diagram.<br />
For switches, signals, etc., a<br />
new window appears where<br />
you select the desired setting.<br />
Hint: Several switch routes can<br />
originate from the same starting<br />
point.<br />
Contacts<br />
With contacts, you can operate<br />
your trains automatically. You can<br />
trigger switch routes, control switches<br />
and other accessories, start<br />
sounds or control your locos.<br />
Usually, contacts are activated by<br />
17010 EPL Loco Magnets attached<br />
to your locos. You can also<br />
activate them from your PC by<br />
slowly clicking twice with the left<br />
button on your mouse onto the<br />
symbol on the track layout (no<br />
double-click).<br />
Connect the contacts, such as<br />
17100 EPL Track Contacts,<br />
12030/12070 EPL Supplementary<br />
Switches or other contacts, to<br />
the 55070 MTS Feedback Interface.<br />
You can use up to 512 real<br />
(and up to 128 virtual) contacts.<br />
1. In the mode “Change track layout,”<br />
place a contact symbol<br />
at the appropriate location<br />
on your track layout. A window<br />
opens. By clicking on the<br />
symbol with the right button of<br />
your mouse, you can open this<br />
window at a later stage.<br />
- Select the number of the contact<br />
(1 through 256, a, b, or v). a and<br />
b replicate the connectors of the<br />
55070 MTS Feedback Interface.<br />
v is used for virtual contacts<br />
(see below).<br />
- Decide whether the contact is<br />
activated by all locos or only by<br />
selected locos (up to 5).<br />
- Select the functions activated by<br />
the contact: activate a sound<br />
(see reference guide), set or<br />
release switch routes (up to 2),<br />
control a switch or signal, or<br />
control a loco.<br />
- When you click on the individual<br />
functions, you will be prompted<br />
to input detailed information.<br />
Hint: By selecting “coupled with a<br />
second contact number,” you can<br />
select a second, virtual contact,<br />
which does not exist on your layout.<br />
For example, you can use this<br />
to stop a loco (e.g., contact No.<br />
129a), have it wait for a preselected<br />
time, then have it return in the<br />
opposite direction (virtual contact<br />
No. 129v). For more information<br />
on this, see the reference guide.<br />
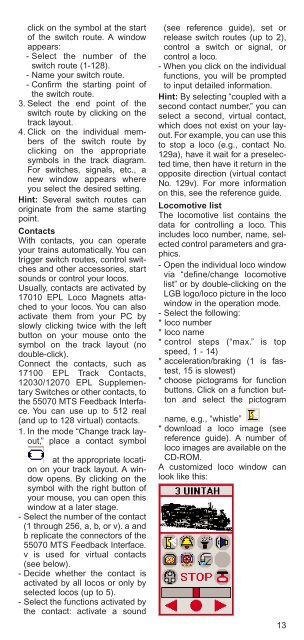
Locomotive list<br />
The locomotive list contains the<br />
data for controlling a loco. This<br />
includes loco number, name, selected<br />
control parameters and graphics.<br />
- Open the individual loco window<br />
via “define/change locomotive<br />
list” or by double-clicking on the<br />
LGB logo/loco picture in the loco<br />
window in the operation mode.<br />
- Select the following:<br />
* loco number<br />
* loco name<br />
* control steps (“max.” is top<br />
speed, 1 - 14)<br />
* acceleration/braking (1 is fastest,<br />
15 is slowest)<br />
* choose pictograms for function<br />
buttons. Click on a function button<br />
and select the pictogram<br />
name, e.g., “whistle”<br />
* download a loco image (see<br />
reference guide). A number of<br />
loco images are available on the<br />
CD-ROM.<br />
A customized loco window can<br />
look like this:<br />
13