INSTRUCTION MANUAL - HPI Racing UK
INSTRUCTION MANUAL - HPI Racing UK
INSTRUCTION MANUAL - HPI Racing UK

You also want an ePaper? Increase the reach of your titles
YUMPU automatically turns print PDFs into web optimized ePapers that Google loves.
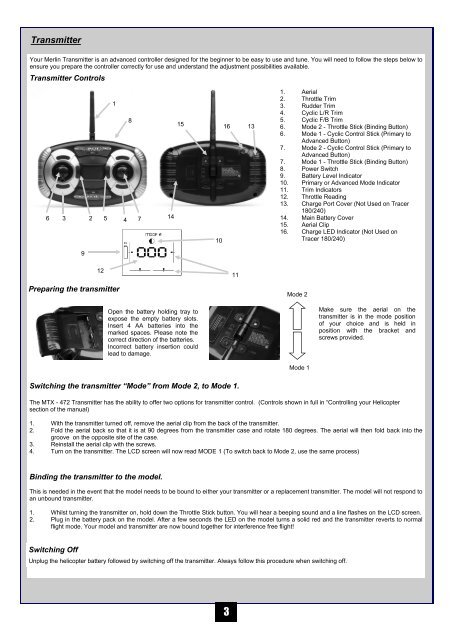
Transmitter<br />
Your Merlin Transmitter is an advanced controller designed for the beginner to be easy to use and tune. You will need to follow the steps below to<br />
ensure you prepare the controller correctly for use and understand the adjustment possibilities available.<br />
Transmitter Controls<br />
1<br />
8<br />
6 3 2 5 4 7<br />
14<br />
15<br />
10<br />
16<br />
13<br />
1. Aerial<br />
2. Throttle Trim<br />
3. Rudder Trim<br />
4. Cyclic L/R Trim<br />
5. Cyclic F/B Trim<br />
6. Mode 2 - Throttle Stick (Binding Button)<br />
6. Mode 1 - Cyclic Control Stick (Primary to<br />
Advanced Button)<br />
7. Mode 2 - Cyclic Control Stick (Primary to<br />
Advanced Button)<br />
7. Mode 1 - Throttle Stick (Binding Button)<br />
8. Power Switch<br />
9. Battery Level Indicator<br />
10. Primary or Advanced Mode Indicator<br />
11. Trim Indicators<br />
12. Throttle Reading<br />
13. Charge Port Cover (Not Used on Tracer<br />
180/240)<br />
14. Main Battery Cover<br />
15. Aerial Clip<br />
16. Charge LED Indicator (Not Used on<br />
Tracer 180/240)<br />
9<br />
12<br />
11<br />
Preparing the transmitter<br />
Mode 2<br />
Open the battery holding tray to<br />
expose the empty battery slots.<br />
Insert 4 AA batteries into the<br />
marked spaces. Please note the<br />
correct direction of the batteries.<br />
Incorrect battery insertion could<br />
lead to damage.<br />
Make sure the aerial on the<br />
transmitter is in the mode position<br />
of your choice and is held in<br />
position with the bracket and<br />
screws provided.<br />
Mode 1<br />
Switching the transmitter “Mode” from Mode 2, to Mode 1.<br />
The MTX - 472 Transmitter has the ability to offer two options for transmitter control. (Controls shown in full in “Controlling your Helicopter<br />
section of the manual)<br />
1. With the transmitter turned off, remove the aerial clip from the back of the transmitter.<br />
2. Fold the aerial back so that it is at 90 degrees from the transmitter case and rotate 180 degrees. The aerial will then fold back into the<br />
groove on the opposite site of the case.<br />
3. Reinstall the aerial clip with the screws.<br />
4. Turn on the transmitter. The LCD screen will now read MODE 1 (To switch back to Mode 2, use the same process)<br />
Binding the transmitter to the model.<br />
This is needed in the event that the model needs to be bound to either your transmitter or a replacement transmitter. The model will not respond to<br />
an unbound transmitter.<br />
1. Whilst turning the transmitter on, hold down the Throttle Stick button. You will hear a beeping sound and a line flashes on the LCD screen.<br />
2. Plug in the battery pack on the model. After a few seconds the LED on the model turns a solid red and the transmitter reverts to normal<br />
flight mode. Your model and transmitter are now bound together for interference free flight!<br />
Switching Off<br />
Unplug the helicopter battery followed by switching off the transmitter. Always follow this procedure when switching off.<br />
3