54089, #54095 Lay-Z-Spa--110-120V - Bestway
54089, #54095 Lay-Z-Spa--110-120V - Bestway
54089, #54095 Lay-Z-Spa--110-120V - Bestway

You also want an ePaper? Increase the reach of your titles
YUMPU automatically turns print PDFs into web optimized ePapers that Google loves.
1. Indoor Installation: Be aware of special requirements if you install the spa indoor.<br />
• The floor must be able to withstand the capacity of the <strong>Lay</strong>-Z-<strong>Spa</strong>. The floor should be a non-slip, level surface.<br />
• Proper drainage is essential for indoor spa installation. When building a new room for the spa it is recommended<br />
that a floor drain be installed.<br />
• Humidity is a natural side effect with <strong>Lay</strong>-Z-<strong>Spa</strong> installation. Determine the effects of airborne moisture on exposed<br />
wood, paper, etc. in the proposed location. To minimize these effects it is best to provide plenty of ventilation to<br />
the selected area. An architect can help determine if more ventilation is needed.<br />
NOTE: Do not install the <strong>Lay</strong>-Z-<strong>Spa</strong> on carpet or other material that can be damaged by moisture.<br />
2. Outdoor Installation<br />
• No matter where you install the <strong>Lay</strong>-Z-<strong>Spa</strong>, it is important you have a solid support foundation. If you are installing<br />
the <strong>Lay</strong>-Z-<strong>Spa</strong> in an outdoor area, ensure there are no sharp objects that could damage it and that the location is<br />
level so the <strong>Lay</strong>-Z-<strong>Spa</strong> sits properly.<br />
• During filling,draining or when in use, water may spill out of the <strong>Spa</strong>. Therefore the <strong>Lay</strong>-Z-<strong>Spa</strong> should be installed<br />
near a floor drain.<br />
• Do not leave the spa's surface exposed to direct sunlight for long periods of time.<br />
WARNING: TO AVOID ELECTRIC SHOCK, DO NOT USE THE SPA WHEN IT IS RAINING.<br />
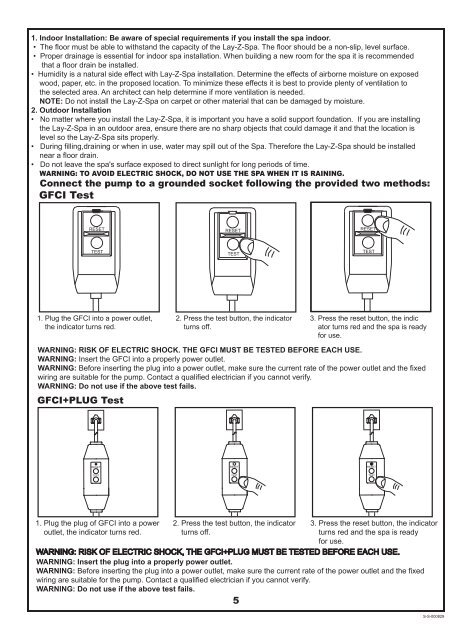
Connect the pump to a grounded socket following the provided two methods:<br />
GFCI Test<br />
1. Plug the GFCI into a power outlet,<br />
the indicator turns red.<br />
2. Press the test button, the indicator<br />
turns off.<br />
3. Press the reset button, the indic<br />
ator turns red and the spa is ready<br />
for use.<br />
WARNING: RISK OF ELECTRIC SHOCK. THE GFCI MUST BE TESTED BEFORE EACH USE.<br />
WARNING: Insert the GFCI into a properly power outlet.<br />
WARNING: Before inserting the plug into a power outlet, make sure the current rate of the power outlet and the fixed<br />
wiring are suitable for the pump. Contact a qualified electrician if you cannot verify.<br />
WARNING: Do not use if the above test fails.<br />
GFCI+PLUG Test<br />
RESET<br />
RESET<br />
RESET<br />
TEST<br />
TEST<br />
TEST<br />
1. Plug the plug of GFCI into a power<br />
outlet, the indicator turns red.<br />
2. Press the test button, the indicator<br />
turns off.<br />
3. Press the reset button, the indicator<br />
turns red and the spa is ready<br />
for use.<br />
WARNING: RISK OF ELECTRIC SHOCK, THE GFCI+PLUG MUST BE TESTED BEFORE EACH USE.<br />
WARNING: Insert the plug into a properly power outlet.<br />
WARNING: Before inserting the plug into a power outlet, make sure the current rate of the power outlet and the fixed<br />
wiring are suitable for the pump. Contact a qualified electrician if you cannot verify.<br />
WARNING: Do not use if the above test fails.<br />
5<br />
S-S-000829