BlackandDecker Scie A Onglets- Sms254 - Type 1 - Instruction Manual (Européen)
BlackandDecker Scie A Onglets- Sms254 - Type 1 - Instruction Manual (Européen)
BlackandDecker Scie A Onglets- Sms254 - Type 1 - Instruction Manual (Européen)
You also want an ePaper? Increase the reach of your titles
YUMPU automatically turns print PDFs into web optimized ePapers that Google loves.
ENGLISH<br />
<br />
Release the on/off switch (3) and allow the blade to stop<br />
before allowing the cutting head to rise.<br />
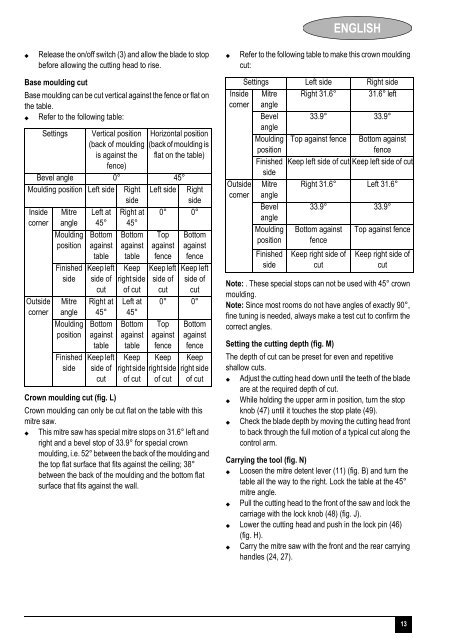
Base moulding cut<br />
Base moulding can be cut vertical against the f<strong>en</strong>ce or flat on<br />
the table.<br />
Refer to the following table:<br />
Settings Vertical position Horizontal position<br />
(back of moulding (back of moulding is<br />
is against the flat on the table)<br />
f<strong>en</strong>ce)<br />
Bevel angle 0° 45°<br />
Moulding position Left side Right<br />
side<br />
Left side Right<br />
side<br />
Inside<br />
corner<br />
Mitre<br />
angle<br />
Left at<br />
45°<br />
Right at<br />
45°<br />
0° 0°<br />
Outside<br />
corner<br />
Moulding<br />
position<br />
Finished<br />
side<br />
Bottom<br />
against<br />
table<br />
Keep left<br />
side of<br />
cut<br />
Mitre Right at<br />
angle 45°<br />
Moulding Bottom<br />
position against<br />
table<br />
Finished<br />
side<br />
Keep left<br />
side of<br />
cut<br />
Bottom<br />
against<br />
table<br />
Keep<br />
right side<br />
of cut<br />
Left at<br />
45°<br />
Bottom<br />
against<br />
table<br />
Keep<br />
right side<br />
of cut<br />
Top<br />
against<br />
f<strong>en</strong>ce<br />
Keep left<br />
side of<br />
cut<br />
Bottom<br />
against<br />
f<strong>en</strong>ce<br />
Keep left<br />
side of<br />
cut<br />
0° 0°<br />
Top<br />
against<br />
f<strong>en</strong>ce<br />
Keep<br />
right side<br />
of cut<br />
Bottom<br />
against<br />
f<strong>en</strong>ce<br />
Keep<br />
right side<br />
of cut<br />
Crown moulding cut (fig. L)<br />
Crown moulding can only be cut flat on the table with this<br />
mitre saw.<br />
This mitre saw has special mitre stops on 31.6° left and<br />
right and a bevel stop of 33.9° for special crown<br />
moulding, i.e. 52° betwe<strong>en</strong> the back of the moulding and<br />
the top flat surface that fits against the ceiling; 38°<br />
betwe<strong>en</strong> the back of the moulding and the bottom flat<br />
surface that fits against the wall.<br />
<br />
Refer to the following table to make this crown moulding<br />
cut:<br />
Settings Left side Right side<br />
Inside Mitre Right 31.6°<br />
31.6° left<br />
corner angle<br />
Bevel 33.9° 33.9°<br />
angle<br />
Moulding<br />
position<br />
Top against f<strong>en</strong>ce Bottom against<br />
f<strong>en</strong>ce<br />
Finished Keep left side of cut Keep left side of cut<br />
side<br />
Outside Mitre Right 31.6° Left 31.6°<br />
corner angle<br />
Bevel 33.9° 33.9°<br />
angle<br />
Moulding<br />
position<br />
Bottom against<br />
f<strong>en</strong>ce<br />
Top against f<strong>en</strong>ce<br />
Finished<br />
side<br />
Keep right side of<br />
cut<br />
Keep right side of<br />
cut<br />
Note: . These special stops can not be used with 45° crown<br />
moulding.<br />
Note: Since most rooms do not have angles of exactly 90°,<br />
fine tuning is needed, always make a test cut to confirm the<br />
correct angles.<br />
Setting the cutting depth (fig. M)<br />
The depth of cut can be preset for ev<strong>en</strong> and repetitive<br />
shallow cuts.<br />
Adjust the cutting head down until the teeth of the blade<br />
are at the required depth of cut.<br />
While holding the upper arm in position, turn the stop<br />
knob (47) until it touches the stop plate (49).<br />
Check the blade depth by moving the cutting head front<br />
to back through the full motion of a typical cut along the<br />
control arm.<br />
Carrying the tool (fig. N)<br />
Loos<strong>en</strong> the mitre det<strong>en</strong>t lever (11) (fig. B) and turn the<br />
table all the way to the right. Lock the table at the 45°<br />
mitre angle.<br />
Pull the cutting head to the front of the saw and lock the<br />
carriage with the lock knob (48) (fig. J).<br />
Lower the cutting head and push in the lock pin (46)<br />
(fig. H).<br />
Carry the mitre saw with the front and the rear carrying<br />
handles (24, 27).<br />
13


