

BlackandDecker Scie A Onglets- Sms254 - Type 1 - Instruction Manual (Européen)
BlackandDecker Scie A Onglets- Sms254 - Type 1 - Instruction Manual (Européen)
BlackandDecker Scie A Onglets- Sms254 - Type 1 - Instruction Manual (Européen)

Create successful ePaper yourself
Turn your PDF publications into a flip-book with our unique Google optimized e-Paper software.
ENGLISH<br />
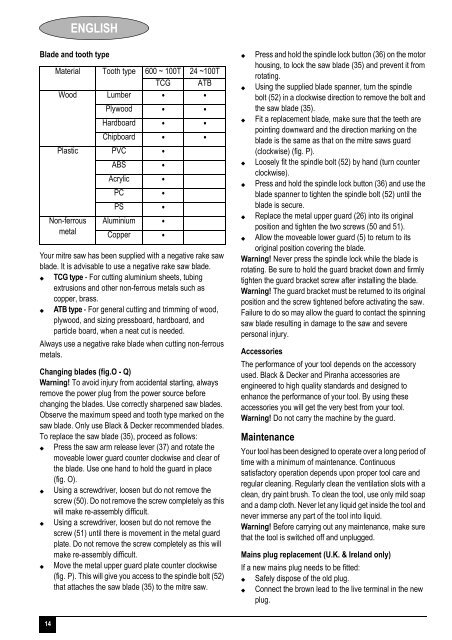
Blade and tooth type<br />
Material Tooth type 600 ~ 100T 24 ~100T<br />
TCG ATB<br />
Wood Lumber • •<br />
Plywood • •<br />
Hardboard • •<br />
Chipboard • •<br />
Plastic PVC •<br />
ABS •<br />
Acrylic •<br />
PC •<br />
PS •<br />
Non-ferrous Aluminium •<br />
metal Copper •<br />
Your mitre saw has be<strong>en</strong> supplied with a negative rake saw<br />
blade. It is advisable to use a negative rake saw blade.<br />
TCG type - For cutting aluminium sheets, tubing<br />
extrusions and other non-ferrous metals such as<br />
copper, brass.<br />
ATB type - For g<strong>en</strong>eral cutting and trimming of wood,<br />
plywood, and sizing pressboard, hardboard, and<br />
particle board, wh<strong>en</strong> a neat cut is needed.<br />
Always use a negative rake blade wh<strong>en</strong> cutting non-ferrous<br />
metals.<br />
Changing blades (fig.O - Q)<br />
Warning! To avoid injury from accid<strong>en</strong>tal starting, always<br />
remove the power plug from the power source before<br />
changing the blades. Use correctly sharp<strong>en</strong>ed saw blades.<br />
Observe the maximum speed and tooth type marked on the<br />
saw blade. Only use Black & Decker recomm<strong>en</strong>ded blades.<br />
To replace the saw blade (35), proceed as follows:<br />
Press the saw arm release lever (37) and rotate the<br />
moveable lower guard counter clockwise and clear of<br />
the blade. Use one hand to hold the guard in place<br />
(fig. O).<br />
Using a screwdriver, loos<strong>en</strong> but do not remove the<br />
screw (50). Do not remove the screw completely as this<br />
will make re-assembly difficult.<br />
Using a screwdriver, loos<strong>en</strong> but do not remove the<br />
screw (51) until there is movem<strong>en</strong>t in the metal guard<br />
plate. Do not remove the screw completely as this will<br />
make re-assembly difficult.<br />
Move the metal upper guard plate counter clockwise<br />
(fig. P). This will give you access to the spindle bolt (52)<br />
that attaches the saw blade (35) to the mitre saw.<br />
Press and hold the spindle lock button (36) on the motor<br />
housing, to lock the saw blade (35) and prev<strong>en</strong>t it from<br />
rotating.<br />
Using the supplied blade spanner, turn the spindle<br />
bolt (52) in a clockwise direction to remove the bolt and<br />
the saw blade (35).<br />
Fit a replacem<strong>en</strong>t blade, make sure that the teeth are<br />
pointing downward and the direction marking on the<br />
blade is the same as that on the mitre saws guard<br />
(clockwise) (fig. P).<br />
Loosely fit the spindle bolt (52) by hand (turn counter<br />
clockwise).<br />
Press and hold the spindle lock button (36) and use the<br />
blade spanner to tight<strong>en</strong> the spindle bolt (52) until the<br />
blade is secure.<br />
Replace the metal upper guard (26) into its original<br />
position and tight<strong>en</strong> the two screws (50 and 51).<br />
Allow the moveable lower guard (5) to return to its<br />
original position covering the blade.<br />
Warning! Never press the spindle lock while the blade is<br />
rotating. Be sure to hold the guard bracket down and firmly<br />
tight<strong>en</strong> the guard bracket screw after installing the blade.<br />
Warning! The guard bracket must be returned to its original<br />
position and the screw tight<strong>en</strong>ed before activating the saw.<br />
Failure to do so may allow the guard to contact the spinning<br />
saw blade resulting in damage to the saw and severe<br />
personal injury.<br />
Accessories<br />
The performance of your tool dep<strong>en</strong>ds on the accessory<br />
used. Black & Decker and Piranha accessories are<br />
<strong>en</strong>gineered to high quality standards and designed to<br />
<strong>en</strong>hance the performance of your tool. By using these<br />
accessories you will get the very best from your tool.<br />
Warning! Do not carry the machine by the guard.<br />
Maint<strong>en</strong>ance<br />
Your tool has be<strong>en</strong> designed to operate over a long period of<br />
time with a minimum of maint<strong>en</strong>ance. Continuous<br />
satisfactory operation dep<strong>en</strong>ds upon proper tool care and<br />
regular cleaning. Regularly clean the v<strong>en</strong>tilation slots with a<br />
clean, dry paint brush. To clean the tool, use only mild soap<br />
and a damp cloth. Never let any liquid get inside the tool and<br />
never immerse any part of the tool into liquid.<br />
Warning! Before carrying out any maint<strong>en</strong>ance, make sure<br />
that the tool is switched off and unplugged.<br />
Mains plug replacem<strong>en</strong>t (U.K. & Ireland only)<br />
If a new mains plug needs to be fitted:<br />
Safely dispose of the old plug.<br />
Connect the brown lead to the live terminal in the new<br />
plug.<br />
14


