ventilconvettore con inverter fan coil with inverter ventilo-convecteur ...
ventilconvettore con inverter fan coil with inverter ventilo-convecteur ...
ventilconvettore con inverter fan coil with inverter ventilo-convecteur ...

Create successful ePaper yourself
Turn your PDF publications into a flip-book with our unique Google optimized e-Paper software.
INSTALLATION<br />
WARNING: check that the power supply<br />
is dis<strong>con</strong>nected before carrying out<br />
any procedures on the unit.<br />
WARNING: the appliance must be fitted<br />
according to the national regulations<br />
on process plant engineering.<br />
WARNING: electrical wirings, installation<br />
of the <strong>fan</strong> <strong>coil</strong>s and relevant accessories<br />
should be performed by a technician<br />
who has the necessary technical and<br />
professional expertise to install, modify,<br />
extend and maintain systems, and who<br />
is able to check the systems for the purposes<br />
of safety and correct operation.<br />
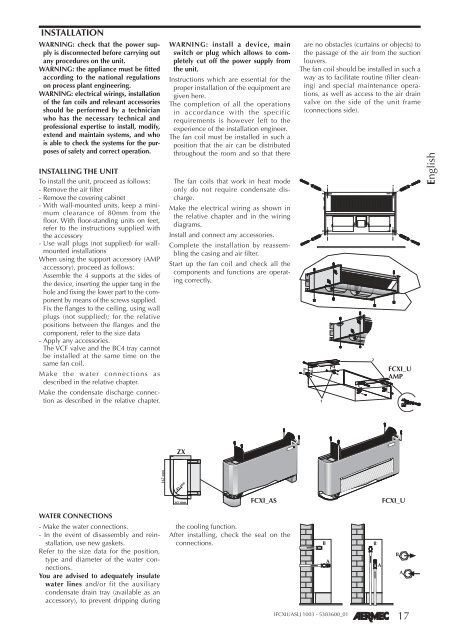
INSTALLING THE UNIT<br />
To install the unit, proceed as follows:<br />
- Remove the air filter<br />
- Remove the covering cabinet<br />
- With wall-mounted units, keep a minimum<br />
clearance of 80mm from the<br />
floor. With floor-standing units on feet,<br />
refer to the instructions supplied <strong>with</strong><br />
the accessory<br />
- Use wall plugs (not supplied) for wallmounted<br />
installations<br />
When using the support accessory (AMP<br />
accessory), proceed as follows:<br />
Assemble the 4 supports at the sides of<br />
the device, inserting the upper tang in the<br />
hole and fixing the lower part to the component<br />
by means of the screws supplied.<br />
Fix the flanges to the ceiling, using wall<br />
plugs (not supplied); for the relative<br />
positions between the flanges and the<br />
component, refer to the size data<br />
- Apply any accessories.<br />
The VCF valve and the BC4 tray cannot<br />
be installed at the same time on the<br />
same <strong>fan</strong> <strong>coil</strong>.<br />
Make the water <strong>con</strong>nections as<br />
described in the relative chapter.<br />
Make the <strong>con</strong>densate discharge <strong>con</strong>nection<br />
as described in the relative chapter.<br />
WATER CONNECTIONS<br />
- Make the water <strong>con</strong>nections.<br />
- In the event of disassembly and reinstallation,<br />
use new gaskets.<br />
Refer to the size data for the position,<br />
type and diameter of the water <strong>con</strong>nections.<br />
You are advised to adequately insulate<br />
water lines and/or fit the auxiliary<br />
<strong>con</strong>densate drain tray (available as an<br />
accessory), to prevent dripping during<br />
167 mm<br />
WARNING: install a device, main<br />
switch or plug which allows to completely<br />
cut off the power supply from<br />
the unit.<br />
Instructions which are essential for the<br />
proper installation of the equipment are<br />
given here.<br />
The completion of all the operations<br />
in accordance <strong>with</strong> the specific<br />
requirements is however left to the<br />
experience of the installation engineer.<br />
The <strong>fan</strong> <strong>coil</strong> must be installed in such a<br />
position that the air can be distributed<br />
throughout the room and so that there<br />
The <strong>fan</strong> <strong>coil</strong>s that work in heat mode<br />
only do not require <strong>con</strong>densate discharge.<br />
Make the electrical wiring as shown in<br />
the relative chapter and in the wiring<br />
diagrams.<br />
Install and <strong>con</strong>nect any accessories.<br />
Complete the installation by reassembling<br />
the casing and air filter.<br />
Start up the <strong>fan</strong> <strong>coil</strong> and check all the<br />
components and functions are operating<br />
correctly.<br />
ZX<br />
49 mm<br />
65 mm<br />
FCXI_AS<br />
the cooling function.<br />
After installing, check the seal on the<br />
<strong>con</strong>nections.<br />
are no obstacles (curtains or objects) to<br />
the passage of the air from the suction<br />
louvers.<br />
The <strong>fan</strong> <strong>coil</strong> should be installed in such a<br />
way as to facilitate routine (filter cleaning)<br />
and special maintenance operations,<br />
as well as access to the air drain<br />
valve on the side of the unit frame<br />
(<strong>con</strong>nections side).<br />
IFCXIUASLJ 1003 - 5383600_01<br />
1<br />
B<br />
A<br />
2<br />
B<br />
A<br />
FCXI_U<br />
AMP<br />
FCXI_U<br />
B<br />
A<br />
17<br />
English