Notice technique – Automatisme PP60 pour porte ... - Wayne Dalton
Notice technique – Automatisme PP60 pour porte ... - Wayne Dalton
Notice technique – Automatisme PP60 pour porte ... - Wayne Dalton

You also want an ePaper? Increase the reach of your titles
YUMPU automatically turns print PDFs into web optimized ePapers that Google loves.
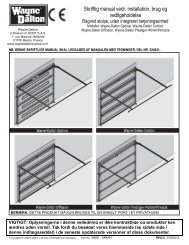
17<br />
18<br />
19<br />
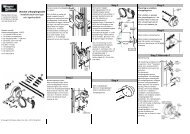
Attach Limit Switches<br />
NOTE: The limits must be installed as shown. If installed incorrectly the unit will not<br />
function properly.<br />
Close garage door by hand. Determine the position of the Close Limit Switch (1)<br />
(Long wire) by aligning the center of trolley and the center of the Limit Switch. The<br />
Limit Switches are actuated by a magnet in the Inner Trolley. Insert bottom tab (5) of<br />
Limit Switch (1) into bottom lip of Rail (7). Insert top tab (4) under top lip of Rail (6).<br />
Lift limit assembly against top lip of Rail and tighten screw (8) to secure Close Limit<br />
Switch. Open garage door by hand to the full open position. Pull red handle to open<br />
door past Inner Trolley. Determine the position of the Open Limit Switch (3) (Short<br />
Wire) by aligning the center of the Trolley and the center of the Limit Switch. Insert<br />
bottom tab (5) of Limit Switch (1) into bottom lip of rail (7). Insert top tab (4) under<br />
top lip of rail (6). Lift limit assembly against top lip of rail and tighten screw (8) to<br />
secure Open Limit Switch. Insert wires for Limit Switch (9) into top channel of Rail<br />
(10). Secure wires with wire clip. the wires must be secured so they do not interfere<br />
with the travel of the Trolley. Activate remote, the opener will operate and reconnect<br />
to the door automatically. Run opener 2 full travel cycles. If the door reverses in mid<br />
travel go to Setting the Force Section. Adjust Limit Switches as necessary to fully<br />
open and close the door without reversing.<br />
Setting the Force<br />
The Force is programmed to operate most doors, however, if Limits are not able to<br />
be set, or the door reverses during normal operation follow this procedure: Locate<br />
the Program Button (1) on the left side panel of unit (2). Push the Program Button<br />
twice to enter unit into Auto-Force Adjustment Mode. The green LED will flash<br />
slowly. Activate unit with remote and run the unit to the Open Limit. Activate unit<br />
again to run the unit to the Closed Limit. The door must travel through a complete<br />
cycle up and down in order for the Force to be set properly. If the unit stops before it<br />
reaches the Open or Close Limit repeat the process. The green LED will stop<br />
flashing when the Force has been learned.<br />
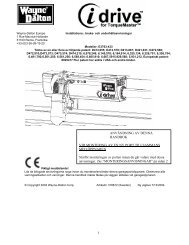
Test the Safety Reverse System<br />
The safety reverse system test is important. Garage door must reverse on<br />
contact with a 40mm obstacle laid flat on the floor. Failure to properly adjust<br />
opener may result in serious personal injury from a closing garage door.<br />
Repeat test once a month and adjust as needed.<br />
Procedure: Place a 40mm obstacle (1) laid flat on the floor under the garage door.<br />
Operate the door in the down direction. The door must reverse on the obstruction.<br />
If the door stops on the obstruction, it is not traveling far enough in the down<br />
direction. Move Close Limit closer to door.<br />
When the door reverses on the 40mm obstacle, remove the obstruction and run the<br />
opener through a complete travel cycle. Door must not reverse in closed position. If<br />
it does, adjust Limit and repeat safety reverse test.<br />
Place 20kg at the center of the door and ensure that the door will not move up more<br />
than 500mm.<br />
SAVE THESE INSTRUCTIONS<br />
20<br />
21<br />
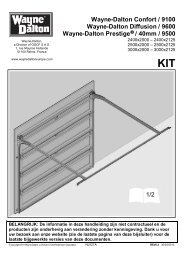
Program Remotes<br />
Activate the opener only when door is in full view, free of obstruction and<br />
properly adjusted. No one should enter or leave garage while door is in<br />
motion.<br />
Your garage door opener receiver and Remote Control Transmitter are set to a<br />
matching code. If you purchase additional Remote Controls, the garage door opener<br />
must be programmed to accept the new Remote code.<br />
To program receiver to match additional Remote Control codes:<br />
1. Press and release the program button on the side of the unit (1). The green LED<br />
will glow steadily for 30 seconds.<br />
2. Within 30 seconds press and hold the button on the hand-held Remote (2).<br />
3. Release the button when the motor unit light blinks. It has learned the code. If the<br />
light bulb is not installed, two clicks will be hear.<br />
To erase all codes from motor unit memory or to deactivate any unwanted<br />
Remote, first erase all codes:<br />
Press and hold the program button (1) on motor unit until the learn indicator light<br />
goes out (approximately 6 seconds). All previous codes are now erased. Reprogram<br />
each Remote or Keyless Entry you wish to use.<br />
Replace Light Bulb<br />
Replace light bulb (1) with a 21 watt maximum light bulb. Insert bulb into socket as<br />
shown. The light will turn on and remain lit for 2 1/2 minutes when power is<br />
connected. After 2 1/2 minutes it will turn off.<br />
Operation Of Your Opener<br />
Your opener can be activated by any of the following devices:<br />
• The Remote Control Transmitter. Hold the push button down until the door starts to<br />
move.<br />
• The Lighted Door Control Button (if you have installed this accessory). Hold the<br />
button down until door starts to move.<br />
• The Outside Keylock or Keyless Entry System (if you have installed either of these<br />
accessories).<br />
Opening the Door Manually:<br />
Door should be fully closed if possible. Weak or broken springs could allow an open<br />
door to fall rapidly. Property damage or serious personal injury could result.<br />
The door can be opened manually by pulling the release handle down. To reconnect<br />
the door, activate the unit.<br />
Do not use the manual release handle to pull the door open<br />
or closed.<br />
When the Opener is Activated by Remote Control or Door Control Button:<br />
1. If fully open, the door will close.<br />
2. If closed, the door will open.<br />
3. If opening or closing, the door will stop.<br />
4. If partially open, the door will move in the opposite direction of last travel.<br />
5. If an obstruction is encountered while closing, the door will reverse to the open<br />
position.<br />
6. If an obstruction is encountered while opening, the door will reverse for 1 second.<br />
7. The optional Protector System uses an invisible beam which, when broken by<br />
an obstruction, causes a closing door to open and prevents an open door from<br />
closing. It is STRONGLY RECOMMENDED for homeowners with young children.<br />
Allow a 15 minute cooling period after 5 continuous operations of the opener.<br />
The opener light will turn on: 1. when opener is initially plugged in;<br />
2. when the power is interrupted; 3. when the opener is activated.<br />
The light turns off automatically after 2-1/2 minutes. Bulb size is<br />
21 Watts maximum.