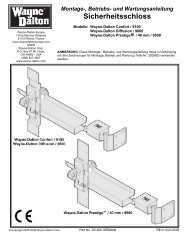
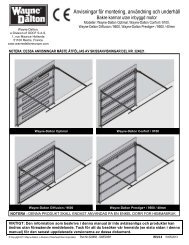
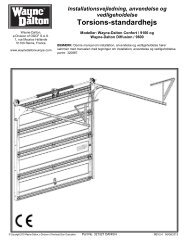
Notice technique – Automatisme PP60 pour porte ... - Wayne Dalton
Notice technique – Automatisme PP60 pour porte ... - Wayne Dalton
Notice technique – Automatisme PP60 pour porte ... - Wayne Dalton

You also want an ePaper? Increase the reach of your titles
YUMPU automatically turns print PDFs into web optimized ePapers that Google loves.
Start by Reading These Important Safety Rules<br />
WARNING: If your garage has no service entrance door, an Outside Quick Release must be installed. This accessory allows<br />
manual operation of the garage door from outside in case of power failure.<br />
Keep garage door balanced. Sticking or binding doors must be<br />
repaired. Garage doors, door springs, cables, pulleys, brackets and<br />
their hardware are under extreme tension and can cause serious<br />
personal injury. Do not attempt to loosen, move or adjust them. Call<br />
for garage door service.<br />
Do not wear rings, watches or loose clothing while installing or<br />
servicing a garage door opener.<br />
To avoid serious personal injury from entanglement, remove all ropes<br />
connected to the garage door before installing the door opener.<br />
Installation and wiring must be in compliance with your local building<br />
and electrical codes. This is a class 2 double insulated product,<br />
connesction to earth is not required or provided.<br />
Lightweight doors of fiberglass, aluminum or steel must be<br />
substantially reinforced to avoid door damage. The best solution is<br />
to check with your garage door manufacturer for an opener installation<br />
reinforcement kit.<br />
The safety reverse system test is very important. Your garage door<br />
MUST reverse on contact with a 40mm obstacle placed on the floor.<br />
Failure to properly adjust the opener may result in serious personal<br />
injury from a closing garage door. Repeat the test once a month and<br />
make any needed adjustments.<br />
This unit should not be installed in a damp or wet space.<br />
Door must not extend over a public byway during<br />
operation.<br />
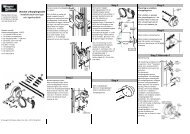
ASSEMBLY HARDWARE<br />
1. Square Head Screws (4)<br />
2. 8mm Carriage Bolt (1)<br />
3. Cable Pulley (1)<br />
INSTALLATION HARDWARE<br />
7. 6mm Nut (8)<br />
8. Concrete Anchor (4)<br />
9. 6mm Lag Bolt (4)<br />
10. 6mm Self-Threading Screw (4)<br />
11. 6mm Hex Bolt (4)<br />
These safety alert symbols mean WARNING <strong>–</strong> a personal safety or property damage instruction.<br />
Read these instructions carefully.<br />
This garage door opener is designed and tested to offer reasonable safe service provided it is installed and operated in strict accordance with<br />
the following safety rules.<br />
Failure to comply with the following instructions may result in serious personal injury or property damage.<br />
4. Pin (1)<br />
5. 8mm Lock Nut (1)<br />
6. Pulley Bracket (1)<br />
12. Wire Clips (3)<br />
13. Hex Screws (2)<br />
14. C-rail Bracket (1)<br />
Fasten the child warning label adjacent to the lighted door control<br />
button as a reminder of safe operating procedures.<br />
Disengage all existing garage door locks to avoid damage to<br />
garage door.<br />
Any door control buttons (if installed) MUST be located where the<br />
garage door is visible, but out of the reach of children. Do not<br />
allow children to operate push button(s) or remote control(s).<br />
Serious personal injury from a closing garage door may result<br />
from misuse of the opener.<br />
Activate opener ONLY when the door is in full view, free of<br />
obstructions and opener is properly adjusted. No one should<br />
enter or leave the garage while the door is in motion. Do not allow<br />
children to play near the door.<br />
Use manual release only to disengage the trolley and, if possible,<br />
ONLY when the door is closed. Do not use the red handle to pull the<br />
door open or closed.<br />
Disconnect electric power to the garage door opener before<br />
making repairs or removing covers.<br />
This product is provided with a transformer and power supply cord of<br />
special design which, if damaged, MUST be replaced by a<br />
transformer from your local Chamberlain Anz distributor and<br />
fitted by a specialist.<br />
SAVE THESE INSTRUCTIONS<br />
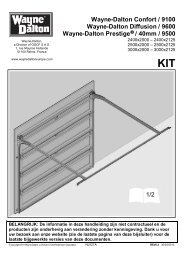
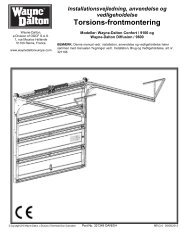
1 Before You Begin<br />
CCoommpplleetteedd IInnssttaallllaattiioonn<br />
This operator is suitable for sectional doors.<br />
1. Look at the wall or ceiling above the garage door. The header bracket MUST be<br />
securely fastened to structural supports.<br />
2. Do you have a finished ceiling in your garage? If so, a support bracket and<br />
additional fastening hardware (not supplied) may be required.<br />
3. Do you have an access door in addition to the garage door? If not, an Outside<br />
Quick Release Accessory is required.<br />
2<br />
3<br />
Tools Required for Installation<br />
Hardware Provided<br />
4<br />
As you proceed with the assembly, installation and adjustment procedures in<br />
this manual, you may find it helpful to refer back to this illustration of a<br />
completed installation.<br />
(1) Cable Pulley Bracket<br />
(2) Trolley<br />
(3) Chain/Cable Assembly<br />
(4) Rail<br />
(5) Hanging Bracket<br />
(6) Power Cord<br />
(7) Opener<br />
(8) Light Lens<br />
(9) Manual Release<br />
Rope & Handle<br />
(10) Door Arm<br />
(11) Door Bracket<br />
(12) Header Bracket