

VC – HC – CD - Johnson Controls
VC – HC – CD - Johnson Controls
VC – HC – CD - Johnson Controls

Create successful ePaper yourself
Turn your PDF publications into a flip-book with our unique Google optimized e-Paper software.
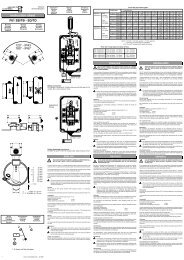
INSTALLAZIONE<br />
MECCANICA<br />
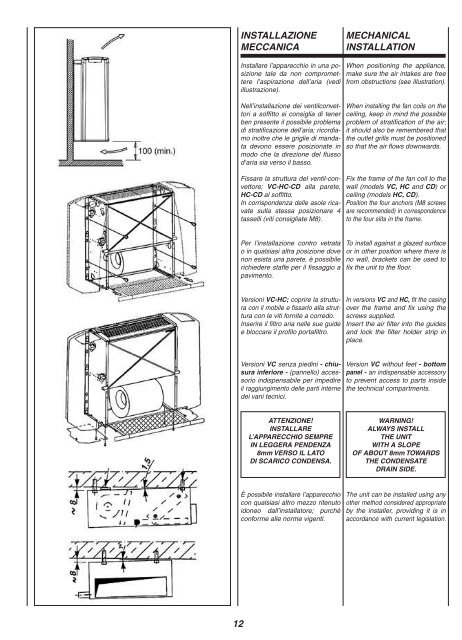
Installare l’apparecchio in una posizione<br />
tale da non compromettere<br />
l’aspirazione dell’aria (vedi<br />
illustrazione).<br />
Nell’installazione dei ventilconvettori<br />
a soffitto si consiglia di tener<br />
ben presente il possibile problema<br />
di stratificazione dell’aria; ricordiamo<br />
inoltre che le griglie di mandata<br />
devono essere posizionate in<br />
modo che la direzione del flusso<br />
d’aria sia verso il basso.<br />
Fissare la struttura del ventil-convettore;<br />
<strong>VC</strong>-<strong>HC</strong>-<strong>CD</strong> alla parete,<br />
<strong>HC</strong>-<strong>CD</strong> al soffitto.<br />
In corrispondenza delle asole ricavate<br />
sulla stessa posizionare 4<br />
tasselli (viti consigliate M8).<br />
Per l’installazione contro vetrata<br />
o in qualsiasi altra posizione dove<br />
non esista una parete, è possibile<br />
richiedere staffe per il fissaggio a<br />
pavimento.<br />
Versioni <strong>VC</strong>-<strong>HC</strong>; coprire la struttura<br />
con il mobile e fissarlo alla struttura<br />
con le viti fornite a corredo.<br />
Inserire il filtro aria nelle sue guide<br />
e bloccare il profilo portafiltro.<br />
Versioni <strong>VC</strong> senza piedini - chiusura<br />
inferiore - (pannello) accessorio<br />
indispensabile per impedire<br />
il raggiungimento delle parti interne<br />
dei vani tecnici.<br />
ATTENZIONE!<br />
INSTALLARE<br />
L’APPARECCHIO SEMPRE<br />
IN LEGGERA PENDENZA<br />
8mm VERSO IL LATO<br />
DI SCARICO CONDENSA.<br />
È possibile installare l’apparecchio<br />
con qualsiasi altro mezzo ritenuto<br />
idoneo dall’installatore; purchè<br />
conforme alle norme vigenti.<br />
MECHANICAL<br />
INSTALLATION<br />
When positioning the appliance,<br />
make sure the air intakes are free<br />
from obstructions (see illustration).<br />
When installing the fan coils on the<br />
ceiling, keep in mind the possible<br />
problem of stratification of the air;<br />
it should also be remembered that<br />
the outlet grills must be positioned<br />
so that the air flows downwards.<br />
Fix the frame of the fan coil to the<br />
wall (models <strong>VC</strong>, <strong>HC</strong> and <strong>CD</strong>) or<br />
ceiling (models <strong>HC</strong>, <strong>CD</strong>).<br />
Position the four anchors (M8 screws<br />
are recommended) in correspondence<br />
to the four slits in the frame.<br />
To install against a glazed surface<br />
or in other position where there is<br />
no wall, brackets can be used to<br />
fix the unit to the floor.<br />
In versions <strong>VC</strong> and <strong>HC</strong>, fit the casing<br />
over the frame and fix using the<br />
screws supplied.<br />
Insert the air filter into the guides<br />
and lock the filter holder strip in<br />
place.<br />
Version <strong>VC</strong> without feet - bottom<br />
panel - an indispensable accessory<br />
to prevent access to parts inside<br />
the technical compartments.<br />
WARNING!<br />
ALWAYS INSTALL<br />
THE UNIT<br />
WITH A SLOPE<br />
OF ABOUT 8mm TOWARDS<br />
THE CONDENSATE<br />
DRAIN SIDE.<br />
The unit can be installed using any<br />
other method considered appropriate<br />
by the installer, providing it is in<br />
accordance with current legislation.<br />
INSTALLATION<br />
MECANIQUE<br />
Installer l’appareil dans une position<br />
n’empêchant pas l’aspiration de l’air<br />
(cf. illustration).<br />
Lorsqu’on installe des ventilo-convecteurs<br />
au plafond il est conseillé<br />
de prendre en compte le problème<br />
possible de stratification de l’air;<br />
nous rappelons en outre que les<br />
grilles de soufflage doivent être<br />
placées de façon à ce que le flux<br />
d’air soit dirigé vers le bas.<br />
Fixer la structure du ventilo-convecteur;<br />
celle des <strong>VC</strong>-<strong>HC</strong>-<strong>CD</strong> à la<br />
paroi et celle des <strong>HC</strong>-<strong>CD</strong> au plafond.<br />
Positionner, au niveau des trous<br />
oblongs pratiqués dans la structure,<br />
quatre chevilles à expansion (vis<br />
conseillées M8).<br />
Pour l’installation contre une baie<br />
vitrée ou dans une quelconque<br />
autre position où il existe pas de<br />
paroi, on peut demander des pattes<br />
pour la fixation au sol.<br />
Versions <strong>VC</strong>-<strong>HC</strong>: couvrir la structure<br />
avec la carrosserie en fixant cette<br />
dernière à la structure, avec les vis<br />
fournies de série.<br />
Insérer le filtre à air dans ses guides<br />
et bloquer le profilé porte-filtre.<br />
Version <strong>VC</strong> sans pieds - fenneture<br />
inférieure - accessoire indispensable<br />
pour empêcher d’atteindre les parties<br />
intérieures des compartiments techniques.<br />
ATTENTION!<br />
INSTALLER<br />
TOUJOURS L’APPAREIL<br />
AVEC UNE LEGERE PENTE<br />
DE 8mm VERS<br />
LE COTE D’EVACUATION<br />
DES CONDENSATS.<br />
L’installeur pourra installer l’appareil<br />
avec n’importe quel autre moyen<br />
jugé approprié, à condition qu’il soit<br />
conforme aux normes en vigueur.<br />
MECHANISCHE<br />
INSTALLATION<br />
Das Gerät muss so installiert werden,<br />
dass die Luftansaugung nicht beeinträchtigt<br />
wird (siehe Darstellung).<br />
Bei der Deckeninstallation von<br />
Klimakonvektoren sollte unbedingt<br />
das potentielle Problem der Luftstratifikation<br />
berücksichtigt werden;<br />
außerdem erinnern wir daran, dass<br />
die Ausblasgitter so positioniert<br />
sein müssen, dass der Luftstrom<br />
nach unten gerichtet ist.<br />
Die Struktur des Gebläsekonvektors<br />
<strong>VC</strong>-<strong>HC</strong>-<strong>CD</strong> an der Wand, bzw.<br />
<strong>HC</strong>-<strong>CD</strong> an der Decke befestigen.<br />
An den Schlitzen 4 Dübel anbringen<br />
(empfohlene Schrauben M8).<br />
Für die Installation gegen eine<br />
verglaste Fläche oder in einer<br />
sonstigen Stellung, in der keine<br />
Wand vorhanden ist, können Bügel<br />
für die Befestigung am Boden<br />
angefordert werden.<br />
Ausführungen <strong>VC</strong>-<strong>HC</strong>: die Gerätestruktur<br />
mit dem Gehäuse abdecken.<br />
Das Gehäuse mit den mitgelieferten<br />
Schrauben an der Struktur befestigen.<br />
Den Luftfilter in seine Führungen<br />
einschieben und das Filter-Halteprofil<br />
befestigen.<br />
Version <strong>VC</strong> ohne Füße - mit unterem<br />
Verschluss - ein unerlässliches<br />
Zubehör, um den Zugriff auf die<br />
inneren Komponenten zu verhindern.<br />
ACHTUNG!<br />
DAS GERÄT MUSS IMMER<br />
IN LEICHTER (8 mm)<br />
NEIGUNG IN RICHTUNG<br />
KONDENSATAUSLASS<br />
INSTALLIERT WERDEN.<br />
Das Gerät kann mit jedem anderen,<br />
vom Installateur für zweckmäßig<br />
erachteten Mittel installiert werden,<br />
jedoch immer unter der Voraussetzung,<br />
dass die Installation den einschlägigen<br />
Bestimmungen entspricht.<br />
12 12A<br />
INSTALACIÓN<br />
MECÁNICA<br />
Instalar el aparato en una posición<br />
tal que no se impida la aspiración<br />
del aire (ver dibujo).<br />
En la instalación de los ventiladores<br />
convectores de techo se recomienda<br />
tener muy presente el posible<br />
problema de estratificación<br />
del aire; además recordamos que<br />
las rejillas de impulsión tienen que<br />
colocarse de modo que la dirección<br />
del flujo de aire sea hacia abajo.<br />
Asegurar la estructura del fan coil;<br />
<strong>VC</strong>-<strong>HC</strong>-<strong>CD</strong> a la pared, <strong>HC</strong>-<strong>CD</strong> al<br />
techo.<br />
En correspondencia con las ranuras<br />
que lleva colocar 4 tacos de expansión<br />
(tornillos aconsejados M8).<br />
Para la instalación contra cristaleras<br />
o en cualquier otra posición<br />
donde no haya una pared, es posible<br />
solicitar unos estribos para<br />
la sujeción al suelo.<br />
Variantes <strong>VC</strong>-<strong>HC</strong>; cubrir la estructura<br />
con el mueble y asegurarlo a<br />
la estructura con los tornillos incluidos<br />
en el suministro.<br />
Introducir el filtro del aire en sus<br />
guías correspondientes y bloquear<br />
el perfil porta-filtro.<br />
Versiones <strong>VC</strong> sin pies - cierre<br />
inferior - accesorio indispensable<br />
para impedir alcanzar las partes<br />
internas de las aperturas técnicas.<br />
ATENCIÓN!<br />
INSTALAR EL APARATO<br />
SIEMPRE CON<br />
UNA LIGERA PENDIENTE<br />
DE 8mm HACIA EL LADO<br />
DE DESCARGA<br />
DEL CONDENSADO.<br />
Es posible instalar el aparato con<br />
cualquier otro medio considerado<br />
adecuado por el instalador; siempre<br />
y cuando cumpla con las normas<br />
vigentes.<br />
MECHANISCHE<br />
INSTALLATIE<br />
Installeer het apparaat in een positie<br />
die de luchtaanvoer niet in het<br />
gedrang brengt (zie illustratie).<br />
Bij de installatie van plafondventilator-convectors<br />
is het<br />
aangeraden rekening te houden met<br />
het probleem van luchtstratificatie;<br />
wij herinneren er u tevens aan dat<br />
de luchtroosters op die manier<br />
geplaatst moeten worden, dat de<br />
luchtstroom naar onder is gericht.<br />
Bevestig de structuur van de ventilatorconvector;<br />
<strong>VC</strong>-<strong>HC</strong>-<strong>CD</strong> aan de wand,<br />
<strong>HC</strong>-<strong>CD</strong> aan het plafond.<br />
Steek 4 pluggen in de gaten<br />
aangebracht in de structuur<br />
(aanbevolen schroeven M8).<br />
Voor een installatie aan een<br />
glaswand ofin een andere positie<br />
waar geen wand aanwezig is, zijn<br />
krammen beschikbaar voor de<br />
bevestiging aan de vloer.<br />
Versies <strong>VC</strong>-<strong>HC</strong>; bedek de structuur<br />
met de behuizing en bevestig deze<br />
aan de structuur met behulp van<br />
de bijgeleverde schroeven.<br />
Schuif de luchtfilter in zijn geleiders<br />
en blokkeer het profiel van de<br />
filterhouder.<br />
Versie <strong>VC</strong> zonder voetjes - onderste<br />
sluiting - (paneel) onmisbaar<br />
accessoire om het bereiken van<br />
interne delen in de technische<br />
ruimtes te voorkomen.<br />
OPGELET!<br />
INSTALLEER HET APPARAAT<br />
STEEDS MET EEN LICHTE<br />
HELLING VAN 8 mm NAAR<br />
DE ZIJDE WAAR<br />
HET CONDENSATIEVOCHT<br />
WORDT AFGEVOERD.<br />
Het is mogelijk het apparaat te<br />
installeren met om het even welk<br />
instrument dat door de monteur<br />
geschikt wordt geacht, mits naleving<br />
van de van kracht zijnde normen.


![[PDF] •Outdoor installation 4-5 - Johnson Controls](https://img.yumpu.com/10374038/1/184x260/pdf-ooutdoor-installation-4-5-johnson-controls.jpg?quality=85)
![[PDF] The European Products Catalogue 2012 - Johnson Controls](https://img.yumpu.com/3624903/1/184x260/pdf-the-european-products-catalogue-2012-johnson-controls.jpg?quality=85)