ZT 71 ZT 72 - Cyclon Engineering
ZT 71 ZT 72 - Cyclon Engineering
ZT 71 ZT 72 - Cyclon Engineering

Create successful ePaper yourself
Turn your PDF publications into a flip-book with our unique Google optimized e-Paper software.
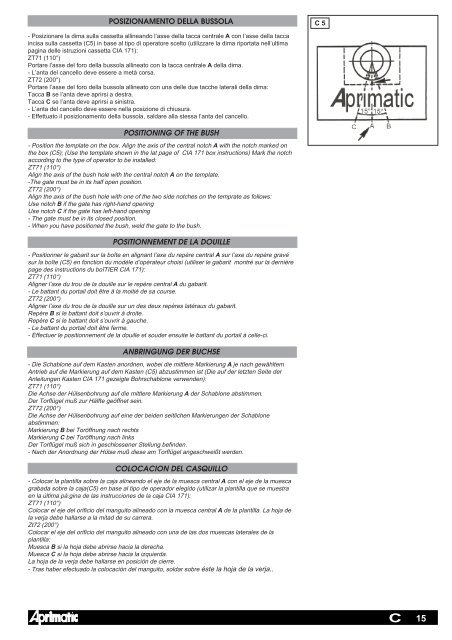
POSIZIONAMENTO DELLA BUSSOLA C 5<br />
- Posizionare la dima sulla cassetta allineando l’asse della tacca centrale A con l’asse della tacca<br />
incisa sulla cassetta (C5) in base al tipo di operatore scelto (utilizzare la dima riportata nell’ultima<br />
pagina delle istruzioni cassetta CIA 1<strong>71</strong>):<br />
<strong>ZT</strong><strong>71</strong> (110°)<br />
Portare l’asse del foro della bussola allineato con la tacca centrale A della dima.<br />
- L’anta del cancello deve essere a metà corsa.<br />
<strong>ZT</strong><strong>72</strong> (200°)<br />
Portare l’asse del foro della bussola allineato con una delle due tacche laterali della dima:<br />
Tacca B se l’anta deve aprirsi a destra.<br />
Tacca C se l’anta deve aprirsi a sinistra.<br />
- L’anta del cancello deve essere nella posizione di chiusura.<br />
- Effettuato il posizionamento della bussola, saldare alla stessa l’anta del cancello.<br />
POSITIONING OF THE BUSH<br />
- Position the template on the box. Align the axis of the central notch A with the notch marked on<br />
the box (C5); (Use the template shown in the lat page of CIA 1<strong>71</strong> box instructions) Mark the notch<br />
according to the type of operator to be installed:<br />
<strong>ZT</strong><strong>71</strong> (110°)<br />
Align the axis of the bush hole with the central notch A on the template.<br />
-The gate must be in its half open position.<br />
<strong>ZT</strong><strong>72</strong> (200°)<br />
Align the axis of the bush hole with one of the two side notches on the temprate as follows:<br />
Use notch B if the gate has right-hand opening<br />
Use notch C if the gate has left-hand opening<br />
- The gate must be in its closed position.<br />
- When you have positioned the bush, weld the gate to the bush.<br />
POSITIONNEMENT DE LA DOUILLE<br />
- Positionner le gabarit sur la boîte en alignant l’axe du repère central A sur l’axe du repère gravé<br />
sur la boîte (C5) en fonction du modèle d’opérateur choisi (utiliser le gabarit montré sur la dernière<br />
page des instructions du boîTIER CIA 1<strong>71</strong>):<br />
<strong>ZT</strong><strong>71</strong> (110°)<br />
Aligner l’axe du trou de la douille sur le repère central A du gabarit.<br />
- Le battant du portail doit être à la moitié de sa course.<br />
<strong>ZT</strong><strong>72</strong> (200°)<br />
Aligner l’axe du trou de la douille sur un des deux repères latéraux du gabarit.<br />
Repère B si le battant doit s’ouvrir à droite.<br />
Repère C si le battant doit s’ouvrir à gauche.<br />
- Le battant du portail doit être ferme.<br />
- Effectuer le positionnement de la douille et souder ensuite le battant du portail à celle-ci.<br />
ANBRINGUNG DER BUCHSE<br />
- Die Schablone auf dem Kasten anordnen, wobei die mittlere Markierung A je nach gewähltem<br />
Antrieb auf die Markierung auf dem Kasten (C5) abzustimmen ist (Die auf der letzten Seite der<br />
Anleitungen Kasten CIA 1<strong>71</strong> gezeigte Bohrschablone verwenden):<br />
<strong>ZT</strong><strong>71</strong> (110°)<br />
Die Achse der Hülsenbohrung auf die mittlere Markierung A der Schablone abstimmen.<br />
Der Torflügel muß zur Hälfte geöffnet sein.<br />
<strong>ZT</strong><strong>72</strong> (200°)<br />
Die Achse der Hülsenbohrung auf eine der beiden seitlichen Markierungen der Schablone<br />
abstimmen:<br />
Markierung B bei Toröffnung nach rechts<br />
Markierung C bei Toröffnung nach links<br />
Der Torflügel muß sich in geschlossener Stellung befinden.<br />
- Nach der Anordnung der Hülse muß diese am Torflügel angeschweißt werden.<br />
COLOCACION DEL CASQUILLO<br />
- Colocar la plantilla sobre la caja alineando el eje de la muesca central A con el eje de la muesca<br />
grabada sobre la caja(C5) en base al tipo de operador elegido (utilizar la plantilla que se muestra<br />
en la última pá:gina de las instrucciones de la caja CIA 1<strong>71</strong>):<br />
<strong>ZT</strong><strong>71</strong> (110°)<br />
Colocar el eje del orificio del manguito alineado con la muesca central A de la plantilla. La hoja de<br />
la verja debe hallarse a la mitad de su carrera.<br />
Zt<strong>72</strong> (200°)<br />
Colocar el eje del orificio del manguito alineado con una de las dos muescas laterales de la<br />
plantilla:<br />
Muesca B si la hoja debe abrirse hacia la derecha.<br />
Muesca C si la hoja debe abrirse hacia la izquierda.<br />
La hoja de la verja debe hallarse en posición de cierre.<br />
- Tras haber efectuado la colocación del manguito, soldar sobre éste la hoja de la verja..<br />
C<br />
15