ZT 71 ZT 72 - Cyclon Engineering
ZT 71 ZT 72 - Cyclon Engineering
ZT 71 ZT 72 - Cyclon Engineering

You also want an ePaper? Increase the reach of your titles
YUMPU automatically turns print PDFs into web optimized ePapers that Google loves.
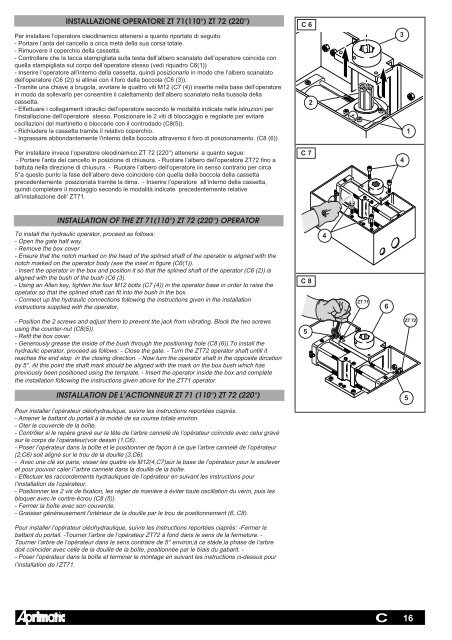
INSTALLAZIONE OPERATORE <strong>ZT</strong> <strong>71</strong>(110°) <strong>ZT</strong> <strong>72</strong> (220°) C 6<br />
Per installare l’operatore oleodinamico attenersi a quanto riportato di seguito:<br />
- Portare l’anta del cancello a circa metà della sua corsa totale.<br />
- Rimuovere il coperchio della cassetta.<br />
- Controllare che la tacca stampigliata sulla testa dell’albero scanalato dell’operatore coincida con<br />
quella stampigliata sul corpo dell’operatore stesso (vedi riquadro C6(1))<br />
- Inserire l’operatore all’interno della cassetta, quindi posizionarlo in modo che l’albero scanalato<br />
dell’operatore (C6 (2)) si allinei con il foro della boccola (C6 (3)).<br />
-Tramite una chiave a brugola, avvitare le quattro viti M12 (C7 (4)) inserite nella base dell’operatore<br />
in modo da sollevarlo per consentire il calettamento dell’albero scanalato nella bussola della<br />
cassetta.<br />
- Effettuare i collegamenti idraulici dell’operatore secondo le modalità indicate nelle istruzioni per<br />
l’installazione dell’operatore stesso. Posizionare le 2 viti di bloccaggio e regolarle per evitare<br />
oscillazioni del martinetto e bloccarle con il controdado (C8(5)).<br />
- Richiudere la cassetta tramite il relativo coperchio.<br />
- Ingrassare abbondantemente l’intemo della boccola attraverso il foro di posizionamento. (C8 (6)).<br />
Per installare invece l’operatore oleodinamico <strong>ZT</strong> <strong>72</strong> (220°) attenersi a quanto segue:<br />
- Portare l’anta del cancello in posizione di chiusura. - Ruotare l’albero dell’operatore <strong>ZT</strong><strong>72</strong> fino a<br />
battuta nella direzione di chiusura. - Ruotare l’albero dell’operatore iin senso contrario per circa<br />
5°a questo punto la fase dell’albero deve coincidere con quella della boccola della cassetta<br />
precedentemente posizionata tramite la dima. - Inserire l’operatore all’interno della cassetta,<br />
quindi completare il montaggio secondo le modalità indicate precedentemente relative<br />
all’installazione dell’ <strong>ZT</strong><strong>71</strong>.<br />
INSTALLATION OF THE <strong>ZT</strong> <strong>71</strong>(110°) <strong>ZT</strong> <strong>72</strong> (220°) OPERATOR<br />
To install the hydraulic operator, proceed as follows:<br />
- Open the gate half way.<br />
- Remove the box cover<br />
- Ensure that the notch marked on the head of the splined shaft of the operator is aligned with the<br />
notch marked on the operator body (see the inset in figure (C6(1)).<br />
- Insert the operator in the box and position it so that the splined shaft of the operator (C6 (2)) is<br />
aligned with the bush of the bush (C6 (3).<br />
- Using an Allen key, tighten the four M12 bolts (C7 (4)) in the operator base in order to raise the<br />
opetator so that the splined shaft can fit into the bush in the box.<br />
- Connect up the hydraulic connections following the instructions given in the installation<br />
instructions supplied with the operator.<br />
- Position the 2 screws and adjust them to prevent the jack from vibrating. Block the two screws<br />
using the counter-nut (C8(5)).<br />
- Refit the box cover.<br />
- Generously grease the inside of the bush through the positioning hole (C8 (6)).To install the<br />
hydraulic operator, proceed as follows: - Close the gate. - Turn the <strong>ZT</strong><strong>72</strong> operator shaft untill it<br />
reaches the end stop in the closing direction. - Now turn the operator shaft in the opposite dircetion<br />
by 5°. At this point the shaft mark should be aligned with the mark on the box bush which has<br />
previously been positioned using the template. - Insert the operator inside the box and complete<br />
the installation following the instructions given above for the <strong>ZT</strong><strong>71</strong> operator.<br />
INSTALLATION DE L’ACTIONNEUR <strong>ZT</strong> <strong>71</strong> (110°) <strong>ZT</strong> <strong>72</strong> (220°)<br />
Pour installer l’opérateur oléohydraulique, suivre les instructions reportées ciaprès.<br />
- Amener le battant du portail à la moitié de sa course totale environ.<br />
- Oter le couvercle de la boîte.<br />
- Contrôler si le repère gravé sur la tête de l’arbre cannelé de l’opérateur coïncide avec celui gravé<br />
sur le corps de l’opérateur(voir dessin (1,C6).<br />
- Poser l’opérateur dans la boîte et le positionner de façon á ce que l’arbre cannelé de l’opérateur<br />
(2,C6) soit aligné sur le trou de la douille (3,C6).<br />
- Avec une clé six pans, visser les quatre vis M12(4,C7)sur la base de l’opérateur pour le soulever<br />
et pour pouvoir caler l’’arbre cannelé dans la douille de la boîte.<br />
- Effectuer les raccordements hydrauliques de l’opérateur en suivant les instructions pour<br />
l’installation de l’opérateur.<br />
- Positionner les 2 vis de fixation, les régler de manière à éviter toute oscillation du vèrin, puis les<br />
bloquer avec le contre-écrou (C8 (5)).<br />
- Fermer la boîte avec son couvercle.<br />
- Graisser généreusement l’intérieur de la douille par le trou de positionnement (6, C8).<br />
Pour installer l’opérateur oléohydraulique, suivre les instructions reportées ciaprès: -Fermer le<br />
battant du portail. -Tourner l’arbre de l’opérateur <strong>ZT</strong><strong>72</strong> à fond dans le sens de la fermeture. -<br />
Tourner l’arbre de l’opérateur dans le sens contraire de 5° environ;à ce stade,la phase de l’arbre<br />
doit coïncider avec celle de la douille de la boîte, positionnée par le biais du gabarit. -<br />
- Poser l’opérateur dans la boîte et terminer le montage en suivant les instructions ci-dessus pour<br />
l’installation de l’<strong>ZT</strong><strong>71</strong>.<br />
C 7<br />
C 8<br />
5<br />
2<br />
4<br />
<strong>ZT</strong> <strong>71</strong><br />
6<br />
C<br />
3<br />
4<br />
1<br />
<strong>ZT</strong> <strong>72</strong><br />
5<br />
16