ZT 71 ZT 72 - Cyclon Engineering
ZT 71 ZT 72 - Cyclon Engineering
ZT 71 ZT 72 - Cyclon Engineering

You also want an ePaper? Increase the reach of your titles
YUMPU automatically turns print PDFs into web optimized ePapers that Google loves.
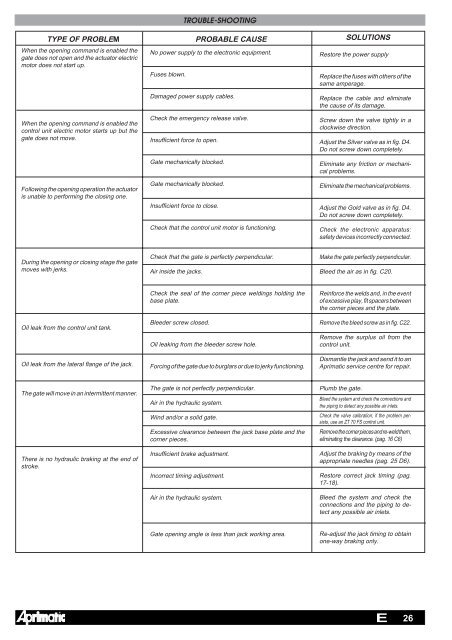
TROUBLE-SHOOTING<br />
TYPE OF PROBLEM PROBABLE CAUSE SOLUTIONS<br />
When the opening command is enabled the<br />
gate does not open and the actuator electric<br />
motor does not start up.<br />
When the opening command is enabled the<br />
control unit electric motor starts up but the<br />
gate does not move.<br />
Following the opening operation the actuator<br />
is unable to performing the closing one.<br />
During the opening or closing stage the gate<br />
moves with jerks.<br />
Oil leak from the control unit tank.<br />
Oil leak from the lateral flange of the jack.<br />
The gate will move in an intermittent manner.<br />
There is no hydraulic braking at the end of<br />
stroke.<br />
No power supply to the electronic equipment.<br />
Fuses blown.<br />
Damaged power supply cables.<br />
Check the emergency release valve.<br />
Insufficient force to open.<br />
Gate mechanically blocked.<br />
Gate mechanically blocked.<br />
Insufficient force to close.<br />
Check that the control unit motor is functioning.<br />
Check that the gate is perfectly perpendicular.<br />
Air inside the jacks.<br />
Check the seal of the corner piece weldings holding the<br />
base plate.<br />
Bleeder screw closed.<br />
Oil leaking from the bleeder screw hole.<br />
Forcing of the gate due to burglars or due to jerky functioning.<br />
The gate is not perfectly perpendicular.<br />
Air in the hydraulic system.<br />
Wind and/or a solid gate.<br />
Excessive clearance between the jack base plate and the<br />
corner pieces.<br />
Insufficient brake adjustment.<br />
Incorrect timing adjustment.<br />
Air in the hydraulic system.<br />
Gate opening angle is less than jack working area.<br />
Restore the power supply<br />
Replace the fuses with others of the<br />
same amperage.<br />
Replace the cable and eliminate<br />
the cause of its damage.<br />
Screw down the valve tightly in a<br />
clockwise direction.<br />
Adjust the Silver valve as in fig. D4.<br />
Do not screw down completely.<br />
Eliminate any friction or mechanical<br />
problems.<br />
Eliminate the mechanical problems.<br />
Adjust the Gold valve as in fig. D4.<br />
Do not screw down completely.<br />
Check the electronic apparatus:<br />
safety devices incorrectly connected.<br />
Make the gate perfectly perpendicular.<br />
Bleed the air as in fig. C20.<br />
Reinforce the welds and, in the event<br />
of excessive play, fit spacers between<br />
the corner pieces and the plate.<br />
Remove the bleed screw as in fig. C22.<br />
Remove the surplus oil from the<br />
control unit.<br />
Dismantle the jack and send it to an<br />
Aprimatic service centre for repair.<br />
Plumb the gate.<br />
Bleed the system and check the connections and<br />
the piping to detect any possible air inlets.<br />
Check the valve calibration; if the problem persists,<br />
use an <strong>ZT</strong> 70 FS control unit.<br />
Remove the corner pieces and re-weld them,<br />
eliminating the clearance. (pag. 16 C6)<br />
Adjust the braking by means of the<br />
appropriate needles (pag. 25 D6).<br />
Restore correct jack timing (pag.<br />
17-18).<br />
Bleed the system and check the<br />
connections and the piping to detect<br />
any possible air inlets.<br />
Re-adjust the jack timing to obtain<br />
one-way braking only.<br />
E<br />
26<br />
39