
Create successful ePaper yourself
Turn your PDF publications into a flip-book with our unique Google optimized e-Paper software.
[7] [1]<br />
[6]<br />
[4]<br />
OK<br />
[2]<br />
[5]<br />
[7] [7]<br />
[1]<br />
[2]<br />
NO<br />
[1]<br />
[6]<br />
[8]<br />
[6]<br />
[7]<br />
[4]<br />
[5]<br />
[3]<br />
[5]<br />
OK<br />
[6]<br />
ITALIANO<br />
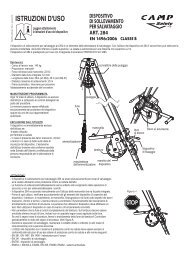
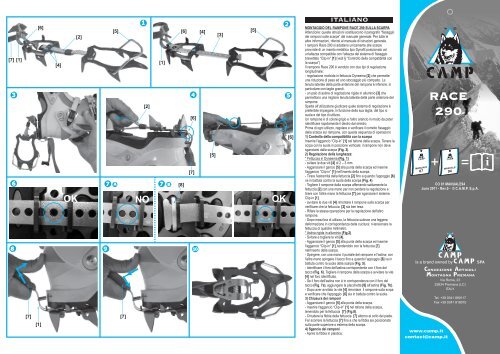
MONTAGGIO DEL <strong>RAMPONE</strong> <strong>RACE</strong> <strong>290</strong> SULLA SCARPA<br />
Attenzione: queste istruzioni sostituiscono il paragrafo “fissaggio<br />
dei ramponi sulle scarpe” del manuale generale. Per tutte le<br />
altre informazioni, riferirsi al manuale di istruzioni generale.<br />
I ramponi Race <strong>290</strong> si adattano unicamente alle scarpe<br />
provviste di un inserto metallico tipo Dynafit posizionato ad<br />
un'altezza compatibile con l'altezza del sistema di fissaggio<br />
brevettato “Clip-in” [1] (vedi § “Controllo della compatibilità con<br />
la scarpa”)<br />
Il rampone Race <strong>290</strong> è venduto con due tipi di regolazione<br />
longitudinale:<br />
- regolazione morbida in fettuccia Dyneema [2] che permette<br />
una riduzione di peso ed uno stoccaggio più compatto. La<br />
tenuta laterale della parte anteriore del rampone è inferiore, in<br />
particolare con taglie grandi.<br />
- un paio di astine di regolazione rigide in alluminio [3] che<br />
permettono una migliore tenuta laterale della parte anteriore del<br />
rampone.<br />
Spetta all'utilizzatore giudicare quale sistema di regolazione è<br />
preferibile impiegare, in funzione della sua taglia, del tipo si<br />
suola e del tipo di utilizzo.<br />
Un rampone è di colore grigio e l'altro arancio in modo da poter<br />
identificare rapidamente il destro dal sinistro.<br />
Prima di ogni utilizzo, regolare e verificare il corretto fissaggio<br />
della scarpa sul rampone, con questa sequenza di operazioni:<br />
1) Controllo della compatibilità con la scarpa<br />
Inserire l'aggancio “Clip-in” [1] nel tallone della scarpa. Tenere la<br />
scrpa con la suola in posizione verticale: il rampone non deve<br />
sganciarsi dalla scarpa (Fig. 3).<br />
2) Regolazione della lunghezza:<br />
* Fettuccia in Dyneema (Fig. 1)<br />
- svitare le due viti [4] di 2 – 3 mm.<br />
- Agganciare il gancio [5] alla punta della scarpa ed inserire<br />
l'aggancio “Clip-in” [1] nell'inserto della scarpa.<br />
- Tirare l'estremità della fettuccia [2] fino a quando l'appoggio [6]<br />
va in battuta contro la suola della scarpa (Fig. 4).<br />
- Togliere il rampone dalla scarpa afferrando saldamente la<br />
fettuccia [2] con una mano per non perdere la regolazione e<br />
tirare con l'altra mano la fettuccia [7] per sganciare il sistema<br />
Clip-in [1].<br />
- avvitare le due viti [4] rimontare il rampone sulla scarpa per<br />
verificare che la fettuccia [2] sia ben tesa.<br />
- Rifare la stessa operazione per la regolazione dell'altro<br />
rampone.<br />
- Dopo mezz'ora di utilizzo, la fettuccia subisce una leggera<br />
deformazione in corrispondenza della cucitura: ri-tensionare la<br />
fettuccia di qualche millimetro.<br />
* Astina rigida in alluminio (Fig.2)<br />
- Svitare e togliere le viti [4].<br />
- Agganciare il gancio [5] alla punta della scarpa ed inserire<br />
l'aggancio “Clip-in” [1], tendendolo con la fettuccia [7]<br />
nell'inserto della scarpa.<br />
- Spingere, con una mano il puntale del rampone e l'astina; con<br />
l'altra mano spingere il tacco fino a quando l'appoggio [6] va in<br />
battuta contro la suola della scarpa (Fig. 5).<br />
- identificare il foro dell'astina corrispondente con il foro del<br />
tacco (Fig. 6). Togliere il rampone dalla scarpa e avvitare la vite<br />
[4] nel foro identificato.<br />
- Se il foro dell'astina non è in corrispondenza con il foro del<br />
tacco (Fig. 7a), aggiungere la placchetta [8] all'astina (Fig. 7b).<br />
- Dopo aver avvitato la vite [4] rimontare il rampone sulla scrpa<br />
e verificare che l'appoggio [6] sia in battuta contro la suola.<br />
3) Chiusura dei ramponi<br />
- Agganciare il gancio [5] alla punta della scarpa.<br />
- Inserire l'aggancio “Clip-in” [1] nel tallone della scarpa,<br />
tenendolo per la fettuccia [7] (Fig.8).<br />
- Chiudere la fibbia della fettuccia [7] attorno al collo del piede.<br />
Far scorrere la fettuccia [7] fino a che la fibbia sia posizionata<br />
sulla parte superiore o esterna della scarpa.<br />
4) Sgancio dei ramponi<br />
- Aprire la fibbia in plastica.<br />
MANUALE<br />
<strong>RACE</strong><br />
<strong>290</strong><br />
+<br />
07 MANUALE<br />
94 =<br />
CO 01 <strong>MANUALE94</strong><br />
June 2011 - Rev.0 - © C.A.M.P. S.p.A.<br />
is a brand owned by SPA<br />
ONCEZIONE RTICOLI<br />
ONTAGNA REMANA<br />
Via Roma, 23<br />
23834 Premana (LC)<br />
ITALY<br />
www.camp.it<br />
contact@camp.it<br />
Tel. +39 0341 890117<br />
Fax +39 0341 818010
- Togliere il rampone tirando sulla fettuccia [7] (Fig. 9). 3) Clamping the crampons: - Pousser, avec une main, l'avant du crampon et la barrette ; - Am Bandende [2] ziehen, bis die Stütze [6] an der Schuhsohle particular con tallas grandes.<br />
5) Piegatura dei ramponi - Attach the hook [5] at the toe of the shoe. avec l'autre main, pousser le talon pour amener l'ergot [6] en anschlägt (Abb. 4). - un par de barras rígidas de regulación de aluminio [3] que<br />
- Abbassare il sistema « Clip-in » [1]. - Insert the “Clip-in” [1] in the heel attachment of the shoe, butée contre la semelle (Fig. 5). - Das Steigeisen vom Schuh nehmen, dabei mit einer Hand das permiten una mejor resistencia lateral de la parte anterior del<br />
- Inserire il tacco nella parte frontale del rampone (Fig. 10). holding it by the webbing [7] (Fig.8). - Repérer le trou de la barrette qui est en correspondance avec Band [2] halten, um die Verstellung beizubehalten, und mit der crampón.<br />
Attenzione : quando il rampone Race <strong>290</strong> è assemblato con - Clamp the buckle with the webbing [7] around the instep of the le trou du talon (Fig. 6). Enlever le crampon de la chaussure et anderen Hand am Band [7] ziehen, um das System Clip-in [1] Corresponde al usuario juzgar cuál de los sistemas de<br />
l'astina rigida in alluminio [3], non è possibile ripiegare il foot. Slide the webbing [7] until the buckle is in position on the viser la vis [4] dans le trou repéré. zu lösen. regulación es preferible emplear, en función de su talla, del tipo<br />
rampone su se stesso e la custodia non è utilizzabile upper or outer part of the shoe. - Si le trou de la barrette n'est pas en correspondance avec le - die beiden Schrauben [4] anziehen, das Steigeisen wieder am de suela y del tipo de utilización.<br />
6) Montaggio dell'antibott 4) Unhooking the crampons: trou du talon (Fig. 7a), ajouter la plaquette [8] dans la barrette Schuh montieren, um sicherzustellen, dass das Band [2] in Un crampón es de color gris y el otro naranja a fin de poder<br />
- Parte frontale del rampone - Open the plastic buckles. (Fig. 7b). angespanntem Zustand ist.<br />
identificar rápidamente el derecho y el izquierdo.<br />
Iniziare con l'aggancio dei due ganci dal lato dell'astina e - Take off the crampons pulling on the webbing [7] (Fig. 9). - Après vissage de la vis [4] remonter la crampon sur la - Den gleichen Verstellvorgang für das andere Steigeisen<br />
Antes de cualquier utilización, regular y comprobar la correcta<br />
continuare con la parte frontale 5) Folding the crampons: chaussure et vérifier que l'ergot [6] est en butée contre la vornehmen.<br />
fijación de la bota sobre el crampón, con esta secuencia de<br />
- Parte posteriore del rampone - Lower the “Clip-in” system [1]. semelle. - Nach einem halbstündigen Gebrauch unterliegt die Bandnaht operaciones:<br />
Agganciare inizialmente l'antibott al fermo [6] e - Insert the heel into the front of the crampon (Fig. 10). 3) Chaussage des crampons einer leichten Verformung: Band erneut um einige Millimeter 1) Control de la compatibilidad con la bota<br />
successivamente i due ganci.<br />
ENGLISH<br />
Warning: when the Race <strong>290</strong> crampon is mounted with the rigid<br />
aluminium bar [3], it is not possible to fold the crampon on itself<br />
and the case is not usable.<br />
- Accrocher le fil [5] à l'avant de la chaussure.<br />
- Insérer la fixation « Clip-in » [1] en la tenant par la sangle [7]<br />
(Fig.8).<br />
spannen.<br />
* Steife Aluminiumschiene (Abb.2).<br />
- Die Schrauben [4] lösen und abnehmen.<br />
Colocar la fijación “Clip-in” [1] en el talón de la bota. Sostener<br />
la bota con la suela en posición vertical: el crampón no se<br />
debe desenganchar de la bota (Fig. 3).<br />
MOUNTING <strong>RACE</strong> <strong>290</strong> CRAMPONS TO SHOES 6) Mounting the anti-balling plates: - Fermer autour du coup de pied la boucle plastique de la sangle - Den Bügel [5] in die Schuhspitze einhaken und die Bindung 2) Regulación de la longitud:<br />
Warning: These instructions replace the paragraph “anchoring - At the Front of crampon [7]. Faire coulisser la sangle [7] dans la fixation afin que la<br />
“Clip-in” [1] einführen, dabei mit dem Band [7] im Schuheinsatz * Cinta de Dyneema (Fig. 1)<br />
crampons to shoes” from the general manual. For any other Start by attaching the two hooks on the side of the bar and boucle fermée soit positionnée sur le dessus ou la partie externe spannen. - Aflojar los dos tornillos [4] de 2 – 3 mm.<br />
information, refer to the general instruction manual. continue with the front. de la chaussure.<br />
- Mit einer Hand die Steigeisenspitze und die Schiene schieben; - Enganchar el gancho [5] en la punta de la bota y colocar la<br />
Race <strong>290</strong> crampons fit shoes with a Dynafit metal inserts at a - At the Rear of crampon 4) Déchaussage des crampons<br />
mit der anderen Hand den Absatz schieben, bis die Stütze [6] fijación “Clip-in” [1] en el refuerzo de la bota.<br />
height compatible with the patented “Clip-in” anchoring system First attach the anti-balling stop [6] and then the two hooks. - Ouvrir la boucle plastique.<br />
an der Schuhsohle anschlägt (Abb. 5). - Estirar el extremo de la cinta [2] hasta que el apoyo [6]<br />
[1] (see “Check shoe compatibility”) - Enlever le crampon en tirant sur la sangle [7] (Fig. 9).<br />
- die Schienenöffnung ermitteln, die der Absatzöffnung choque contra la suela de la bota (Fig. 4).<br />
Race <strong>290</strong> Crampons are sold with two types of length 5) Pliage des crampons<br />
entspricht (Abb. 6). Steigeisen vom Schuh nehmen und die - Retirar el crampón de la bota aferrando firmemente la cinta<br />
adjustment: FIXATION DES CRAMPONS <strong>RACE</strong> <strong>290</strong> SUR LES - Rabattre la fixation « Clip-in » [1]. Schraube [4] in der ermittelten Öffnung anschrauben.<br />
[2] con una mano para no perder la regulación y estirar con la<br />
- One uses the soft adjustment with Dyneema [2] webbing; this CHAUSSURES - Insérer le talon dans la partie avant du crampon (Fig. 10).<br />
- Sollte die Schienenöffnung nicht mit der Absatzöffnung otra mano la cinta [7] para desenganchar el sistema Clip-in [1].<br />
reduces weight and affords compact storage. However, the Attention : Ces instructions remplacent le paragraphe « Fixation Attention : Lorsque le Race <strong>290</strong> est monté avec les barrettes übereinstimmen (Abb. 7a), ist an der Schiene das Plättchen [8] - Ajustar los dos tornillos [4] volver a colocar el crampón sobre<br />
sideways grip on the front of the crampon is not as strong, des crampons sur les chaussures » de la notice générale. Pour rigides en aluminium [3], il n'est pas possible de replier le talon hinzuzufügen (Abb. 7b). la bota para comprobar que la cinta [2] esté bien tensa.<br />
especially for larger shoe sizes. toutes les autres informations, se référer à la notice générale. sur l'avant du crampon et la housse de rangement n'est pas - Nach dem Anschrauben der Schraube [4] das Steigeisen - Repetir la misma operación para la regulación del otro<br />
- The other uses a pair of rigid aluminium adjustment bars [3] Les crampons Race <strong>290</strong> s'adaptent uniquement sur des utilisable. wieder am Schuh montieren und sicherstellen, dass die Stütze crampón.<br />
which create a stronger sideways grip on the front of the chaussures pourvues d'un insert métallique de type Dynafit situé 6) Mise en place des Antibott [6] an der Sohle anschlägt.<br />
- Luego de media hora de utilización, la cinta experimenta una<br />
crampon. à une hauteur compatible avec la hauteur de la fixation breveté - Partie avant du crampon 3) Schließung der Steigeisen<br />
ligera deformación en correspondencia con la costura: volver a<br />
It is at the discretion of the user which adjustment system is « Clip-in » [1] (voir § « Contrôle de la compatibilité avec la Commencer à mettre les 2 crochets du côté de la barrette et - Den Bügel [5] in die Schuhspitze einhängen.<br />
tensar algunos milímetros la cinta.<br />
preferable based on size, shoe sole and use. chaussure ») progresser vers l'avant du crampon. - Die Bindung “Clip-in” [1] in die Schuhferse einführen und dabei * Barra rígida de aluminio (Fig.2).<br />
One gray and one orange crampon make it is easy to Le crampon Race <strong>290</strong> est livré avec deux types de barrettes : - Partie arrière du crampon am Band [7] halten (Abb.8).<br />
- Aflojar y retirar los tornillos [4].<br />
distinguish right from left. - une paire de barrettes souples en sangle Dyneema [2] qui Commencer à accrocher au moyen de l'ergot [6] puis mettre les - Bandschnalle [7] um den Fußhals schließen. Band [7] gleiten - Enganchar el gancho [5] en la punta de la bota y colocar la<br />
Before each use, follow these steps to check that the crampon<br />
is correctly anchored to the shoe:<br />
1) Verify that the crampon and shoe are compatible:<br />
permet un gain de poids et un rangement plus compact. La<br />
tenue latérale de la partie avant du crampon est un peu moins<br />
bonne, en particulier avec les grandes pointures.<br />
2 crochets.<br />
DEUTSCH<br />
lassen, bis die Schnalle am oberen oder äußeren Schuhteil<br />
aufliegt.<br />
4) Aushängen der Steigeisen<br />
fijación “Clip-in” [1], sujetándola con la cinta [7] en el refuerzo<br />
de la bota.<br />
- Empujar, con una mano la punta del crampón y la barra; con<br />
Insert the “Clip-in” [1] attachment in the heel of the shoe. Hold - une paire de barrettes rigides en aluminium [3] qui permet une MONTAGE DES STEIGEISENS <strong>RACE</strong> <strong>290</strong> AM SCHUH - Kunststoffschnalle öffnen.<br />
la otra mano empujar el taco hasta que el apoyo [6] choque<br />
the shoe so the sole is perpendicular to the ground: the meilleure tenue latérale de l'avant du crampon. Achtung: Diese Anweisungen ersetzen den Abschnitt “Fixierung - Steigeisen durch Ziehen am Band [7] (Abb. 9) abnehmen. contra la suela de la bota (Fig. 5).<br />
crampon must not become disengaged from the shoe (Fig. 3). Il appartient à l'utilisateur de juger en fonction de sa pointure, de der Steigeisen an den Schuhen” der allgemeinen Anweisung. 5) Zusammenklappen der Steigeisen<br />
- Identificar el agujero de la barra correspondiente con el<br />
2) Adjust the length: son type de semelle de chaussure et de son type d'utilisation Für alle anderen Informationen bitte die allgemeine - System “Clip-in” [1] senken.<br />
agujero del taco (Fig. 6). Retirar el crampón de la bota y<br />
* Dyneema webbing (Fig. 1) quelle barrette il est préférable d'utiliser. Bedienungsanweisung hinzuziehen. - Absatz in den vorderen Teil des Steigeisens einführen (Abb. ajustar el tornillo [4] en el agujero identificado.<br />
- Back out the two screws [4] (2-3 mm). Un crampon est de couleur grise et l'autre orange afin de Die Steigeisen Race <strong>290</strong> eignen sich ausschließlich für Schuhe 10).<br />
- Si el agujero de la barra no se corresponde con el agujero del<br />
- Attach the clip [5] at the toe of the shoe and insert the “Clip- différencier rapidement le pied gauche du pied droit. mit Metalleinsatz des Typs Dynafit, welcher auf einer Höhe Achtung: Wurde das Steigeisen Race <strong>290</strong> mit der festen<br />
taco (Fig. 7a), agregar la plaqueta [8] a la barra (Fig. 7b).<br />
in” attachment [1] into the shoe insert. Avant toute utilisation, régler et vérifier la bonne fixation de la angebracht ist, die mit der Höhe des patentierten Fixiersystems Aluminiumschiene [3] montiert, ist das Zusammenklappen des - Después de haber ajustado el tornillo [4] volver a colocar el<br />
- Pull the end of the webbing [2] until the support [6] lies flat up chaussure sur le crampon en suivant les étapes suivantes: “Clip-in” [1] kompatibel ist (siehe § “Überprüfung der Steigeisens nicht möglich und der Packbeutel ist nicht crampón sobre la bota y comprobar que el apoyo [6] esté en<br />
against the sole of the shoe (Fig.4). 1) Contrôle de la compatibilité avec la chaussure Schuhkompatibilität”) verwendbar contacto con la suela.<br />
- Firmly grasp the webbing [2], pull the crampon with one hand Insérer la fixation « Cilp-in » [1] dans le talon de la chaussure. Das Steigeisen Race <strong>290</strong> wird mit zwei Arten von 6) Montage der Antistollplatte 3) Cierre de los crampones<br />
to not lose the adjustment and with the other unhook the Clip-in Tenir la chaussure avec la semelle verticale : le crampons doit Längenverstellung verkauft: - Vorderer Steigeisenteil - Enganchar el gancho [5] en la punta de la bota.<br />
system [1]. tenir à la chaussure (Fig. 3). - weiche Verstellung aus Dyneema-Band [2], die eine Zuerst die beiden Bügel an der Schienenseite einhaken und - Colocar la fijación “Clip-in” [1] en el talón de la bota,<br />
- Tighten the two screws [4] and remount the crampon to the 2) Réglage en longueur : Gewichtsreduzierung und eine kompaktere Aufbewahrung dann an der Vorderseite fortfahren sujetándola por la cinta [7] (Fig.8).<br />
shoe to check to be sure the webbing [2] is tight. * Barrettes souples en sangle Dyneema (Fig. 1) ermöglicht. Der Seitenhalt des vorderen Steigeisenteils liegt - Hinterer Steigeisenteil - Cerrar la hebilla de la cinta [7] alrededor del cuello del pie.<br />
- Repeat the same steps with the other crampon. - Desserrer les deux vis [4] de 2 à 3 mm. unten, insbesondre bei größeren Größen. Zuerst die Antistollplatte und daraufhin die beiden Bügel in die Hacer deslizar la cinta [7] hasta que la hebilla esté ubicada<br />
- After a half hour of use, the webbing stretches slightly - Accrocher le fil [5] à l'avant de la chaussure et insérer la - ein Paar steife Verstellschienen aus Aluminium [3], die einen Sperre [6] einhaken. sobre la parte superior o externa de la bota.<br />
because of the stitching: Re-tighten the webbing a few fixation « Clip-in » [1] dans l'insert de la chaussure. besseren Seitenhalt des vorderen Steigeisenteils ermöglichen. 4) Desenganche de los crampones<br />
ESPANOL<br />
millimetres. - Tirer sur l'extrémité de la sangle [2] pour amener l'ergot [6] en Der Benutzer selbst muss entscheiden, welches Verstellsystem - Abrir la hebilla de plástico.<br />
* Rigid aluminium bar (Fig.2). butée contre la semelle de la chaussure (Fig. 4). er im Hinblick auf seine Größe, Sohlen- und Einsatzart vorzieht. COLOCACIÓN DEL CRAMPÓN <strong>RACE</strong> <strong>290</strong> SOBRE LAS - Retirar el crampón estirando la cinta [7] (Fig. 9).<br />
- Back out and remove the screws [4]. - Enlever le crampon de la chaussure en serrant avec une main Ein Steigeisen ist grau, das andere orange, so dass der rechte BOTAS 5) Plegado de los crampones<br />
- Attach the clip [5] at the toe of the shoe and insert the “Clip- la sangle [2] pour ne pas perdre le réglage et en tirant avec rasch vom linken Steigeisen unterschieden werden kann. Atención: estas instrucciones sustituyen al párrafo “fijación de - Bajar el sistema « Clip-in » [1].<br />
in” attachment [1] holding it with the webbing [7] in the shoe l'autre main sur la sangle [7] pour ouvrir la fixation Clip-in [1]. Vor jedem Gebrauch ist die korrekte Schuhfixierung am los crampones sobre las botas” del manual general. Para el - Colocar el taco en la parte frontal del crampón (Fig. 10).<br />
insert. - Serrer les deux vis [4] et remonter le crampon sur la Steigeisen, wie nachstehend beschrieben, zu regulieren und zu resto de la información, remitirse al manual de instrucciones Atención: cuando el crampón Race <strong>290</strong> está armado con la<br />
- Push with one hand on the toe of the crampon and the bar; chaussure pour contrôler que la sangle [2] est bien tendue. überprüfen: generales. barra rígida de aluminio [3], no es posible plegar el crampón<br />
with the other hand push the heel until the tread lies flat against - Renouveler ces opérations pour régler l'autre pied. 1) Überprüfung der Schuhkompatibilität Los crampones Race <strong>290</strong> se adaptan únicamente al calzado sobre sí mismo y el estuche no es utilizable<br />
the sole of the shoe (Fig. 5). - Après la première demi-heure d'utilisation, la sangle se Die Bindung “Clip-in” [1] in die Schuhferse einführen. Den provisto de un refuerzo metálico tipo Dynafit colocado a una 6) Montaje del antibott<br />
- Make sure the bar hole lines up with the shoe hole (Fig. 6). déforme légèrement au niveau de la couture : retendre la sangle Schuh mit der Sohle in senkrechter Position halten: Das altura compatible con la altura del sistema de fijación patentado - Parte frontal del crampón<br />
Remove the crampon from the shoe and tighten the screws [4] de quelques millimètres. Steigeisen darf sich nicht vom Schuh lösen (Abb. 3). “Clip-in” [1] (ver § “Control de compatibilidad con el calzado”) Comenzar con el enganche de los dos ganchos del lado de la<br />
in the identified hole. * Barrettes rigide en aluminium (Fig.2) 2) Längenverstellung: El crampón Race <strong>290</strong> se vende con dos tipos de regulación barra y continuar con la parte frontal<br />
- If the bar hole doesn't line up with the shoe hole (Fig. 7a), - Dévisser et enlever la vis [4]. * Dyneema-Band (Abb. 1) longitudinal: - Parte posterior del crampón<br />
add a washer [8] to the bar (Fig. 7b). - Accrocher le fil [5] à l'avant de la chaussure et insérer la - die beiden Schrauben [4] um 2 – 3 mm lockern. - regulación blanda en cinta Dyneema [2] que permite una Enganchar inicialmente el antibott al seguro [6] y<br />
- After tightening the screws [4], re-attach the crampon to the fixation « Clip-in » [1], en la tenant par la sangle [7], dans l'insert - Den Bügel [5] in die Schuhspitze einhaken und die Bindung reducción de peso y un almacenamiento más compacto. La sucesivamente los dos ganchos.<br />
shoe and check that the tread [6] lies flat against the sole. de la chaussure. “Clip-in” [1] in den Schuheinsatz einführen. resistencia lateral de la parte anterior del crampón es inferior, en