Manuale di istruzioni completo (12 lingue)
Manuale di istruzioni completo (12 lingue)
Manuale di istruzioni completo (12 lingue)

You also want an ePaper? Increase the reach of your titles
YUMPU automatically turns print PDFs into web optimized ePapers that Google loves.
The gas nozzle must be replaced when the hole is no<br />
longer smooth and the cutting capacity is <strong>di</strong>minished.<br />
The <strong>di</strong>ffuser must be replaced when some areas are<br />
blackened. Due to its small size, it is very important to<br />
position it correctly during assembly (see fig. 4).<br />
The nozzle holder must be replaced when the insulating<br />
part is deteriorated<br />
Make sure that the electrode T, the <strong>di</strong>ffuser U and the<br />
gas nozzle V are mounted correctly, and that the<br />
nozzle holder W is firmly tightened.<br />
If any of these parts are missing, this will interfere<br />
with smooth operation of the machine and, especially,<br />
jeopar<strong>di</strong>ze operator safety<br />
4 CUTTING ERRORS<br />
4.1 INSUFFICIENT PENETRATION<br />
This error may be caused by the following:<br />
high speed. Always make sure that the arc fully penetrates<br />
the workpiece and is never held at a forward angle<br />
of more than 10 -15°. This will avoid incorrect consumption<br />
of the nozzle and burns to the nozzle holder.<br />
Excessively thick workpiece (see cutting speed <strong>di</strong>agrams,<br />
fig. 5).<br />
Fig. 5<br />
Groun<strong>di</strong>ng clamp not in good electrical contact with the<br />
workpiece.<br />
Worn nozzle and electrode.<br />
Cutting current too low.<br />
NOTE: When the arc does not penetrate, the molten<br />
metal scraps obstruct the nozzle.<br />
4.2 THE CUTTING ARC GOES OFF<br />
This error may be caused by:<br />
worn nozzle, electrode or swirl ring.<br />
air pressure too high.<br />
supply voltage too low.<br />
4.3 SHORTER LIFE OF CONSUMER PARTS<br />
This error may be caused by:<br />
oil or <strong>di</strong>rt in the arc intake,<br />
unnecessarily long pilot arc,<br />
low arc pressure.<br />
5 HELPFUL HINTS<br />
If the system air contains considerable amounts of moisture<br />
and oil, it is best to use a drying filter to avoid<br />
excessive oxidation and wear on consumer parts, damage<br />
to the torch and a reduction in the speed and quality<br />
of the cutting.<br />
Make sure that the new electrode and nozzle to be<br />
mounted are thoroughly clean and degreased.<br />
Always use original spare parts to avoid damaging<br />
the torch.<br />
6 MAINTENANCE<br />
Always cut off the power supply to the machine before<br />
any operation, which must always be carried out by qualified<br />
personnel.<br />
6.1 GENERATOR MAINTENANCE<br />
In the case of maintenance inside the machine, make<br />
sure that the switch C is in position "O" and that the<br />
power cord is <strong>di</strong>sconnected from the mains.<br />
Even though the machine is equipped with an automatic<br />
condensation drainage device that is tripped each time<br />
the air supply is closed, it is good practice to perio<strong>di</strong>cally<br />
make sure that there is no condensation accumulated in<br />
the water trap I (fig.1).<br />
It is also necessary to perio<strong>di</strong>cally clean the interior of the<br />
machine from the accumulated metal dust, using compressed<br />
air.<br />
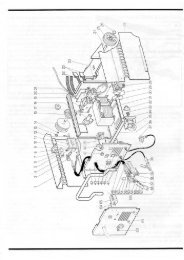
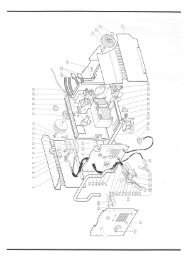
6.2 PRECAUTIONS AFTER REPAIRS.<br />
After making repairs, take care to organize the wiring so that<br />
there is secure insulation between the primary and secondary<br />
sides of the machine. In particular, make sure that the<br />
casing 50 is mounted (see exploded drawing). Do not allow<br />
the wires to come into contact with moving parts or those<br />
that heat up during operation. Reassemble all clamps as<br />
they were on the original machine, to prevent a connection<br />
from occurring between the primary and secondary circuits<br />
should a wire accidentally break or be <strong>di</strong>sconnected.<br />
Also mount the screws with geared washers as on the original<br />
machine.<br />
9