FW 5549 Bedienungsanleitung/Garantie Fleischwolf
FW 5549 Bedienungsanleitung/Garantie Fleischwolf
FW 5549 Bedienungsanleitung/Garantie Fleischwolf
Create successful ePaper yourself
Turn your PDF publications into a flip-book with our unique Google optimized e-Paper software.
30<br />
English<br />
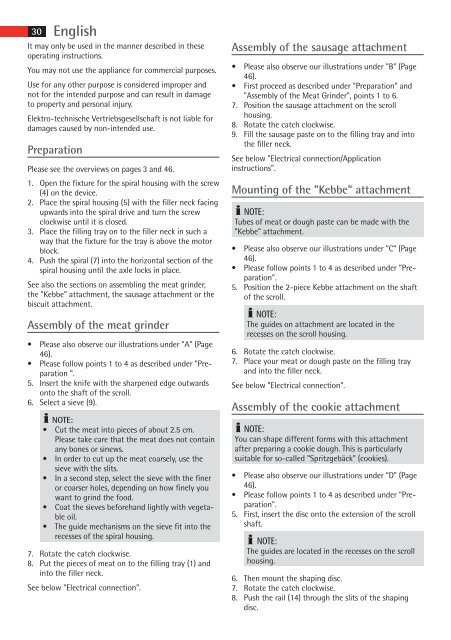
It may only be used in the manner described in these<br />
operating instructions.<br />
You may not use the appliance for commercial purposes.<br />
Use for any other purpose is considered improper and<br />
not for the intended purpose and can result in damage<br />
to property and personal injury.<br />
Elektro-technische Vertriebsgesellschaft is not liable for<br />
damages caused by non-intended use.<br />
Preparation<br />
Please see the overviews on pages 3 and 46.<br />
1. Open the fixture for the spiral housing with the screw<br />
(4) on the device.<br />
2. Place the spiral housing (5) with the filler neck facing<br />
upwards into the spiral drive and turn the screw<br />
clockwise until it is closed.<br />
3. Place the filling tray on to the filler neck in such a<br />
way that the fixture for the tray is above the motor<br />
block.<br />
4. Push the spiral (7) into the horizontal section of the<br />
spiral housing until the axle locks in place.<br />
See also the sections on assembling the meat grinder,<br />
the "Kebbe" attachment, the sausage attachment or the<br />
biscuit attachment.<br />
Assembly of the meat grinder<br />
• Please also observe our illustrations under "A" (Page<br />
46).<br />
• Please follow points 1 to 4 as described under "Preparation<br />
".<br />
5. Insert the knife with the sharpened edge outwards<br />
onto the shaft of the scroll.<br />
6. Select a sieve (9).<br />
NOTE:<br />
• Cut the meat into pieces of about 2.5 cm.<br />
Please take care that the meat does not contain<br />
any bones or sinews.<br />
• In order to cut up the meat coarsely, use the<br />
sieve with the slits.<br />
• In a second step, select the sieve with the finer<br />
or coarser holes, depending on how finely you<br />
want to grind the food.<br />
• Coat the sieves beforehand lightly with vegetable<br />
oil.<br />
• The guide mechanisms on the sieve fit into the<br />
recesses of the spiral housing.<br />
7. Rotate the catch clockwise.<br />
8. Put the pieces of meat on to the filling tray (1) and<br />
into the filler neck.<br />
See below "Electrical connection".<br />
Assembly of the sausage attachment<br />
• Please also observe our illustrations under "B" (Page<br />
46).<br />
• First proceed as described under "Preparation" and<br />
"Assembly of the Meat Grinder", points 1 to 6.<br />
7. Position the sausage attachment on the scroll<br />
housing.<br />
8. Rotate the catch clockwise.<br />
9. Fill the sausage paste on to the filling tray and into<br />
the filler neck.<br />
See below "Electrical connection/Application<br />
instructions".<br />
Mounting of the "Kebbe" attachment<br />
NOTE:<br />
Tubes of meat or dough paste can be made with the<br />
"Kebbe" attachment.<br />
• Please also observe our illustrations under "C" (Page<br />
46).<br />
• Please follow points 1 to 4 as described under "Preparation".<br />
5. Position the 2-piece Kebbe attachment on the shaft<br />
of the scroll.<br />
NOTE:<br />
The guides on attachment are located in the<br />
recesses on the scroll housing.<br />
6. Rotate the catch clockwise.<br />
7. Place your meat or dough paste on the filling tray<br />
and into the filler neck.<br />
See below "Electrical connection".<br />
Assembly of the cookie attachment<br />
NOTE:<br />
You can shape different forms with this attachment<br />
after preparing a cookie dough. This is particularly<br />
suitable for so-called "Spritzgebäck" (cookies).<br />
• Please also observe our illustrations under "D" (Page<br />
46).<br />
• Please follow points 1 to 4 as described under "Preparation".<br />
5. First, insert the disc onto the extension of the scroll<br />
shaft.<br />
NOTE:<br />
The guides are located in the recesses on the scroll<br />
housing.<br />
6. Then mount the shaping disc.<br />
7. Rotate the catch clockwise.<br />
8. Push the rail (14) through the slits of the shaping<br />
disc.<br />
05-<strong>FW</strong> <strong>5549</strong> AEG.indd 30 11.09.2009 9:14:18 Uhr


