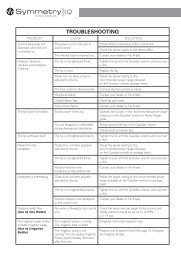
User Manual • Benutzerhandbuch • Manuel de l'utilisateur • Manuale ...
User Manual • Benutzerhandbuch • Manuel de l'utilisateur • Manuale ...
User Manual • Benutzerhandbuch • Manuel de l'utilisateur • Manuale ...

Create successful ePaper yourself
Turn your PDF publications into a flip-book with our unique Google optimized e-Paper software.
4 5<br />
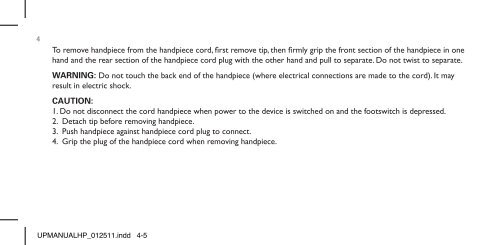
To remove handpiece from the handpiece cord, first remove tip, then firmly grip the front section of the handpiece in one<br />
OPERATING PROCEDURES<br />
hand and the rear section of the handpiece cord plug with the other hand and pull to separate. Do not twist to separate.<br />
TIp CoNNECTIoN<br />
WARNING: Do not touch the back end of the handpiece (where electrical connections are ma<strong>de</strong> to the cord). It may<br />
Your Hu-Friedy Symmetry piezo tip comes with its own tip carrier/torque limiting<br />
result in electric shock.<br />
wrench (the guardian, Fig. 3).<br />
CAUTION:<br />
Attach tip to handpiece using the guardian wrench by aligning the threa<strong>de</strong>d<br />
1. Do not disconnect the cord handpiece when power to the <strong>de</strong>vice is switched on and the footswitch is <strong>de</strong>pressed.<br />
end of the tip to the handpiece. (Fig. 4) Rotate the guardian wrench clockwise.<br />
2. Detach tip before removing handpiece.<br />
3. push handpiece against handpiece cord plug to connect.<br />
Complete installation of the tip by rotating the guardian until you hear clicking.<br />
4. grip the plug of the handpiece cord when removing handpiece.<br />
The guardian must be used to completely tighten the tip during installation.<br />
Incomplete tightening may cause the tip to become loose or lack vibration.<br />
When using the guardian without a tip previously inserted into the tip carrier,<br />
take the following step: place the guardian over the tip by slipping tip through the<br />
small hole in the bottom, closed end of the tool. This will position the tip within<br />
the guardian wrench for safety and convenience.<br />
UPMANUALHP_012511.indd 4-5 1/25/11 3:19 PM