Manual de instalación y mantenimiento - Astral Pool
Manual de instalación y mantenimiento - Astral Pool
Manual de instalación y mantenimiento - Astral Pool

Create successful ePaper yourself
Turn your PDF publications into a flip-book with our unique Google optimized e-Paper software.
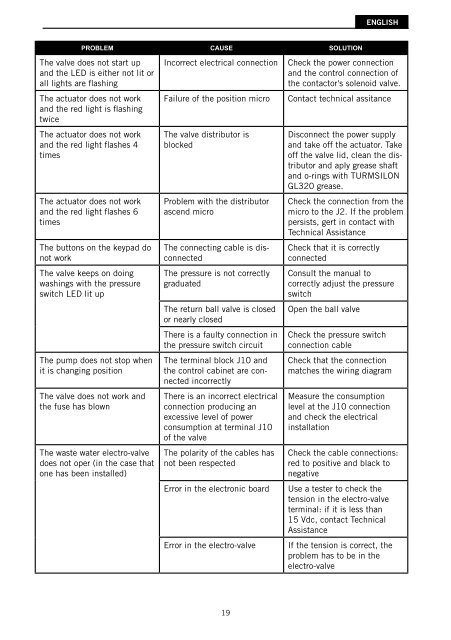
ENGLISH<br />
PROBLEM CAUSE SOLUTION<br />
The valve does not start up<br />
and the LED is either not lit or<br />
all lights are fl ashing<br />
The actuator does not work<br />
and the red light is fl ashing<br />
twice<br />
The actuator does not work<br />
and the red light fl ashes 4<br />
times<br />
The actuator does not work<br />
and the red light fl ashes 6<br />
times<br />
The buttons on the keypad do<br />
not work<br />
The valve keeps on doing<br />
washings with the pressure<br />
switch LED lit up<br />
The pump does not stop when<br />
it is changing position<br />
The valve does not work and<br />
the fuse has blown<br />
The waste water electro-valve<br />
does not oper (in the case that<br />
one has been installed)<br />
Incorrect electrical connection<br />
Failure of the position micro<br />
The valve distributor is<br />
blocked<br />
Problem with the distributor<br />
ascend micro<br />
The connecting cable is disconnected<br />
The pressure is not correctly<br />
graduated<br />
The return ball valve is closed<br />
or nearly closed<br />
There is a faulty connection in<br />
the pressure switch circuit<br />
The terminal block J10 and<br />
the control cabinet are connected<br />
incorrectly<br />
There is an incorrect electrical<br />
connection producing an<br />
excessive level of power<br />
consumption at terminal J10<br />
of the valve<br />
The polarity of the cables has<br />
not been respected<br />
Error in the electronic board<br />
Error in the electro-valve<br />
Check the power connection<br />
and the control connection of<br />
the contactor's solenoid valve.<br />
Contact technical assitance<br />
Disconnect the power supply<br />
and take off the actuator. Take<br />
off the valve lid, clean the distributor<br />
and aply grease shaft<br />
and o-rings with TURMSILON<br />
GL320 grease.<br />
Check the connection from the<br />
micro to the J2. If the problem<br />
persists, gert in contact with<br />
Technical Assistance<br />
Check that it is correctly<br />
connected<br />
Consult the manual to<br />
correctly adjust the pressure<br />
switch<br />
Open the ball valve<br />
Check the pressure switch<br />
connection cable<br />
Check that the connection<br />
matches the wiring diagram<br />
Measure the consumption<br />
level at the J10 connection<br />
and check the electrical<br />
installation<br />
Check the cable connections:<br />
red to positive and black to<br />
negative<br />
Use a tester to check the<br />
tension in the electro-valve<br />
terminal: if it is less than<br />
15 Vdc, contact Technical<br />
Assistance<br />
If the tension is correct, the<br />
problem has to be in the<br />
electro-valve<br />
19