You also want an ePaper? Increase the reach of your titles
YUMPU automatically turns print PDFs into web optimized ePapers that Google loves.
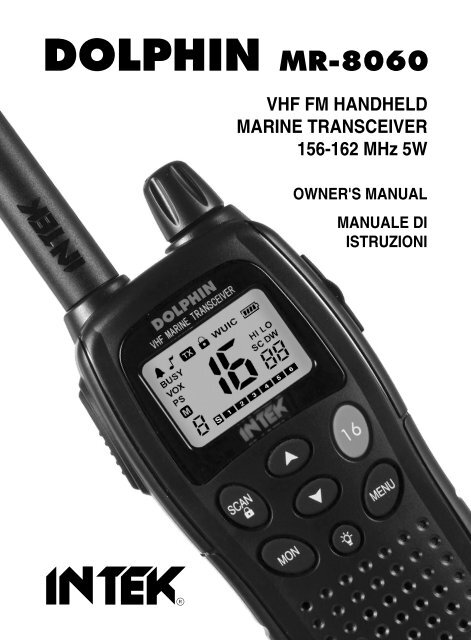
<strong>DOLPHIN</strong> MR-8060<br />
VHF FM HANDHELD<br />
MARINE TRANSCEIVER<br />
156-162 MHz 5W<br />
OWNER'S MANUAL<br />
MANUALE DI<br />
ISTRUZIONI
Index<br />
English<br />
Contents .................................................................................................................. 1<br />
Introduction ......................................................................................................... 2-3<br />
Contents of Package ............................................................................................. 3<br />
Battery Operation ................................................................................................... 4<br />
Controls and Indicators .................................................................................... 5-10<br />
Operation.......................................................................................................... 11-18<br />
User Information ................................................................................................... 18<br />
Specifications ....................................................................................................... 19<br />
Optional Accessories ........................................................................................... 19<br />
Important Informations ........................................................................................ 20<br />
Declaration of Conformity.................................................................................... 21<br />
Table of restrictions on the use of VHF marine transceivers ........................... 22<br />
NOTICE !<br />
The use of VHF marine transceivers is subject to the regulations applied in the country<br />
where the product has to be used. As regulations are subject to possible modifications,<br />
please check the current regulations in your country with your dealer or local supplier,<br />
before using the radio. INTEK does not take any responsibility for illegal use and<br />
operation of this product not in accordance with the regulation of the country where the<br />
product is used (please check the frequency bands table at page 22).<br />
0678<br />
RoHS<br />
2002/95/EC<br />
- 1 -
Introduction<br />
Congratulations !<br />
Congratulations on your selection and purchase of this high quality product. With proper care<br />
and adherence to the set-up and user instructions in this Owner’s Manual, this unit will let you<br />
enjoy years of trouble-free service.<br />
We are committed to providing quality products that fit your needs, however we would like to<br />
receive any comments or suggestions that you might have on this product, which will help us in<br />
continuous improvement of the quality.<br />
English<br />
Applications<br />
Thank you for choosing INTEK for your marine mobile application. We believe that this user<br />
friendly transceiver will provide you with clear and reliable communications and to keep your<br />
professional and sport activities at peak efficiency. This transceiver incorporates the latest and<br />
most advanced technology, so you will be pleased with its quality and its technical features.<br />
The marine transceiver INTEK <strong>DOLPHIN</strong> has been designed to be used in marine environment<br />
and his functions make it very attractive, specially thanks to the VOX (handsfree use) function,<br />
adjustable Digital Squelch and Digital S/RF Meter.<br />
<strong>DOLPHIN</strong>-EX (INTERNATIONAL VERSION)<br />
Items in this manual that are marked (<strong>DOLPHIN</strong>-EX) refer only to model INTEK <strong>DOLPHIN</strong>-EX.<br />
Functions marked (<strong>DOLPHIN</strong>-EX) are not available in model <strong>DOLPHIN</strong> (EUROPEAN<br />
VERSION).<br />
Model <strong>DOLPHIN</strong>-EX is not available in the European market.<br />
IMPORTANT !<br />
This radio can only be used with a valid ship' s radio station licence, issued by the national<br />
authorities in the home country of the ship.<br />
This radio can be used on non-solas (non GMDSS) ships only.<br />
- 2 -
Introduction - Contents of Package<br />
English<br />
Features and Benefits<br />
The radio includes a number of advanced features, nevertheless its operation is user firendly<br />
and you may get familiar with it, after few minutes of use.<br />
Please refer to the following list of the main feautres in this two-way radio :<br />
Fastpath to the rescue channel 16<br />
50 Private Channels (<strong>DOLPHIN</strong>-EX)<br />
Selection from International channels, USA channels and Canadian channels<br />
Meteo weather channels<br />
Roger Beep Tone<br />
Keypad Program Tone<br />
8 Memory Channels<br />
Keypad Lock<br />
Adjustable Digital Squelch<br />
Monitor<br />
Auto Power Save Circuit<br />
VOX / Handsfree Use<br />
Dual Watch function<br />
Adjustable Hi-LO Transmitter Power<br />
Channel / Memory Scan<br />
3 Selectable Call Tone Melodies<br />
Large Size Back Lighted LCD Display<br />
Battery Status<br />
Digital S/RF Meter<br />
Scrambler Function (<strong>DOLPHIN</strong>-EX)<br />
38 CTCSS Codes (<strong>DOLPHIN</strong>-EX)<br />
External Earset-Microphone Jack<br />
Wall Charger Jack<br />
Contents of Package<br />
Please carefully check that the package contains the following items :<br />
1 x Main Unit (Radio with Antenna)<br />
5 x 1.2V 1500mAh Ni-MH Battery<br />
1 x 230VAC Wall Charger<br />
1 x Belt Clip<br />
1 x User Manual (this one)<br />
- 3 -
Battery Operation<br />
Installing and Checking Batteries<br />
Slide down and remove the battery door (17) and to access the battery room. Set the battery<br />
type switch (18) according to the type of used batteries (Ni for rechargeable batteries and AL<br />
for alkaline batteries). Install 5 x AA size alkaline batteries or rechargeable batteries and pay<br />
attention to install it with the correct polarity as indicated in the battery room. Switch ON radio<br />
by turning the OFF/VOL (2) control and check the battery level on the battery level indicator<br />
(G), 4 bars mean full charge, 3 bars mean normal charge, 2 bars mean half charge and 1 bar<br />
means low battery condition. When the battery capacity is low, the Battery Indicator (G) and bt<br />
Lo (P) indication will flash on the LCD display. Recharge or replace the batteries at this time.<br />
Please refer to the following item BATTERY CHARGING.<br />
English<br />
Battery Charging<br />
When the battery capacity is low, switch OFF the radio and connect the supplied battery travel to<br />
the CHARGE jack (4), then plug it into the 230VAC outlet. To obtain the maximum performance<br />
from the batteries, recharge them only when they are fully discharged. The charging time<br />
depends on the capacity of the used batteries, it is approximately 12 hours for one set of Ni-MH<br />
batteries (1200-1500mAh). When the charging time has expired, unplug the charger from the AC<br />
outlet and then disconnect it from the radio.<br />
WARNING !<br />
1. Only the Ni-MH (or Ni-CD) batteries may be recharged.<br />
2. Do never try to recharge alkaline batteries, as this might cause damage to the radio<br />
or explosion of the batteries.<br />
3. Set the battery type selector (18) to Ni.<br />
4. Always switch OFF radio before starting the battery charging process.<br />
5. Do not recharge batteries for more than 13-14 hours, in order to avoid overcharge or<br />
overheating, which could cause damage to the radio.<br />
6. Use only the enclosed battery charger or original INTEK battery chargers.<br />
- 4 -
Controls and Indicators<br />
English<br />
Front Panel<br />
1<br />
2<br />
<strong>DOLPHIN</strong><br />
VHF MARINE TRANSCEIVER<br />
3<br />
15<br />
BUSY<br />
VOX<br />
PS<br />
TX<br />
WUIC<br />
SCR<br />
HI LO<br />
SC DW<br />
4<br />
S 1 2 3 4 5 6<br />
14<br />
13<br />
12<br />
16<br />
5<br />
6<br />
7<br />
8<br />
11<br />
9<br />
10<br />
- 5 -
Controls and Indicators<br />
1. Antenna<br />
High efficency rubber antenna.<br />
2. OFF/VOL (OFF/Volume) Control<br />
This knob switches the radio ON and OFF and it adjusts the volume control. If no signals are<br />
being received on the operating channel, it is suggested to open the SQUELCH and adjust the<br />
volume to the desired level while listening to the background noise.<br />
3. LCD Display<br />
Large size LCD display with green color backlight function for best readability in darkness. The<br />
large 6-line LCD indicates simultaneously all the programmed settings and all the enabled<br />
functions. Digital 6-bar S/RF Meter and 4-bar battery level indicator.<br />
English<br />
LCD Display<br />
A<br />
B<br />
C<br />
D<br />
E F G<br />
V<br />
U<br />
T<br />
S<br />
R<br />
TX<br />
BUSY<br />
VOX<br />
PS<br />
WUIC<br />
SCR<br />
HI LO<br />
SC DW<br />
S 1 2 3 4 5 6<br />
Q P O<br />
H<br />
I<br />
L<br />
M<br />
N<br />
A. Keypad Program Tone Icon<br />
The Keypad Program Tone Icon (A) is lighted when the keyboard tone function is enabled.<br />
B. Roger Beep Icon<br />
The Roger Beep Icon (A) is lighted when the Roger Beep function is enabled.<br />
- 6 -
Controls and Indicators<br />
English<br />
C. TX Icon<br />
The TX (C) icon is ligthed when radio is in the transmit mode.<br />
D. LOCK Icon<br />
The LOCK icon is lighted when the keypad lock function has been enabled.<br />
E. W Icon<br />
The W (E) icon is lighted when the Meteo weather channels are enabled.<br />
F. U I C Icons<br />
The indication U I C (F) is alternatively displayed in accordance with the selected band<br />
(U = USA, I = International, C = Canada).<br />
G. Battery Level Indicator<br />
It shows the current battery level condition.<br />
H. SCR Icon (<strong>DOLPHIN</strong>-EX)<br />
The SCR Icon (H) is lighted when the SCRAMBLER function is enabled.<br />
I. HI Icon<br />
The HI icon (I) is lighted when the trasmitter is in the HIGH POWER mode.<br />
L. LO Icon<br />
The LO icon (L) is lighted when the trasmitter is in the LOW POWER mode.<br />
M. DW Icon<br />
The DW icon is lighted when the DW (DUAL WATCH) function has been enabled, in order to<br />
automatically monitor two different channels.<br />
N. CTCSS Code Number (<strong>DOLPHIN</strong>-EX)<br />
It shows the selected CTCSS Code Number.<br />
O. SC Icon<br />
The SC icon (O) is lighted when the SCAN function has been enabled, in order to automatically<br />
search busy channels or busy memory channels.<br />
P. Channel Number<br />
It indicates the number of the current operating channel.<br />
Q. S/RF Digital Bar Meter<br />
The 6-bar digital meter indicates the received signal strength (S0 to S6) in the receive mode.<br />
It indicates the transmitter RF output power in the transmit mode.<br />
- 7 -
Controls and Indicators<br />
R. Memory Channel Number (1-8)<br />
It indicates the selected memory channel number, total 8 memory channels are available (1-8).<br />
S. M Icon<br />
The M Icon (S) is lighted when the radio is in MEMORY MODE.<br />
T. PS Icon<br />
The PS Icon (T) is lighted when the Automatic Power Save Circuit has been enabled.<br />
U. VOX Icon<br />
The VOX Icon (U) is lighted when the VOX (handsfree use) is enabled.<br />
V. BUSY Icon<br />
The BUSY Icon (V) appears when radio is receiving a signal or when Squelch is open.<br />
4. Earset-Microphone-Charge Jack<br />
Connect an external earset-microphone to this jack. Connect the supplied 230VAC battery travel<br />
charger to this jack.<br />
WARNING !<br />
Use only original accessories. Connecting and using accessories other than the original<br />
ones, may cause serious damage to the radio and will void the warranty.<br />
Always set the volume to minimum before connecting an external earset, in order to avoid<br />
damaging the earset or the user’s ear.<br />
5. UP Key<br />
The UP (5) key is used to change channel and toggle setting in Menu mode.<br />
6. 16 Key (Emergency Rescue Channel 16)<br />
Press this key to immediately access and enable the emergency rescue channel 16 (156.800 MHz).<br />
7. DOWN Key<br />
The DOWN (7) key is used to change channel and toggle setting in Menu mode.<br />
8. MENU / MEMORY key<br />
Use the MENU (8) key to enable and program the various functions of the radio. Pressing the<br />
MENU (8) key will scroll the various functions. Press and hold the MENU (8) key for about 3<br />
seconds to enter in the MEMORY MODE (refer to MEMORY CHANNEL OPERATION at page 15<br />
and 16).<br />
English<br />
- 8 -
Controls and Indicators<br />
English<br />
9. Built-in Speaker<br />
Built-in front speaker.<br />
10. Desk Charger Contacts<br />
Contacs for Desk Charger mod. INTEK DDC-500.<br />
11. Built-in Microphone<br />
Built-in microphone.<br />
12. LIGHT / SCRAMBLER Key<br />
LIGHT<br />
Shortly press the LIGHT (12) key to backlight the LCD display. The LCD backlight will be turned<br />
OFF automatically after 5 seconds.<br />
SCRAMBLER (<strong>DOLPHIN</strong>-EX)<br />
Press and hold the LIGHT (12) key to enable the SCRAMBLER function (refer to SCRAMBLER<br />
FUNCTION at page 17).<br />
13. MON Key<br />
Press the MON key (13) to activate the Monitor function. This function opens Squelch in order to<br />
listen to the background noise and weak signals.<br />
14. SCAN / LOCK Key<br />
SCAN<br />
Shortly press the SCAN (14) key to start the channels/memory scanning (refer to AUTOMATIC<br />
SCAN at page 16 and 17).<br />
KEYPAD LOCK<br />
Press and hold the SCAN (14) key for about 3 seconds to enable the keypad LOCK function.<br />
Press and hold this key again to disable the keypad LOCK function.<br />
15. PTT (Push-To-Talk) Key<br />
Press the PTT (15) key to transmit and hold it during transmission. The TX (C) icon will be lighted<br />
during transmission. Release the PTT (15) key at the end of your transmission to return to the<br />
receive mode.<br />
WARNING ! Do not touch the antenna during transmission.<br />
- 9 -
Controls and Indicators<br />
Rear Panel<br />
English<br />
16<br />
17<br />
18<br />
16. Belt Clip<br />
1. To install the belt clip, slide it down into the special slot situated in the rear side of the<br />
unit, until the block system make a click.<br />
2. To remove the clip, pull the block tab toward exterior and slide the clip toward the up<br />
side of the unit.<br />
17. Battery Door<br />
Open this cover (17) to install or remove batteries.<br />
18. Battery Type Selector<br />
The battery type selector (18) is located inside the battery room. Set the switch (18) to Ni if<br />
rechargeable batteries are used. Set the switch (18) to AL if alkaline batteries are used.<br />
- 10 -
Operation<br />
English<br />
Menu Operation<br />
Channel Selection<br />
The pre-set frequency band is the International band. To choose the desired channel, please<br />
proceed as follows :<br />
1. Press the MENU (8) key until the channel number (P) blinks on the LCD display.<br />
2. Press the UP (5) or DOWN (7) keys to select the desired channel. Pressing and holding<br />
the UP (5) or DOWN (7) keys, the channel selection will move quicker.<br />
3. To confirm the selection and exit the Menu Mode, press the PTT key (15) or press the<br />
MENU (8) key to move to the next function.<br />
International Channels Frequency Table<br />
CHANNEL FREQ. (TX) FREQ. (RX) CHANNEL FREQ. (TX) FREQ. (RX)<br />
1<br />
2<br />
3<br />
4<br />
5<br />
6<br />
7<br />
8<br />
9<br />
10<br />
11<br />
12<br />
13<br />
14<br />
15<br />
16<br />
17<br />
18<br />
19<br />
20<br />
21<br />
22<br />
23<br />
24<br />
25<br />
26<br />
27<br />
28<br />
156.050<br />
156.100<br />
156.150<br />
156.200<br />
156.250<br />
156.300<br />
156.350<br />
156.400<br />
156.450<br />
156.500<br />
156.550<br />
156.600<br />
156.650<br />
156.700<br />
156.750<br />
156.800<br />
156.850<br />
156.900<br />
156.950<br />
157.000<br />
157.050<br />
157.100<br />
157.150<br />
157.200<br />
157.250<br />
157.300<br />
157.350<br />
157.400<br />
160.650<br />
160.700<br />
160.750<br />
160.800<br />
160.850<br />
156.300<br />
160.950<br />
156.400<br />
156.450<br />
156.500<br />
156.550<br />
156.600<br />
156.650<br />
156.700<br />
156.750<br />
156.800<br />
156.850<br />
161.500<br />
161.550<br />
161.600<br />
161.650<br />
161.700<br />
161.750<br />
161.800<br />
161.850<br />
161.900<br />
161.950<br />
162.000<br />
60<br />
61<br />
62<br />
63<br />
64<br />
65<br />
66<br />
67<br />
68<br />
69<br />
71<br />
72<br />
73<br />
74<br />
75<br />
76<br />
77<br />
78<br />
79<br />
80<br />
81<br />
82<br />
83<br />
84<br />
85<br />
86<br />
87<br />
88<br />
156.025<br />
156.075<br />
156.125<br />
156.175<br />
156.225<br />
156.275<br />
156.325<br />
156.375<br />
156.425<br />
156.475<br />
156.575<br />
156.625<br />
156.675<br />
156.725<br />
156.775<br />
156.825<br />
156.875<br />
156.925<br />
156.975<br />
157.025<br />
157.075<br />
157.125<br />
157.175<br />
157.225<br />
157.275<br />
157.325<br />
157.375<br />
157.425<br />
160.625<br />
160.675<br />
160.725<br />
160.775<br />
160.825<br />
160.875<br />
160.925<br />
156.375<br />
156.425<br />
156.475<br />
156.575<br />
156.625<br />
156.675<br />
156.725<br />
156.775<br />
156.825<br />
156.875<br />
161.525<br />
161.575<br />
161.625<br />
161.675<br />
161.725<br />
161.775<br />
161.825<br />
161.875<br />
161.925<br />
157.375<br />
157.425<br />
- 11 -
Operation<br />
VOX (Handsfree use) Function<br />
Your radio is equipped with a user selectable Voice Operated Transmitter function (VOX), that<br />
is used for automatic voice transmission (handsfree use or baby room monitor use). In this<br />
mode, transmission is automatically initiated by speaking into the microphone (11) and there is<br />
no need to push the PTT (15). To enable the VOX function, please proceed as follows :<br />
1. Press the MENU (8) key several times, until the Vo indication (P) appears on the LCD<br />
display and the VOX icon (U) will blink.<br />
2. Press the UP (5) or DOWN (7) keys to select the level of sensitivity (from 01 to 04) or to<br />
disactivate the VOX (OF). The VOX level 01 indicates the highest VOX sensitivity. When<br />
VOX feature is on, the VOX icon (U) will appear on the LCD display.<br />
3. To confirm the selection and exit the Menu Mode, press the PTT key (15) or press the<br />
MENU (8) key to move to the next function.<br />
Transmitter RF Power Setting<br />
Your radio has a HI/LOW Power selection function to set the TX Output Power. This function is<br />
very convenient to reduce the current drain and extend battery life when communicating within<br />
short distance. To select the output power, please proceed as follows :<br />
1. Press the MENU (8) key several times, until the Pr (P) indication appears on the LCD<br />
display and the HI (I) or LO (L) icons will blink.<br />
2. Press the UP (5) or DOWN (7) keys to select the desired power level HI (high power) or<br />
LO (low power).<br />
3. To confirm the selection and exit the Menu Mode, press the PTT key (15) or press the<br />
MENU (8) key to move to the next function.<br />
Squelch Level Selection<br />
This function allows to silent the receiver by cutting the background noise, when no signals are<br />
received. The SQUELCH threshold level is adjustable in 7 steps, from level 0 (Squelch open) to<br />
level 6 (lowest Squelch sensitivity). To select the desired Squelch level, please proceed as<br />
follows :<br />
1. Press the MENU (8) key several times, until the SL (P) and the selected Squelch level (N)<br />
indications will blink on the LCD display.<br />
2. Press the UP (5) or DOWN (7) keys to select the desired Squelch level from 0 (squelch open)<br />
to 6. If level 0 is selected, Squelch will be open and you will hear the background noise.<br />
3. To confirm the selection and exit the Menu Mode, press the PTT key (15) or press the<br />
MENU (8) key to move to the next function.<br />
English<br />
- 12 -
Operation<br />
English<br />
Keypad Program Tone Setting<br />
When a key is pressed, a beep tone is heard to confirm your command. The user may enable or<br />
disable this keypad program tone.<br />
1. Press the MENU (8) key several times, until the Bp (P) indication appears and the keypad<br />
tone icon (A) will blink on the LCD display.<br />
2. Press the UP (5) or DOWN (7) keys to set the desired selection on (keypad tone enabled)<br />
or oF (keypad tone disabled).<br />
3. To confirm the selection and exit the Menu Mode, press the PTT key (15) or press the<br />
MENU (8) key to move to the next function.<br />
4. When the Keypad tone is enabled, the tone icon (A) appears on the LCD display.<br />
Roger Beep Tone Setting<br />
The radio is equipped with a user selectable Roger Beep Tone feature, which enables you to<br />
send a Beep Tone at the end of each transmission after every release of the PTT (15) key. This<br />
will prompt any receiving unit that your transmission has ended. To enable or disable this<br />
function, please proceed as follows :<br />
1. Press the MENU (8) key several times, until the rb (P) indication appears and the tone<br />
icon (B) will blink on the LCD display.<br />
2. Press the UP (5) or DOWN (7) keys to set the desired selection on (Roger Beep tone<br />
enabled) or oF (Roger Beep tone disabled).<br />
3. To confirm the selection and exit the Menu Mode, press the PTT key (15) or press the<br />
MENU (8) key to move to the next function.<br />
4. When the Roger Beep tone is enabled, the tone icon (B) appears on the LCD display.<br />
Call Tone Setting<br />
The radio is equipped with 3 user selectable Call tone melodies. To set the desired Call tone<br />
melody, please proceed as follows :<br />
1. Press the MENU (8) key several times, until the CA (P) indication and melody number (N)<br />
will blink on the LCD display.<br />
2. Press the UP (5) or DOWN (7) keys to set the desired melody (01-02-03).<br />
3. To confirm the selection and exit the Menu Mode, press the PTT key (15) or press the<br />
MENU (8) key to move to the next function.<br />
4. To transmit the CALL tone, quickly press the PTT key (15) twice.<br />
- 13 -
Operation<br />
Dual Watch Setting<br />
The radio is equipped with a Dual Watch function that allows to monitor 2 differents channels.<br />
To set the Dual Watch function, please proceed as follows :<br />
English<br />
1. Select the first channel to be monitored.<br />
2. Press the MENU (8) key several time until the oF (P) icon (function disabled) and the DW<br />
(M) icon will blink on the LCD display.<br />
3. Press the UP (5) or DOWN (7) keys to select the second channel to be monitored.<br />
4. To confirm the selection and exit the Menu Mode, press the PTT key (15) or press the<br />
MENU (8) key to move to the next function.<br />
5. When the Dual watch function is enabled, the DW icon (M) appears on the LCD display<br />
and the radio will start monitoring and will stop when a signal is received on one of the two<br />
stored channels, scan will re-start at the end of transmission.<br />
6. To disable the Dual Watch function, press the SCAN (14) key.<br />
Automatic Power Save Setting<br />
The radio has a unique Automatic Power Save circuit designed to dramatically extend battery<br />
life. If it senses no transmission within 5 seconds, it automatically switches to the Power Save<br />
mode. The Radio can still receive transmissions in this mode. To enable or disable this<br />
function, please proceed as follows :<br />
1. Press the MENU (8) key several times, until the PS (P) indication appears and the PS icon<br />
(T) will blink on the LCD display.<br />
2. Press the UP (5) or DOWN (7) keys to set the desired selection on (function enabled) or<br />
oF (function disabled).<br />
3. To confirm the selection and exit the Menu Mode, press the PTT key (15) or press the<br />
MENU (8) key to move to the next function.<br />
4. When the Power Save function is enabled, the PS icon (T) appears on the LCD display.<br />
Frequency Band Selection<br />
The user must select the frequency channels in accordance with the country where the radio is<br />
used from International channels (International channels are allowed frequencies in Europe) to<br />
USA channels or Canadian channels (USA and Canadian frequencies are to be used only in<br />
the American market). To select the desired Frequency Band, please proceed as follows :<br />
1. Press the MENU (8) key several times, until the Co (P) indication appears and the U (USA<br />
- 14 -
Operation<br />
English<br />
channels), I (International channels) or C (Canadian channels) will flash on the LCD display.<br />
2. Press the UP (5) or DOWN (7) keys to select the desired frequency band.<br />
3. To confirm the selection and exit the Menu Mode, press the PTT key (15) or press the<br />
MENU (8) key to move to the next function.<br />
Meteo Weather Channel Selection<br />
The 10 Weather Channels (WX Band) may be enabled and may be selected after the normal<br />
operating channels, in the selected band. To select the Meteo weather channels, please<br />
procees as follows :<br />
1. Press the MENU (8) key several times, until the 01 (P) indication appears and the W (E)<br />
icon will blink on the LCD display.<br />
2. Press the UP (5) or DOWN (7) keys to set the desired selection on (function enabled) or<br />
oF (function disabled).<br />
3. To confirm the selection and exit the Menu Mode, press the PTT key (15) or the MENU (8) key.<br />
4. If the Meteo channels are enabled, the icon W (E) appears on the LCD display.<br />
MEMORY CHANNEL OPERATION<br />
Programming Memory Channels (1-8)<br />
La radio is equipped with 8 programmable memory channels. To store a channel in one of the 8<br />
memory channels, please proceed as follows :<br />
1. Select the desired channel number as indicated at page 11.<br />
2. Press and hold the MENU (8) key for about 3 seconds to enter the MEMORY MODE. The<br />
M icon (S) will blink on the LCD display.<br />
3. Press the UP (5) or DOWN (7) keys to select one of the 8 memory channels (1-8). If the<br />
memory channel 0 is selected, no channels can be stored as a memory channel. If a<br />
memory channel has been already programmed and stored, a new programming will<br />
replace the previous on (overwriting).<br />
4. Shortly press the PTT (15) key to confirm the selection and store the memory channel.<br />
The radio will enter in Stand-by mode.<br />
Memory Channels Recall<br />
1. Press and hold the MENU (8) key for about 3 seconds to enter the MEMORY MODE. The<br />
M icon (S) will blink on the LCD display.<br />
2. Shortly press the PTT (15) key to enter the MEMORY RECALL MODE. The radio will<br />
- 15 -
Operation<br />
show the last programmed memory channel. If no memory channels have been<br />
programmed, radio will return automatically to Stand-by mode.<br />
3. Shortly press the MENU (8) key and the UP (5) or DOWN (7) keys to select the desired<br />
memory channel e press the PTT (15) key to confirm the selection.<br />
4. To exit the MEMORY MODE switch OFF and ON the radio.<br />
Memory Channels Delete<br />
1. Recall the desired memory channel as indicated above.<br />
2. Press and hold the MENU (8) key for about 3 seconds until the M (S) icon will blink on the<br />
LCD display.<br />
3. Press the UP (5) or DOWN (7) keys to select the memory channel 0 and press the PTT<br />
(15) key to confirm the deletion. The radio will enter in Stand-by mode.<br />
AUTOMATIC SCAN<br />
This function allows automatic scanning of all channels and programmed memories. To start<br />
the automatic scan function proceed as follows :<br />
Automatic Channel Scanning<br />
1. Shortly press the SCAN (14) key; the unit will automatically start the automatic channels<br />
scanning and the SC (O) icon will appear on the LCD display.<br />
SCAN will automatically stop when a signal is detected on one channel, in order to listen to<br />
the communication and SCAN will re-start when no more signal is detected on that channel<br />
after about 4 seconds. If you press the PTT key (15) during the SCAN operation, SCAN will<br />
stop automatically and radio will set the last used channel. SCAN will then restart after<br />
about 14 seconds if no signals are received on that channel. If a signal with a CTCSS code<br />
is received, the radio shows that channel with the corresponding code. If the receiving code<br />
is different from the pre-programmed, the radio won’t correspond with that correspondent.<br />
2. Press the SCAN (14) key to exit the SCAN mode.<br />
Automatic Memory Channels Scanning<br />
1. Press and hold the MENU (8) key for about 3 seconds to enter the MEMORY MODE. The<br />
M icon (S) will blink on the LCD display.<br />
2. Shortly press the PTT (15) key to enter the MEMORY RECALL MODE. The radio will<br />
show the last programmed memory channel.<br />
3. Shortly press the SCAN (14) key; the unit will automatically start the automatic memory<br />
channels scanning and the SC (O) icon will appear on the LCD display.<br />
English<br />
- 16 -
Operation<br />
English<br />
SCAN will automatically stop when a signal is detected on one channel, in order to listen<br />
to the communication and SCAN will re-start when no more signal is detected on that<br />
channel after about 4 seconds. If you press the PTT key (15) during the SCAN operation,<br />
SCAN will stop automatically and radio will set the last programmed channel. SCAN will<br />
then restart after about 14 seconds if no signals are received on that channel.<br />
4. Press the SCAN (14) key to exit the SCAN mode.<br />
5. To exit the MEMORY MODE switch OFF and ON the radio.<br />
SCRAMBLER FUNCTION (<strong>DOLPHIN</strong>-EX)<br />
You can enjoy privacy of communication within your group, by enabling the SCRAMBLER<br />
function and selecting the same scrambler formula as your group members do. Two different<br />
scrambler formulas are available and selectable (01-02). To enable the SCRAMBLER function<br />
please proceed as follows :<br />
1. Press and hold the LIGHT (12) key for about 3 seconds until the Sc (P) indication appears<br />
and the SCR (H) icon will blink on the LCD display.<br />
2. Press the UP (5) or DOWN (7) keys to select the desired formula (01-02). Selecting OF<br />
will disable the SCRAMBLER function.<br />
2. Press the PTT (15) key to confirm the selection and exit to Stand-by mode.<br />
4. When the SCRAMBLER function is enabled, the SCR icon (H) appears on the LCD display.<br />
5. Please make sure that other group members have enabled SCRAMBLER function and<br />
select the same formula.<br />
6. To disable the SCRAMBLER function repeat the items 1-2 and select OF.<br />
CTCSS FUNCTION (<strong>DOLPHIN</strong>-EX)<br />
The radio has 38 CTCSS private codes available. Different CTCSS tones may be associated to<br />
different channels. To choose the desired CTCSS code, please proceed as follows :<br />
1. Press the MENU (8) key several times, until the CTCSS code number (N) blinks on the<br />
LCD display. The CTCSS code OF (N) indicates that no CTCSS tone is programmed on<br />
that channel.<br />
2. Press the UP (5) or DOWN (7) keys to select the desired CTCSS code number. Pressing<br />
and holding the UP (5) or DOWN (7) keys, the selection will move quicker.<br />
3. To confirm the selection and exit the Menu Mode, press PTT key (15) or press the MENU<br />
(8) key to move to the next function.<br />
- 17 -
Operation - User Information<br />
Selecting a CTCSS code of OF will disable the CTCSS feature. To communicate between two<br />
or more radios, both the channel and CTCSS code selections must be the same. To<br />
communicate with other models and brands of radios, the actual radio frequency and CTCSS<br />
frequency must be matched. The frequency chart and CTCSS Code chart are included to help<br />
with this selection.<br />
English<br />
No Freq. (Hz)<br />
OF CTCSS OFF<br />
01 67,0<br />
02 71,9<br />
03 74,4<br />
04 77,0<br />
05 79,7<br />
06 82,5<br />
07 85,4<br />
CTCSS - TONE FREQUENCY CHART<br />
No Freq. (Hz)<br />
08 88,5<br />
09 91,5<br />
10 94,8<br />
11 97,4<br />
12 100,0<br />
13 103,5<br />
14 107,2<br />
15 110,9<br />
No Freq. (Hz)<br />
16 114,8<br />
17 118,8<br />
18 123,0<br />
19 127,3<br />
20 131,8<br />
21 136,5<br />
22 141,3<br />
23 146,2<br />
No Freq. (Hz)<br />
24 151,4<br />
25 156,7<br />
26 162,2<br />
27 167,9<br />
28 173,8<br />
29 179,9<br />
30 186,2<br />
31 192,8<br />
No Freq. (Hz)<br />
32 203,5<br />
33 210,7<br />
34 218,1<br />
35 225,7<br />
36 233,6<br />
37 241,8<br />
38 250,3<br />
- -<br />
User Information<br />
in accordance with art. 13 of the Legislative Decree of 25th July 2005, no. 15 ”Implementation of<br />
Directives 2002/95/EC, 2002/96/EC and 2003/108/EC, relative to reduction of the use of<br />
hazardous substances in electrical and electronic equipment, in addition to waste disposal”.<br />
The crossed bin symbol shown on the equipment indicates that at the end of its<br />
working life the product must be collected separately from other waste.<br />
The user must therefore take the above equipment to the appropriate differentiated<br />
collection centres for electronic and electro technical waste, or return it to the dealer<br />
when purchasing a new appliance of equivalent type, in a ratio of one to one.<br />
Appropriate differentiated waste collection for subsequent recycling, treatment and environmentfriendly<br />
disposal of the discarded equipment helps to prevent possible negative environmental<br />
and health effects and encourages recycling of the component materials of the equipment.<br />
Illegal disposal of the product by the user will be punished by application of the administrative<br />
fines provided for by the legislative decree no. 22/1997 (article 50 and following of the legislative<br />
decree no. 22/1997).<br />
- 18 -
Specifications - Optional Accessories<br />
English<br />
SPECIFICATIONS<br />
General<br />
Channels<br />
Operating Frequency<br />
Power Source<br />
Dimensions<br />
Weight<br />
Receiver<br />
Sensitivity<br />
Squelch Sensitivity<br />
Audio output<br />
Transmitter<br />
Output Power<br />
Modulation<br />
INT / USA / CANADA / METEO<br />
156.025 - 157.425 MHz (TX) / 156.300 - 162.000 MHz (RX)<br />
7.5V (5 x AA 1.5V alkaline battery)<br />
6.0V (5 x AA 1.2V rechargeable battery)<br />
H195 x L60 X D40 mm (including antenna)<br />
gr. 250 (including battery)<br />
0.3µV for 12dB SINAD<br />
Adjustable in 7 levels<br />
300mW at 10% THD<br />
5W-1W selectable<br />
FM<br />
Damaged Antenna<br />
Do not use any radio that has a damaged Antenna. If a damaged antenna comes in contact<br />
with the skin, a minor burn may occur.<br />
Battery Operation - Important Information<br />
Dispose of battery in the proper manner, according to federal, state and local regulations that<br />
apply in your area. A battery may leak electrolyte if it is mixed in a set with different battery<br />
types, if inserted incorrectly, if disposed of in fire, or if an attempt is made to charge a battery<br />
not intended to be charged. Discard leaky batteries immediately. Leaking batteries can cause<br />
skin burns or other personal injury.<br />
Optional Accessories :<br />
MT-SM100<br />
MT-SM200<br />
DDC-500<br />
External Earset-Microphone with Tie Clip<br />
External Earset- Flexible Boom Microphone with Tie Clip<br />
230VAC Electronic Quick Desk Charger<br />
- 19 -
Important Informations<br />
Important Informations<br />
Important !<br />
Changes or modifications to this product could void your authority to operate this unit. Your<br />
radio is produced and factory set to transmit a regulated signal on an assigned frequency. It is<br />
against the law to alter or adjust the settings inside the radio to exceed those limitations. Any<br />
adjustment to your radio must be made by a qualified authorized technician or service.<br />
To be safe and sure :<br />
Never open the cabinet of your radio.<br />
Never change or replace anything in your radio (except the batteries).<br />
Your radio might cause TV or radio interference even when it is operating properly. To determine<br />
whether your radio is causing the interference, turn it off. If the interference goes away, your radio<br />
is causing it. Try to eliminate the interference by moving your radio away from the receiver. If you<br />
cannot eliminate the interference, stop using the radio.<br />
Hazardous Environments :<br />
Do not operate the radio in hazardous environments.<br />
Care and Safety :<br />
To clean the radio, use a soft cloth dampened with water. Do not use cleaners or solvents<br />
because they can harm the body of the unit and leak inside, causing permanent damage. Use<br />
a dry, lint-free cloth to clean the battery contacts. Do not submerge the unit in water. If the<br />
unit gets wet, turn it off and remove the batteries immediately. Dry the batteryies and the<br />
battery compartment with a soft cloth to minimize potential water damage. Leave the battery<br />
compartment cover off overnight to ensure complete drying. Do not use the radio until it is<br />
completely dry.<br />
English<br />
- 20 -
Declaration of Conformity<br />
English<br />
EC Certificate of Conformity<br />
(to EC Directive 99/5-89/336-93/68-73/23)<br />
DECLARATION OF CONFORMITY<br />
With the present declaration, we certify that the following products :<br />
INTEK <strong>DOLPHIN</strong> MR-8060<br />
comply with all the technical regulations applicable to the above mentioned products<br />
in accordance with the EC Directives 73/23/EEC, 89/336/EEC and 99/5/EC.<br />
Type of product :<br />
Details of applied standards :<br />
Manufacturer :<br />
Notified Body :<br />
Contact Reference :<br />
VHF Marine hand portable equipment<br />
(for NON GMDSS application only)<br />
EN 301 178-2 essential requirement<br />
EN 301 843-1, EN 301 843-2<br />
EN 60065<br />
INTEK S.R.L.<br />
Via G. Marconi, 16<br />
20090 Segrate, Italy<br />
Tel. 39-02-26950451 / Fax. 39-02-26952185<br />
E-mail : intek.com@intek-com.it<br />
EMCCert Dr. Rasek<br />
Boelwiese 5, 91320 Ebermannstadt<br />
Germany<br />
Identification Number : 0678<br />
Armando Zanni<br />
Tel. 39-02-26950451 / Fax. 39-02-26952185<br />
E-mail : intek.com@intek-com.it<br />
Segrate, 11/01/2008<br />
dr. Vittorio Zanetti<br />
(General Manager)<br />
- 21 -
Table of restrictions on the use of VHF marine transceivers<br />
COUNTRY<br />
AUSTRIA<br />
BELGIUM<br />
DENMARK<br />
GERMANY<br />
Licence<br />
Note : a general operator certificate could be necessary, please verify by contacting the competent maritime authority.<br />
FINLAND<br />
FRANCE<br />
GREECE<br />
IRELAND<br />
ITALY<br />
LUXEMBOURG<br />
NORWAY<br />
NETHERLANDS<br />
PORTUGAL<br />
UNITED KINGDOM<br />
SPAIN<br />
SWEDEN<br />
SWITZERLAND<br />
YES<br />
YES<br />
YES<br />
YES<br />
YES<br />
YES<br />
YES<br />
YES<br />
YES<br />
YES<br />
YES<br />
YES<br />
YES<br />
YES<br />
YES<br />
YES<br />
NO<br />
Restrictions on the use<br />
Individual licence is required.<br />
Use allowed on international channels only.<br />
Individual licence is required. Use allowed on international channels only.<br />
Use not allowed while navigating in inland waters.<br />
Use allowed on international channels only.<br />
Individual licence and competence certificate are required.<br />
Use allowed on international channels only.<br />
Individual licence is required. Use allowed on international channels only.<br />
Use not allowed while navigating in inland waters.<br />
Individual licence is required. Use allowed on international channels only.<br />
Use not allowed while navigating in inland waters.<br />
Individual licence is required.<br />
Use allowed on international channels only.<br />
Individual licence and competence certificate are required.<br />
Use allowed on international channels only.<br />
Use allowed on leisure boats (law No. 172 of 08/07/03) and on non-Solas<br />
vessels. General authorisation ("Licenza di stazione - law No. 259 dated<br />
01/08/03) is required. Use allowed on international channels only.<br />
Individual licence and appropriate radio operator's are required.<br />
Use allowed on international channels only. Maritime lowest power : 1W.<br />
Interland waterways : use only CH 15 and/or 17 (onboard communications);<br />
power : 0.1-1W<br />
Individual licence is required.<br />
Use allowed on international channels only.<br />
Individual licence is required. Use allowed on international channels only.<br />
Use not allowed while navigating in inland waters.<br />
Individual licence is required.<br />
Use allowed on international channels only.<br />
Individual licence and competence certificate are required.<br />
Use allowed on international channels only.<br />
Individual licence is required.<br />
Use allowed on international channels only.<br />
Individual licence is required.<br />
Use allowed on international channels only.<br />
Not allowed.<br />
English<br />
- 22 -
Indice<br />
Italiano<br />
Indice . . . . . . . . . . . . . . . . . . . . . . . . . . . . . . . . . . . . . . . . . . . . . . . . . . . . . . . . . . 23<br />
Introduzione . . . . . . . . . . . . . . . . . . . . . . . . . . . . . . . . . . . . . . . . . . . . . . . . . . 24-25<br />
Contenuto della Confezione . . . . . . . . . . . . . . . . . . . . . . . . . . . . . . . . . . . . . . . . 25<br />
Utilizzo delle batterie . . . . . . . . . . . . . . . . . . . . . . . . . . . . . . . . . . . . . . . . . . . . . . 26<br />
Descrizione dei comandi e indicatori . . . . . . . . . . . . . . . . . . . . . . . . . . . . . . 27-32<br />
Funzionamento . . . . . . . . . . . . . . . . . . . . . . . . . . . . . . . . . . . . . . . . . . . . . . . . 33-40<br />
Avviso agli utenti . . . . . . . . . . . . . . . . . . . . . . . . . . . . . . . . . . . . . . . . . . . . . . . . 40<br />
Specifiche Tecniche / Accessori Opzionali . . . . . . . . . . . . . . . . . . . . . . . . . . . 41<br />
Altre Informazioni . . . . . . . . . . . . . . . . . . . . . . . . . . . . . . . . . . . . . . . . . . . . . . . . 42<br />
Tabella delle restrizioni all' uso dei ricetrasmettitori VHF marini . . . . . . . . . . 43<br />
Regolamentazione italiana . . . . . . . . . . . . . . . . . . . . . . . . . . . . . . . . . . . . . . . . . 44<br />
Dichiarazione di Conformità . . . . . . . . . . . . . . . . . . . . . . . . . . . . . . . . . . . . . . . . 45<br />
Garanzia Limitata . . . . . . . . . . . . . . . . . . . . . . . . . . . . . . . . . . . . . . . . . . . . . . . . 46<br />
IMPORTANTE !<br />
L’utilizzo dei ricetrasmettitori VHF Marini è regolato dalle norme di legge in vigore. Poiché le<br />
norme stesse sono soggette a possibili variazioni, prima di utilizzare gli apparecchi, si raccomanda<br />
di informarsi presso il proprio rivenditore o fornitore verificando gli eventuali adempimenti da<br />
osservare. INTEK declina qualsiasi responsabilità relativamente ad un uso degli apparecchi non<br />
autorizzato o non conforme alle norme di legge (vedi tabelle a pag. 43-44).<br />
IMPORTANTE !<br />
L' apparato può essere utilizzato solo con regolare licenza di stazione rilasciata dall' autorità<br />
nazionale presso cui è registrata l' imbarcazione. In Italia è richiesta la Licenza di Stazione - Legge<br />
N. 172 del 08/07/03 e N. 259 del 01/08/03.<br />
L' apparato è utilizzabile su imbarcazioni non-solas (non GMDSS).<br />
0678<br />
RoHS<br />
2002/95/EC<br />
- 23 -
Introduzione<br />
Congratulazioni !<br />
Congratulazioni per aver scelto ed acquistato un prodotto di qualità INTEK. Con un uso corretto e<br />
seguendo il set-up e le istruzioni d’ uso in questo <strong>Manuale</strong> di Istruzioni, questo apparecchio vi<br />
garantirà un servizio senza problemi per molti anni.<br />
Ci impegnamo costantemente a fornire prodotti di qualità che rispondano alle vostre esigenze,<br />
ma siamo comunque sempre molto interessati a ricevere eventuali vostri commenti o<br />
suggerimenti su questo prodotto, che ci aiutino nel continuo miglioramento della qualità.<br />
Applicazioni<br />
Vi ringraziamo per aver scelto INTEK per applicazioni nautiche. Siamo certi che questo<br />
ricetrasmettitore di facile uso vi consentirà di comunicare in modo affidabile e di svolgere le<br />
vostre attività professionali e sportive con la massima efficienza. Questo ricetrasmettitore<br />
incorpora la più avanzata tecnologia e sarete soddisfatti del suo livello di qualità e delle sue<br />
caratteristiche tecniche. L’ apparato INTEK <strong>DOLPHIN</strong> è progettato per l’utilizzo in ambiente<br />
marino e le funzioni a disposizione lo rendono particolarmente interessante quali il sistema<br />
VOX (uso a mani libere), Squelch con soglia regolabile e indicatore di intensità del segnale<br />
ricevuto S-Meter e indicatore dellap potenza RF di uscita.<br />
Italiano<br />
<strong>DOLPHIN</strong>-EX (VERSIONE INTERNAZIONALE)<br />
In questo manuale i paragrafi relativi alle funzioni contrassegnate (<strong>DOLPHIN</strong>-EX) si riferiscono<br />
esclusivamente al modello INTEK <strong>DOLPHIN</strong>-EX. Le funzioni contrassegnate (<strong>DOLPHIN</strong>-EX)<br />
non sono disponibili nel modello <strong>DOLPHIN</strong> (VERSIONE EUROPEA). Il modello <strong>DOLPHIN</strong>-EX<br />
non è disponibile per il mercato europeo.<br />
- 24 -
Introduzione - Contenuto della Confezione<br />
Italiano<br />
Caratteristiche Principali<br />
Questo apparecchio comprende numerose funzioni avanzate, ciò nonostante l’ utilizzo è molto<br />
semplice e potete prendere familiarità con la radio dopo pochi minuti di uso.<br />
Per favore riferitevi alla lista seguente delle principali funzioni incorporate :<br />
Accesso rapido al canale 16 di soccorso<br />
50 canali privati (<strong>DOLPHIN</strong>-EX)<br />
Selezione canali Internazionali, USA e Canadesi<br />
Canali Meteo<br />
Tono Roger Beep<br />
Tono di Inserimento Comandi<br />
8 memorie programmabili<br />
Blocco della Tastiera<br />
Squelch con soglia regolabile<br />
Monitor<br />
Circuito automatico Power Save<br />
Sistema VOX / Uso Mani Libere<br />
Funzione Dual Watch<br />
Potenza del Trasmettitore Regolabile Hi-LO<br />
Scansione automatica dei Canali e delle Memorie<br />
3 Diversi Toni Musicali di Chiamata<br />
Ampio display LCD retroilluminato<br />
Indicatore di Livello Batteria<br />
S/RF Meter digitale<br />
Dispositivo Scrambler (<strong>DOLPHIN</strong>-EX)<br />
38 Codici Privati CTCSS (<strong>DOLPHIN</strong>-EX)<br />
Presa per Microfono Auricolare Esterno<br />
Presa per Carica Batteria<br />
Contenuto della confezione<br />
Per favore controllate che la confezione contenga tutti i seguenti componenti :<br />
1 x Unità Principale (Ricetrasmittente)<br />
5 x Batteria ricaricabile Ni-MH 7.2V 1500mAh<br />
1 x Caricabatterie da parete 230VAC<br />
1 x Clip da cintura<br />
1 x <strong>Manuale</strong> d’ Istruzioni<br />
- 25 -
Utilizzo delle batterie<br />
Installazione e controllo delle batterie<br />
Rimuovere il coperchio batterie (17) sfilandolo verso il basso. Selezionare il tipo di batterie che<br />
verrà utilizzato tramite il deviatore (18) posto nel vano batterie. Selezionare Ni per le batterie<br />
ricaricabili o AL per le batterie alkaline. Inserire 5 pile tipo AA alkaline oppure oppure batterie<br />
ricaricabili al Ni-MH, rispettando la corretta polarità, come indicato nel vano batterie. Accendere l'<br />
apparecchio, ruotando la manopola OFF/VOL (2) in senso orario e controllare l' indicatore del<br />
livello di carica delle batterie (G). 4 barre indicano la piena carica delle batterie, 3 barre indicano<br />
normale livello di carica, 2 barre indicano metà livello di carica e 1 barra indica basso livello di<br />
carica. Quando lo stato di carica delle batterie è insufficente, l' icona (G) e l' indicazione bt Lo (P)<br />
lampeggiano sul display. Ricaricare o sostituire a questo punto le batterie. Per il corretto<br />
procedimento, fare riferimento al paragrafo successivo.<br />
Ricarica batterie<br />
Quando la carica delle batterie è insufficente, spegnere il ricetrasmettitore e collegare il<br />
caricabatterie da parete in dotazione alla presa di ricarica Charge (4) e successivamente alla<br />
presa di corrente 230VAC. Per ottenere il massimo rendimento, le batterie dovrebbero essere<br />
ricaricate solo se completamente scariche. Il tempo di carica dipende dalla capacità delle batterie<br />
utilizzate; il tempo di carica normale, per un set di batterie al Ni-MH (1200-1500 mAh) é di circa<br />
12 ore. A processo di ricarica ultimato, estrarre il caricabatterie dalla presa di corrente e<br />
successivamente scollegarlo dalla radio.<br />
AVVERTENZE !<br />
1. Possono essere ricaricate solo batterie di tipo Ni-MH (o Ni-CD).<br />
2. Non tentare mai di ricaricare le batterie alkaline, al fine di evitare danni alla radio o l'<br />
esplosione delle stesse.<br />
3. Assicurarsi che il selettore del tipo di batterie utilizzato (18) sia posizionato su Ni.<br />
4. Spegnere sempre il ricetrasmettitore prima di iniziare il processo di ricarica.<br />
5. Non ricaricare mai le batterie per più di 13-14 ore, per evitare la sovraccarica o il<br />
surriscaldamento delle stesse, con conseguenti danni alla radio.<br />
6. Utilizzare solo il caricabatterie in dotazione con il prodotto o i carica batterie<br />
originali INTEK.<br />
Italiano<br />
- 26 -
Descrizione dei comandi e indicatori<br />
Pannello frontale<br />
Italiano<br />
1<br />
2<br />
<strong>DOLPHIN</strong><br />
VHF MARINE TRANSCEIVER<br />
3<br />
15<br />
BUSY<br />
VOX<br />
PS<br />
TX<br />
WUIC<br />
SCR<br />
HI LO<br />
SC DW<br />
4<br />
S 1 2 3 4 5 6<br />
14<br />
13<br />
12<br />
16<br />
5<br />
6<br />
7<br />
8<br />
11<br />
9<br />
10<br />
- 27 -
Descrizione dei comandi e indicatori<br />
1. Antenna<br />
Antenna in gomma, ad alto rendimento.<br />
2. Manopola OFF/VOL<br />
Manopola di accensione e spegnimento della radio. Permette la regolazione del volume di<br />
ascolto. In assenza di segnali sul canale in uso, si consiglia di aprire lo SQUELCH e quindi di<br />
regolare il volume al livello desiderato utilizzando come riferimento il rumore (fruscio) di fondo.<br />
3. Display LCD<br />
Ampio display LCD di tipo retro-illuminato in colore verde, per la massima leggibilità anche<br />
nell’oscurità. Il grande display a 6 linee indica simultaneamente tutti i parametri in uso e tutte<br />
funzioni e i dispositivi attivati. Strumento indicatore tipo S/RF Meter digitale a 6 barre e indicatore<br />
livello batteria a 4 segmenti.<br />
Italiano<br />
Display LCD<br />
A<br />
B<br />
C<br />
D<br />
E F G<br />
V<br />
U<br />
T<br />
S<br />
R<br />
TX<br />
BUSY<br />
VOX<br />
PS<br />
WUIC<br />
SCR<br />
HI LO<br />
SC DW<br />
S 1 2 3 4 5 6<br />
Q P O<br />
H<br />
I<br />
L<br />
M<br />
N<br />
A. Indicazione tono di tastiera<br />
L' icona (A) è accesa quando la funzione tono di tastiera è attiva.<br />
B. Indicazione Roger Beep<br />
L' icona (B) è accesa quando è abilitato il dispositivo Roger Beep (tono di fine trasmissione).<br />
C. Indicazione TX<br />
L' indicazione TX è accesa quando il ricetrasmettitore è in modalità trasmissione.<br />
- 28 -
Descrizione dei comandi e indicatori<br />
Italiano<br />
D. Indicazione LOCK<br />
L' indicazione LOCK è accesa quando la funzione di blocco tastiera è attiva.<br />
E. Indicazione W<br />
L' indicazione W (E) è accesa quando solo selezionati i canali Meteo.<br />
F. Indicazioni U I C<br />
Le indicazioni U I C (F) si accendono alternativamente quando sono selezionati<br />
rispettivamente i canali USA (U), i canali Internazionali (I) o i canali Canadesi (C).<br />
G. Indicazione livello batteria<br />
Visualizza lo stato di carica delle batterie a 4 livelli.<br />
H. Icona SCR (<strong>DOLPHIN</strong>-EX)<br />
L' icona SCR (H) è accesa quando è abilitato il dispositivo SCRAMBLER.<br />
I. Icona HI<br />
L' icona HI (I) è accesa quando il ricetrasmettitore è in modalità alta potenza.<br />
L. Icona LO<br />
L' icona LO (L) è accesa quando il ricetrasmettitore è in modalità bassa potenza.<br />
M. Icona DW<br />
L' icona DW (M) è accesa quando è attiva la funzione DUAL WATCH, ovvero il monitoraggio<br />
automatico di 2 canali.<br />
N. Indicazione tono CTCSS (<strong>DOLPHIN</strong>-EX)<br />
Visualizza il numero del codice CTCSS selezionato.<br />
O. Icona SC<br />
L' icona SC (O) è accesa quando è attiva la funzione di scansione SCAN, ovvero la ricerca<br />
automatica delle memorie o dei canali occupati.<br />
P. Indicazione del canale<br />
L' indicazione consente la lettura del numero del canale in uso.<br />
Q. Strumento digitale a barre S/RF Meter<br />
Lo strumento a 6 barre S/RF Meter indica l' intensità del segnale ricevuto da S0 a S6 in ricezione<br />
e la potenza RF di uscita.<br />
R. Indicazione del numero di memoria (1-8)<br />
L' indicazione delle memorie (1-8) è accesa quando è stato selezionato 1 degli 8 canali<br />
- 29 -
Descrizione dei comandi e indicatori<br />
programmabili di memoria.<br />
S. Icona M<br />
L' icona M (S) indica che la radio si trova in modalità memoria.<br />
T. Icona PS<br />
L' icona PS (T) indica che la funzione di risparmio energetico (Power Save) è attiva.<br />
U. Icona VOX<br />
L' icona VOX (U) indica che la funzione VOX (uso a mani libere) è attiva.<br />
V. Icona BUSY<br />
L' icona BUSY (V) è accesa quando la radio sta ricevendo un segnale oppure lo Squelch è aperto.<br />
4. Presa Mike-Speaker / ricarica<br />
Presa per il collegamento di un microfono-altoparlante esterno e del carica batterie da parete<br />
230VAC in dotazione.<br />
AVVERTENZA ! Usare solo accessori originali. Collegare ed utilizzare accessori diversi da<br />
quelli originali può causare gravi danni al ricetrasmettitore ed inoltre la perdita della<br />
garanzia. Ridurre sempre il livello di volume al minimo prima di collegare una cuffia o<br />
microfono esterni e aumentarlo gradatamente per evitare di danneggiare l'accessorio o l'<br />
udito dell' operatore.<br />
5. Tasto UP<br />
Tasto per la selezione dei canali in ordine crescente e lo scorrimento delle funzioni in modalità Menu.<br />
6. Tasto 16 (canale 16 di soccorso)<br />
Questo tasto consente la selezione immediata del canale 16 di emergenza (156.800 MHz).<br />
7. Tasto DOWN<br />
Tasto per la selezione dei canali in ordine decrescente e lo scorrimento delle funzioni in<br />
modalità Menu.<br />
8. Tasto MENU / MEMORIE<br />
Il tasto MENU (8) permette di abilitare e programmare le diverse funzioni della radio. Ad ogni<br />
pressione del tasto MENU (7), è possibile selezionare in sequenza una delle varie funzioni.<br />
Mantenendo premuto il tasto MENU (8), la radio entrerà in modalità MEMORIA (vedi a pag. 37-38).<br />
Italiano<br />
- 30 -
Descrizione dei comandi e indicatori<br />
9. Altoparlante incorporato<br />
Altoparlante entro contenuto.<br />
10. Contatti per caricabatterie da tavolo<br />
Contatti per il caricabatterie da tavolo mod. INTEK DDC-500.<br />
Italiano<br />
11. Microfono incorporato<br />
Microfono entro contenuto.<br />
12. Tasto LIGHT / SCRAMBLER<br />
LIGHT<br />
Premere brevemente il tasto LIGHT (12) per attivare la retroilluminazione del display LCD, che si<br />
spegnerà automaticamente dopo circa 5 secondi.<br />
SCRAMBLER (<strong>DOLPHIN</strong>-EX)<br />
Mantenendo premuto questo tasto viene attivata la funzione SCRAMBLER.<br />
Per la descrizione vedere il paragrafo FUNZIONE SCRAMBLER a pag. 39<br />
13. Tasto Monitor<br />
Premere questo tasto per attivare la funzione Monitor. Questa funzione consente di aprire lo<br />
Squelch e ascoltare così il rumore di fondo.<br />
14. Tasto SCAN / LOCK<br />
SCAN<br />
Premere brevemente questo tasto per attivare la scansione automatica dei canali o delle<br />
memorie in uso (vedi paragrafo SCANSIONE AUTOMATICA a pag. 38-39).<br />
BLOCCO TASTIERA KEY LOCK<br />
Mantenere premuto il tasto SCAN (14) per circa 3 secondi per attivare il blocco della tastiera (sul<br />
display comparirà l' icona LOCK (D)). Quando il blocco tastiera è attivato, tutti i tasti sono<br />
disattivati ad eccezione del tasto PTT (15). Per disattivare il blocco tastiera, mantenere premuto<br />
di nuovo il tasto SCAN (14).<br />
15. Tasto PTT (Push-To-Talk)<br />
Tasto di trasmissione. Premere per trasmettere e mantenere premuto durante la trasmissione.<br />
L' indicatore di trasmissione TX (C) rimarrà acceso durante la trasmissione. Rilasciare il tasto<br />
PTT (15) per ritornare in modalità ricezione.<br />
ATTENZIONE ! Non toccare l' antenna durante la trasmissione.<br />
- 31 -
Descrizione dei comandi e indicatori<br />
Pannello posteriore<br />
Italiano<br />
16<br />
17<br />
18<br />
16. Clip da cintura<br />
1. Per installare la clip da cintura, far slittare la stessa verso il basso nello slot apposito<br />
situato nella parte posteriore della radio, finchè il meccanismo di blocco compie un clic.<br />
2. Per rimuovere la clip, tirare la linguetta di blocco verso l' esterno e quindi delicatamente<br />
far slittare la clip verso la parte alta della radio.<br />
17. Coperchio vano batterie<br />
Coperchio dell’ alloggiamento delle batterie.<br />
18. Selettore batterie utilizzate<br />
Deviatore, posto all’ interno del vano batterie, utilizzato per la selezione del tipo di batterie<br />
utilizzate: Ni per batterie ricaricabili e AL per batterie alkaline.<br />
- 32 -
Funzionamento<br />
Italiano<br />
UTILIZZO DEL MENU<br />
Selezione dei canali<br />
La banda dei canali pre-impostata è quella Internazionale. Per selezionare il canale desiderato,<br />
eseguire le seguenti operazioni :<br />
1. Premere 1 volta il tasto MENU (8) finchè il numero del canale (P) lampeggia sul display LCD.<br />
2. Premere i tasti UP (5) o DOWN (7) per selezionare il canale desiderato. Mantenendo<br />
premuto uno di questi tasti, la selezione avverrà con velocità maggiore.<br />
3. Per confermare la selezione eseguita ed uscire dal menu, premere il tasto PTT (15) oppure<br />
premere il tasto MENU (8) per passate alla funzione successiva.<br />
Tabella Canali Internazionali<br />
CANALE FREQ. (TX) FREQ. (RX) CANALE FREQ. (TX) FREQ. (RX)<br />
1<br />
2<br />
3<br />
4<br />
5<br />
6<br />
7<br />
8<br />
9<br />
10<br />
11<br />
12<br />
13<br />
14<br />
15<br />
16<br />
17<br />
18<br />
19<br />
20<br />
21<br />
22<br />
23<br />
24<br />
25<br />
26<br />
27<br />
28<br />
156.050<br />
156.100<br />
156.150<br />
156.200<br />
156.250<br />
156.300<br />
156.350<br />
156.400<br />
156.450<br />
156.500<br />
156.550<br />
156.600<br />
156.650<br />
156.700<br />
156.750<br />
156.800<br />
156.850<br />
156.900<br />
156.950<br />
157.000<br />
157.050<br />
157.100<br />
157.150<br />
157.200<br />
157.250<br />
157.300<br />
157.350<br />
157.400<br />
160.650<br />
160.700<br />
160.750<br />
160.800<br />
160.850<br />
156.300<br />
160.950<br />
156.400<br />
156.450<br />
156.500<br />
156.550<br />
156.600<br />
156.650<br />
156.700<br />
156.750<br />
156.800<br />
156.850<br />
161.500<br />
161.550<br />
161.600<br />
161.650<br />
161.700<br />
161.750<br />
161.800<br />
161.850<br />
161.900<br />
161.950<br />
162.000<br />
60<br />
61<br />
62<br />
63<br />
64<br />
65<br />
66<br />
67<br />
68<br />
69<br />
71<br />
72<br />
73<br />
74<br />
75<br />
76<br />
77<br />
78<br />
79<br />
80<br />
81<br />
82<br />
83<br />
84<br />
85<br />
86<br />
87<br />
88<br />
156.025<br />
156.075<br />
156.125<br />
156.175<br />
156.225<br />
156.275<br />
156.325<br />
156.375<br />
156.425<br />
156.475<br />
156.575<br />
156.625<br />
156.675<br />
156.725<br />
156.775<br />
156.825<br />
156.875<br />
156.925<br />
156.975<br />
157.025<br />
157.075<br />
157.125<br />
157.175<br />
157.225<br />
157.275<br />
157.325<br />
157.375<br />
157.425<br />
160.625<br />
160.675<br />
160.725<br />
160.775<br />
160.825<br />
160.875<br />
160.925<br />
156.375<br />
156.425<br />
156.475<br />
156.575<br />
156.625<br />
156.675<br />
156.725<br />
156.775<br />
156.825<br />
156.875<br />
161.525<br />
161.575<br />
161.625<br />
161.675<br />
161.725<br />
161.775<br />
161.825<br />
161.875<br />
161.925<br />
157.375<br />
157.425<br />
- 33 -
Funzionamento<br />
Impostazione della funzione VOX (uso a mani libere)<br />
La radio dispone della funzione VOX, che può essere utilizzata per una trasmissione di voce<br />
automatica (uso a mani libere o uso come baby room monitor). In questa modalità, la<br />
trasmissione inizia automaticamente parlando nel microfono (11). Non c’ è bisogno quindi di<br />
premere il tasto PTT (15). Per impostare la modalità VOX, eseguire le seguenti operazioni :<br />
1. Premere più volte il tasto MENU (8) finchè appare sul display la scritta Vo (P) e l'<br />
indicazione VOX (U) inizierà a lampeggiare.<br />
2. Premere i tasti UP (5) o DOWN (7) per selezionare il livello di sensibilità desiderato, da 01<br />
a 04. Selezionando OF, la funzione VOX viene disattivata. La funzione VOX è più<br />
sensibile impostando il livello 01. Quando la funzione VOX è attivata, l' indicazione VOX<br />
(U) appare sul display LCD.<br />
3. Per confermare la selezione eseguita ed uscire dal menu, premere il tasto PTT (15) oppure<br />
premere il tasto MENU (8) per passate alla funzione successiva.<br />
Selezione della Potenza del Trasmettitore<br />
La radio dispone di una funzione di regolazione della potenza RF del trasmettitore (alta/bassa),<br />
molto utile per ridurre il consumo della batteria durante comunicazioni a breve distanza. Per<br />
selezionare la potenza del trasmettitore, eseguire le seguenti operazioni :<br />
1. Premere più volte il tasto MENU (8) finchè appare sul display LCD la scritta Pr (P) e le<br />
icone HI (I) o LO (L) iniziano a lampeggiare.<br />
2. Premere i tasti UP (5) o DOWN (7) per selezionare il livello di potenza desiderato HI (alta<br />
potenza) o LO (bassa potenza).<br />
3. Per confermare la selezione eseguita ed uscire dal menu, premere il tasto PTT (15) oppure<br />
premere il tasto MENU (8) per passate alla funzione successiva.<br />
4. A seconda della selezione effettuata, sul display comparirà LO o HI.<br />
Selezione del livello di Squelch<br />
Questa funzione permette di silenziare il ricevitore ed eliminare quindi il rumore di fondo. E'<br />
possibile selezionare la soglia di Squelch desiderata in 7 livelli, da 0 (Squelch aperto) a 6. Per<br />
selezionare il livello di Squelch desiderato, eseguire le seguenti operazioni :<br />
1. Premere più volte il tasto MENU (8) finchè appaiono sul display LCD la scritta SL (P) ed il<br />
livello di Squelch impostato (N).<br />
2. Premere i tasti UP (5) o DOWN (7) per selezionare il livello di SQUELCH desiderato da 0<br />
(Squelch aperto) a 6. Selezionando il livello 0 sarà possibile ascoltare il rumore di fondo.<br />
Italiano<br />
- 34 -
Funzionamento<br />
3. Per confermare la selezione eseguita ed uscire dal menu, premere il tasto PTT (15) oppure<br />
premere il tasto MENU (8) per passate alla funzione successiva.<br />
Italiano<br />
Impostazione del tono di tastiera<br />
Ogni qualvolta viene premuto un tasto della radio, un tono beep è prodotto per confermare il<br />
comando inserito. Questa nota musicale può essere attivata o disattivata dall’utente,<br />
eseguendo le seguenti operazioni :<br />
1. Premere 6 volte il tasto MENU (8) finchè appare sul display LCD la scritta Bp (P) e l' icona<br />
del tono (A) inizia a lampeggiare.<br />
2. Premere i tasti UP (5) o DOWN (7) per selezionare on (tono beep attivato) oppure oF<br />
(tono beep disattivato).<br />
3. Per confermare la selezione eseguita ed uscire dal menu, premere il tasto PTT (15) oppure<br />
premere il tasto MENU (8) per passate alla funzione successiva.<br />
4. Se il tono beep è attivato, sul display compare l' icona (A).<br />
Impostazione della funzione Roger Beep<br />
Questa funzione permette di inviare automaticamente una nota musicale quando viene<br />
rilasciato il tasto PTT. Questo avviso musicale conferma al vostro corrispondente che la vostra<br />
trasmissione è finita. Per impostare la funzione Roger Beep, eseguire le seguenti operazioni :<br />
1. Premere più volte il tasto MENU (8) finchè appare sul display LCD la scritta rb (P) e l'<br />
icona del tono (B) inizia a lampeggiare.<br />
2. Premere i tasti UP (5) o DOWN (7) per selezionare on (tono beep attivato) oppure oF<br />
(tono beep disattivato).<br />
3. Per confermare la selezione eseguita ed uscire dal menu, premere il tasto PTT (15) oppure<br />
premere il tasto MENU (8) per passate alla funzione successiva.<br />
4. Se il tono beep è attivato, sul display compare l' icona (B).<br />
Impostazione del Tono di Chiamata Call<br />
La radio dispone di 3 differenti toni musicali (melodie) per l' avviso di chiamata. Per selezionare<br />
la melodia desiderata, eseguire le seguenti operazioni :<br />
1. Premere più volte il tasto MENU (8) finchè la scritta CA (P) e il numero della melodia<br />
selezionata (N) lampeggiano sul display LCD.<br />
2. Premere i tasti UP (5) o DOWN (7) per selezionare la melodia desiderata, da 01 a 03.<br />
3. Per confermare la selezione eseguita ed uscire dal menu, premere il tasto PTT (15) oppure<br />
- 35 -
Funzionamento<br />
premere il tasto MENU (8) per passate alla funzione successiva.<br />
4 Per inviare una chiamata, premere 2 volte rapidamente il tasto PTT (15).<br />
Impostazione della funzione Dual Watch<br />
La radio è dotata della funzione Dual Watch, che consente di monitorare 2 canali differenti.<br />
Per abilitare la funzione Dual Watch, eseguire le seguenti operazioni :<br />
1. Selezionare il primo canale da monitorare.<br />
2. Premere più volte il tasto MENU (8); le scritte oF (P) (funzione disattivata) e l' icona DW<br />
(M) inizieranno a lampeggiare sul display LCD.<br />
3. Premere i tasti UP (5) o DOWN (7) per selezionare il secondo canale da monitorare.<br />
4. Per confermare la selezione eseguita ed uscire dal menu, premere il tasto PTT (15) oppure<br />
premere il tasto MENU (8) per passate alla funzione successiva.<br />
5. Se la funzione Dual Watch è attivata, sul display compare l' icona DW la radio inizierà il<br />
monitoraggio arrestandosi automaticamente quando, su uno dei 2 canali, verrà ricevuto un<br />
segnale, per poi riprendere la scansione al termine della comunicazione.<br />
6. Per disattivare la funzione Dual Watch, premere il tasto SCAN (14).<br />
Impostazione della funzione Power Save<br />
La radio comprende un dispositivo automatico chiamato Automatic Power Save, che<br />
permette di estendere in modo significativo la durata della batteria. Se la radio resta in Stand<br />
By (modo di attesa) per almeno 5 secondi, il circuito Power Save viene attivato. La radio può<br />
comunque sempre ricevere trasmissioni in questa modalità. E' possibile attivare o disattivare<br />
questa funzione, procedendo come segue :<br />
1. Premere più volte il tasto MENU (8) finchè appare sul display LCD la scritta PS (P) e l'<br />
icona PS (T) inizia a lampeggiare.<br />
2. Premere i tasti UP (5) o DOWN (7) per selezionare on (funzione attivata) o oF (tfunzione<br />
disattivata).<br />
3. Per confermare la selezione eseguita ed uscire dal menu, premere il tasto PTT (15) oppure<br />
premere il tasto MENU (8) per passate alla funzione successiva.<br />
4. Se la funzione Power Save è attivata, sul display compare l' icona PS (T).<br />
Selezione della banda di frequenza<br />
L’ utilizzatore, a seconda del luogo in cui si trova, deve effettuare la selezione dei canali tra<br />
Internazionali (frequenze permesse in Europa ), canali USA e canali Canadesi (frequenze<br />
Italiano<br />
- 36 -
Funzionamento<br />
Italiano<br />
permesse solo per il mercato americano). Per selezionare la banda desiderata procedere<br />
come segue:<br />
1. Premere più volte il tasto MENU (8) finchè appare sul display LCD la scritta Co (P) e le<br />
indicazioni U (canali USA), I (canali Internazionali) o C (canali canadesi) iniziano a lampeggiare.<br />
2. Premere i tasti UP (5) o DOWN (7) per selezionare la banda desiderate.<br />
3. Per confermare la selezione eseguita ed uscire dal menu, premere il tasto PTT (15) oppure<br />
premere il tasto MENU (8) per passate alla funzione successiva.<br />
Selezione dei canali Meteo<br />
Questa funzione consente di attivare i 10 canali Meteo che verranno aggiunti in sequenza ai<br />
canali della banda selezionata. Per selezionare i canali Meteo, procedere come segue:<br />
1. Premere più volte il tasto MENU (8) finchè appare sul display LCD la scritta 01 (P), e l'<br />
icona W (E) inizia a lampeggiare.<br />
2. Premere i tasti UP (5) o DOWN (7) per selezionare on (funzione attivata) o oF (tfunzione<br />
disattivata).<br />
3. Per confermare la selezione eseguita ed uscire dal menu, premere il tasto PTT (15) oppure il<br />
tasto MENU (8).<br />
4. Se i canali Meteo sono attivati, sul display compare l' icona W (E).<br />
UTILIZZO DELLE MEMORIE<br />
Programmazione dei canali di memoria (1-8)<br />
La radio dispone di 8 canali di memoria programmabili. Per memorizzare un canale in una<br />
delle 8 memorie disponibili, procedere come segue :<br />
1. Selezionare il canale desiderato da memorizzare, procedendo come descritto a pag. 33.<br />
2. Mantenere premuto per circa 3 secondi il tasto MENU (8) per entrare in MODALITA'<br />
MEMORIE. L' icona di memoria M (S) inizia a lampeggiare sul display LCD.<br />
3. Premere i tasti UP (5) o DOWN (7) per selezionare una delle 8 memorie da programmare<br />
da 1 a 8 (R). Se viene selezionato il numero di memoria 0, nessun canale verrà<br />
memorizzato. Se il canale di memoria è già occupato, verrà sovrascritto.<br />
4. Premere brevemente il tasto PTT (15) per confermare la selezione e salvare il canale in<br />
memoria. La radio tornerà in modalità Stand-by.<br />
- 37 -
Funzionamento<br />
Richiamo dei canali di memoria (1-8)<br />
1. Mantenere premuto per circa 3 secondi il tasto MENU (8) per entrare in MODALITA'<br />
MEMORIE. L' icona di memoria M (S) inizia a lampeggiare sul display LCD.<br />
2. Premere brevemente il tasto PTT (15) per entrare in modalità RICHIAMO MEMORIE; la<br />
radio visualizzerà l' ultima memoria programmata. Se nessuna memoria è stata<br />
programmata, la radio entrerà automaticamente in modalità Stand-by.<br />
3. Per selezionare la memoria desiderata, premere brevemente il tasto MENU (8) seguito dai<br />
tasti UP (5) o DOWN (7) e confermare premendo il tasto PTT (15).<br />
4. Per uscire dalla MODALITA' MEMORIE è necessario spegnere e riaccendere la radio.<br />
Cancellazione dei canali di memoria (1-8)<br />
1. Richiamare la memoria da cancellare come descritto in precedenza.<br />
2. Mantenere premuto per circa 3 secondi il tasto MENU (8) finchè l' icona di memoria M (S)<br />
inizia a lampeggiare sul display LCD.<br />
3. Premere i tasti UP (5) o DOWN (7) per selezionare il numero di memoria 0 e confermare<br />
la cancellazione premendo il tasto PTT (15). La radio tornerà in modalità Stand-by.<br />
Italiano<br />
SCANSIONE AUTOMATICA<br />
Questa funzione permette la scansione automatica di tutti i canali e delle memorie<br />
programmate. Per attivare la scansione procedere come segue :<br />
Scansione automatica dei canali<br />
1. Premere brevemente il tasto SCAN (14); la radio inizierà automaticamente la scansione<br />
alla ricerca dei canali in uso e sul display verrà visualizzata l' indicazione SC (O). La<br />
scansione si arresta sul primo canale attivo trovato, per poi ripartire dopo circa 4 secondi<br />
dal termine della comunicazione. Se durante la scansione viene premuto il tasto PTT (15),<br />
la radio interromperà la scansione e si posizionerà sull' ultimo canale dove è avvenuta una<br />
comunicazione e la riprenderà dopo circa 14 secondi se nessuna trasmissione viene più<br />
ricevuta.<br />
2. Per uscire dalla modalità scansione, premere nuovamente il tasto SCAN (14).<br />
Scansione automatica delle memorie programmate<br />
1. Mantenere premuto per circa 3 secondi il tasto MENU (8) per entrare in MODALITA'<br />
MEMORIE. L' icona di memoria M (S) inizia a lampeggiare sul display LCD.<br />
2. Premere brevemente il tasto PTT (15) per entrare in modalità RICHIAMO MEMORIE; la<br />
- 38 -
Funzionamento<br />
Italiano<br />
radio visualizzerà l' ultima memoria programmata (R).<br />
3. Premere brevemente il tasto SCAN (14) per avviare la scansione automatica delle<br />
memorie programmate. Sul display verrà visualizzata l' indicazione SC (O).<br />
4. La scansione si arresta sul primo canale attivo trovato, per poi ripartire dopo circa 4 secondi<br />
dal termine della comunicazione. Se durante la scansione viene premuto il tasto PTT (15), la<br />
radio interromperà la scansione e si posizionerà sull' ultimo canale programmato e la<br />
riprenderà dopo circa 14 secondi se nessuna trasmissione viene più ricevuta.<br />
5. Per uscire dalla modalità scansione, premere nuovamente il tasto SCAN (14).<br />
6. Per uscire dalla MODALITA' MEMORIE è necessario spegnere e riaccendere la radio.<br />
FUNZIONE SCRAMBLER (<strong>DOLPHIN</strong>-EX)<br />
Attivando questa funzione è possibile ottenere conversazioni private all' interno del proprio<br />
gruppo di utenti, sfruttando uno speciale sistema di codifica del segnale. La radio dispone di 2 tipi<br />
diversi di codifica che possono essere però utilizzati esclusivamente con altri apparecchi dello<br />
stesso modello. Per selezionare il tipo di codifica desiderato procedere come segue :<br />
1. Mantenere premuto il tasto LIGHT (12) per circa 3 secondi, finchè sul display LCD viene<br />
mostrata l' indicazione Sc (P) e la scritta SCR (H) inizia a lampeggiare..<br />
2. Premere i tasti UP (5) o DOWN (6) per selezionare il tipo di codifica desiderato (01 o 02).<br />
Selezionando OF, la funzione verrà disabilitata.<br />
3. Premere il tasto PTT (15) per confermare la selezione e tornare in modalità Stand-by.<br />
4. Quando la funzione SCRAMBLER viene attivata, sul display compare la scritta SCR (H).<br />
5. Assicurarsi che gli altri membri del gruppo utilizzino il sistema SCRAMBLE e abbiano<br />
selezionato lo stesso tipo di codifica. In caso contrario le radio non potranno comunicare.<br />
6. Per disabilitare la funzione SCRAMBLER ripetere i punti 1 e 2 e selezionare OF.<br />
FUNZIONE CTCSS (<strong>DOLPHIN</strong>-EX)<br />
La radio dispone di 38 codici privati CTCSS. E’ possibile associare un diverso tono CTCSS a ciascun<br />
canale. Per impostare un tono CTCSS, eseguire le seguenti operazioni :<br />
1. Premere 2 volte il tasto MENU (8) finchè il numero del tono CTCSS (N) lampeggia sul<br />
display LCD. Se nessun tono è selezionato verrà visualizzata l' indicazione OF (N).<br />
2. Premere i tasti UP (5) o DOWN (7) per selezionare il tono CTCSS desiderato. Mantenendo<br />
premuto uno di questi tasti, la selezione dei canali avverrà con velocità maggiore.<br />
3. Per confermare la selezione eseguita ed uscire dal menu, premere i tasti PTT (15) o CALL (6)<br />
oppure premere il tasto MENU (8) per passate alla funzione successiva.<br />
- 39 -
Funzionamento - Avviso agli utenti<br />
Note : Selezionando il codice CTCSS OF, la funzione CTCSS sarà disattivata. Per comunicare<br />
tra due o più radio, le selezioni del canale e del codice CTCSS devono essere le stesse. Per<br />
comunicare con altri modelli e marchi di radio, l’attuale frequenza radio e la frequenza del tono<br />
CTCSS devono coincidere. Fate riferimento alle tabelle delle frequenze (canali e toni CTCSS)<br />
in questo manuale.<br />
No Freq. (Hz)<br />
OF CTCSS OFF<br />
01 67,0<br />
02 71,9<br />
03 74,4<br />
04 77,0<br />
05 79,7<br />
06 82,5<br />
07 85,4<br />
CTCSS - TABELLA DEI TONI PRIVATI<br />
No Freq. (Hz)<br />
08 88,5<br />
09 91,5<br />
10 94,8<br />
11 97,4<br />
12 100,0<br />
13 103,5<br />
14 107,2<br />
15 110,9<br />
No Freq. (Hz)<br />
16 114,8<br />
17 118,8<br />
18 123,0<br />
19 127,3<br />
20 131,8<br />
21 136,5<br />
22 141,3<br />
23 146,2<br />
No Freq. (Hz)<br />
24 151,4<br />
25 156,7<br />
26 162,2<br />
27 167,9<br />
28 173,8<br />
29 179,9<br />
30 186,2<br />
31 192,8<br />
No Freq. (Hz)<br />
32 203,5<br />
33 210,7<br />
34 218,1<br />
35 225,7<br />
36 233,6<br />
37 241,8<br />
38 250,3<br />
- -<br />
Italiano<br />
Avviso agli utenti<br />
Ai sensi dell’art. 13 del decreto legislativo 25 luglio 2005, n. 15”Attuazione delle Direttive<br />
2002/95/CE, 2002/96/CE e 2003/108/CE, relative alla riduzione dell’uso di sostanze pericolose<br />
nelle apparecchiature elettriche ed elettroniche, nonché allo smaltimento dei rifiuti”.<br />
Il simbolo del cassonetto barrato riportato sull’apparecchiatura indica che il prodotto<br />
alla fine della propria vita utile deve essere raccolto separatamente dagli altri rifiuti.<br />
L’utente dovrà, pertanto, conferire l’apparecchiatura giunta a fine vita agli idonei<br />
centri di raccolta differenziata dei rifiuti elettronici ed elettrotecnici, oppure<br />
riconsegnarla al rivenditore al momento dell’acquisto di una nuova apparecchiatura<br />
di tipo equivalente, in ragione di uno a uno.<br />
L’adeguata raccolta differenziata per l’avvio successivo dell’apparecchiatura dismessa al<br />
riciclaggio, al trattamento e allo smaltimento ambientalmente compatibile contribuisce ad<br />
evitare possibili effetti negativi sull’ambiente e sulla salute e favorisce il riciclo dei materiali di<br />
cui è composta l’apparecchiatura.<br />
Lo smaltimento abusivo del prodotto da parte dell’utente comporta l’applicazione delle sanzioni<br />
amministrative di cui al dlgs. n. 22/1997” (articolo 50 e seguenti del dlgs. n. 22/1997).<br />
- 40 -
Specifiche Tecniche - Accessori Opzionali<br />
Italiano<br />
Specifiche Tecniche<br />
Generali<br />
Canali<br />
Gamma di Frequenza<br />
Alimentazione<br />
Dimensioni<br />
Peso<br />
Ricevitore<br />
Sensibilità<br />
Sensibilità Squelch<br />
Uscita audio<br />
Trasmettitore<br />
Potenza RF di uscita<br />
Tipo di modulazione<br />
INT / USA / CANADA / METEO<br />
156.025 - 157.425 MHz (TX) / 156.300 - 162.000 MHz (RX)<br />
7.5V (5 x AA 1,5V pile alkaline)<br />
6.0V (5 x AA 1,2V batterie ricaricabili Ni-MH)<br />
A245 x L60 X P40 mm (antenna inclusa)<br />
gr. 265 (batterie incluse)<br />
0.3µV per 12dB SINAD<br />
Regolabile in 7 livelli<br />
300mW a 10% THD<br />
5W-1W selezionabile<br />
FM<br />
Antenna Danneggiata<br />
Non usare mai la radio se l' antenna è danneggiata. Se un' antenna danneggiata viene a<br />
contatto con la pelle, è possibile che accada una piccola bruciatura.<br />
Informazioni Importanti sulle Batterie<br />
Eliminate le batterie utilizzando gli appositi contenitori previsti nella vostra area. Le batterie<br />
possono provocare perdite di liquido elettrolita, se inserita in modo errato, gettata nel fuoco o<br />
se caricata in modo errato o con caricatori diversi da quello originale.<br />
Accessori Opzionali<br />
MT-SM100<br />
Microfono-Auricolare esterno con Clip per cravatta<br />
MT-SM200<br />
Microfono-Auricolare esterno con Clip per cravatta<br />
DDC-500<br />
Caricatore elettronico da tavolo di tipo rapido<br />
- 41 -
Altre informazioni<br />
Informazioni Importanti<br />
Importante !<br />
Modifiche o interventi sulla radio possono farvi perdere la vostra autorizzazione ad utilizzare il<br />
prodotto. Questa ricetrasmittente è progettata per trasmettere un segnale regolato su<br />
specifiche frequenze assegnate. E' una violazione della legge modificare i settaggi o le<br />
regolazioni interne della radio per eccedere questi limiti. Qualsiasi regolazione o intervento<br />
tecnico sul prodotto deve essere effettuata unicamente da un tecnico qualificato o da un centro<br />
di servizio autorizzato.<br />
Per la sicurezza :<br />
Non aprite mai il contenitore della radio (tranne per sostituzione delle batterie).<br />
Non cambiate o sostituite nulla all' interno della radio (tranne le batterie).<br />
La vostra radio potrebbe occasionalmente causare delle interferenze radio o TV, anche se<br />
utilizzata correttamente. Per determinare se queste interferenze sono causate dalla vostra radio<br />
spegnete l' apparecchio. Se le interferenze sono cessate, la causa è la vostra radio. Per eliminare<br />
il problema, spostate la radio più lontana dal ricevitore radio o TV disturbato. Se le interferenze<br />
persistono, non usate la radio in tale luogo.<br />
Luoghi pericolosi :<br />
Non utilizzate la radio in luoghi pericolosi, esempio presenza di esplosivi o di dispositivi<br />
sensibili alle trasmissioni radio, all' interno di aeromobili.<br />
Cura e Manutenzione :<br />
Per pulire la radio, usare un panno soffice inumidito con l' acqua. Non usate assolutamente<br />
solventi o prodotti similari, in quanto gli stessi possono danneggiare il contenitore della radio, lo<br />
schermo LCD e penetrare all' interno della radio, causando danni al circuito e alle batterie. Non<br />
immergete assolutamente la radio nell' acqua. Se la radio si bagna accidentalmente,<br />
spegnetela e rimuovete la batteria immediatamente. Asciugate bene la batteria e l' interno della<br />
radio con un getto di aria tiepida, per rimuovere ogni residuo di acqua o umidità. Lasciate la<br />
radio aperta senza la batteria per almeno una notte in modo che la stessa si asciughi<br />
completamente.<br />
Avviso :<br />
Il contenuto di questo manuale è stato attentamente controllato, tuttavia il fabbricante non<br />
assume alcuna responsabilità per problemi derivanti da errori e omissioni nel testo. Nessuna<br />
parte di questo manuale può essere riprodotta o utilizzata in ogni modo, senza autorizzazione<br />
specifica del fabbricante.<br />
Italiano<br />
- 42 -
Tabella delle restrizioni all' uso dei ricetrasmettitori VHF marini<br />
Italiano<br />
PAESE<br />
AUSTRIA<br />
BELGIO<br />
DANIMARCA<br />
FINLANDIA<br />
FRANCIA<br />
GERMANIA<br />
GRECIA<br />
IRLANDA<br />
ITALIA<br />
LUSSEMBURGO<br />
NORVEGIA<br />
OLANDA<br />
PORTOGALLO<br />
REGNO UNITO<br />
SPAGNA<br />
SVEZIA<br />
SVIZZERA<br />
Autorizz.<br />
Restrizioni all' uso<br />
Nota : può essere richiesto un certificato di operatore.<br />
Per maggiori informazioni, contattare le autorità marittime competenti.<br />
SI<br />
Richiesta la licenza individuale.<br />
Utilizzo consentito solo sui canali internazionali.<br />
SI<br />
Richiesta la licenza individuale. Utilizzo consentito solo sui canali<br />
internazionali. Uso non autorizzato durante la navigazione in acque interne.<br />
SI Utilizzo consentito solo sui canali internazionali.<br />
SI<br />
Richiesti la licenza individuale e la licenza di operatore.<br />
Utilizzo consentito solo sui canali internazionali.<br />
SI<br />
Richiesta la licenza individuale. Utilizzo consentito solo sui canali<br />
internazionali. Uso non autorizzato durante la navigazione in acque interne.<br />
SI<br />
SI<br />
SI<br />
SI<br />
SI<br />
SI<br />
SI<br />
SI<br />
SI<br />
SI<br />
SI<br />
NO<br />
Richiesta la licenza individuale. Utilizzo consentito solo sui canali<br />
internazionali. Uso non autorizzato durante la navigazione in acque interne.<br />
Richiesta la licenza individuale.<br />
Utilizzo consentito solo sui canali internazionali.<br />
Richiesti la licenza individuale e la licenza di operatore.<br />
Utilizzo consentito solo sui canali internazionali.<br />
Utilizzo ammesso per diporto (Legge 172 del 08/07/03) e a bordo di navi non<br />
soggette a Solas. Richiesta l' autorizzazione generale (Licenza di stazione -<br />
legge 259 del 01/08/03). Utilizzo consentito solo sui canali internazionali.<br />
Richiesta la licenza individuale. Utilizzo consentito solo sui canali<br />
internazionali. Potenza minima : 1W. In acque interne : ammessi solo canali<br />
15 e/o 17 (comunicazioni a bordo); potenza 0.1-1W.<br />
Richiesta la licenza individuale.<br />
Utilizzo consentito solo sui canali internazionali.<br />
Richiesta la licenza individuale. Utilizzo consentito solo sui canali<br />
internazionali. Uso non autorizzato durante la navigazione in acque interne.<br />
Richiesta la licenza individuale.<br />
Utilizzo consentito solo sui canali internazionali.<br />
Richiesti la licenza individuale e la licenza di operatore.<br />
Utilizzo consentito solo sui canali internazionali.<br />
Richiesta la licenza individuale.<br />
Utilizzo consentito solo sui canali internazionali.<br />
Richiesta la licenza individuale.<br />
Utilizzo consentito solo sui canali internazionali.<br />
Non autorizzato.<br />
- 43 -
Regolamentazione italiana<br />
REGOLAMENTAZIONE ITALIANA IN SINTESI (aggiornata al 08/04/2005) (*)<br />
DIPORTO<br />
L' uso di apparati VHF nautici è obbligatorio per legge su tutte le imbarcazioni da diporto lunghe fino a 24<br />
mt che navigano oltre le 6 miglia. Legge 172 del 08/07/03 - GU 161 del 14/07/03 segue in sintesi :<br />
Scafo da 10 a 24 mt che naviga oltre<br />
le 6 miglia<br />
TIPO DI IMBARCAZIONE<br />
Unità da diporto a remi<br />
Unità da diporto fino a 10 mt.<br />
Italiano<br />
Iscrizione imbarcazione<br />
presso la Capitaneria di Porto<br />
Dotazione di apparato<br />
ricetrasmittente VHF<br />
Collaudo e ispezioni ordinarie<br />
OBBLIGATORIA<br />
OBBLIGATORIA. Può essere sufficiente<br />
anche un apparato portatile.<br />
ESENTI se conformi alla 99/05/CE<br />
(R&TTE). Gli apparati INTEK sono<br />
conformi a tale direttiva.<br />
L' utilizzatore deve presentare la<br />
"Dichiarazione di Conformità" (allegata<br />
al prodotto) presso la Capitaneria di<br />
Porto. Ne consegue che la Capitaneria :<br />
A) Assegna nominativo internazionale<br />
B) Rilascia la licenza provvisoria<br />
C) Trasmette all ' Ispettorato<br />
Territoriale i documenti per il<br />
rilascio della licenza definitiva.<br />
NON OBBLIGATORIA<br />
OBBLIGATORIA solo se navigano<br />
oltre le 6 miglia dalla costa; è<br />
sufficiente anche un portatile.<br />
ESENTI se conformi alla 99/05/CE<br />
(R&TTE). Gli apparati INTEK sono<br />
conformi a tale direttiva.<br />
L' utilizzatore richiede la licenza<br />
di stazione e presenta la<br />
"Dichiarazione di Conformità"<br />
(allegata al prodotto) presso l'<br />
Ispettorato Territoriale di<br />
residenza del richiedente.<br />
L' Ispettorato assegna indicativo<br />
di chiamata di identificazione.<br />
Legenda<br />
DIPORTO : sport, ricreazione, SENZA SCOPO DI LUCRO. Acque marine e interne.<br />
UNITA' DA DIPORTO : tutto quello che viene usato per il diporto.<br />
NAVE DA DIPORTO : scafo superiore a 24 mt (obbligatorie radio ad onde ettometriche da 0.3<br />
a 3 MHz) 1 miglio = 1.81 Km.<br />
(*) Le normative sono in continua evoluzione; per ulteriori chiarimenti vi consigliamo di<br />
contattare il Ministero delle Comunicazioni presso l' Ispettorato Territoriale competente<br />
(www.urpcomunicazioni.it/ispettorati.htm)<br />
- 44 -
Dichiarazione di Conformità<br />
DICHIARAZIONE DI CONFORMITA'<br />
Italiano<br />
Con la seguente dichiarazione si attesta che i prodotti :<br />
INTEK <strong>DOLPHIN</strong> MR-8060<br />
soddisfano tutte le norme tecniche applicabili ai suddetti prodotti secondo le Direttive<br />
Comunitarie 73/23/EEC, 89/336/EEC e 99/5/EC.<br />
Tipo di prodotto :<br />
Dettagli degli standard applicati :<br />
Produttore :<br />
Notified Body :<br />
Ricetrasmettitore marino VHF<br />
EN 301 178-2 (requisiti essenziali)<br />
EN 301 843-1, EN 301 843-2<br />
EN 60065<br />
INTEK S.R.L.<br />
Via G. Marconi, 16<br />
20090 Segrate (Mi)<br />
Tel. 02-26950451 / Fax 02-26952185<br />
E-Mail intek.com@intek-com.it<br />
EMCCert Dr. Rasek<br />
Boelwiese 5, 91320 Ebermannstadt<br />
Germany<br />
Identification Number : 0678<br />
Punto di contatto :<br />
Armando Zanni<br />
Tel. 02-26950451 / Fax 02-26952185<br />
E-Mail intek.com@intek-com.it<br />
Segrate, 11/01/2008<br />
dr. Vittorio Zanetti (amministratore unico)<br />
- 45 -
Garanzia Limitata<br />
Garanzia Limitata<br />
Questo prodotto é garantito contro difetti nei materiali e nella lavorazione, in condizioni di uso<br />
e servizio normali, per un periodo di un anno, sempre che il prodotto sia ritornato senza spese<br />
al rivenditore presso cui é stato acquistato, accompagnato dallo scontrino fiscale o altro<br />
documento di acquisto, comprovante la data effettiva di acquisto. Questa garanzia non copre<br />
difetti o danni derivanti da abuso, uso improprio, modifiche non autorizzate, perdita di liquidi<br />
delle batterie, utilizzo in ambiente inadatto o normale deperimento d' uso.<br />
Tutti i valori presenti nel manuale sono misurati in condizioni ottimali di utilizzo. Tutti i disegni, i<br />
testi e le caratteristiche tecniche non sono impegnativi e possono essere variati in qualunque<br />
momento.<br />
Italiano<br />
<strong>DOLPHIN</strong> MR-8060<br />
N. di serie : Data:<br />
Timbro e firma del rivenditore<br />
Prodotto importato e distribuito da<br />
INTEK S.R.L.<br />
Via G. Marconi, 16 - 20090 Segrate (MI) - Tel. 02-26950451 - Fax. 02-26952185<br />
www.intek-com.it / e-mail : intek.com@intek-com.it<br />
- 46 -
PRINTED IN CHINA


