Untitled - Hwam
Untitled - Hwam
Untitled - Hwam
You also want an ePaper? Increase the reach of your titles
YUMPU automatically turns print PDFs into web optimized ePapers that Google loves.
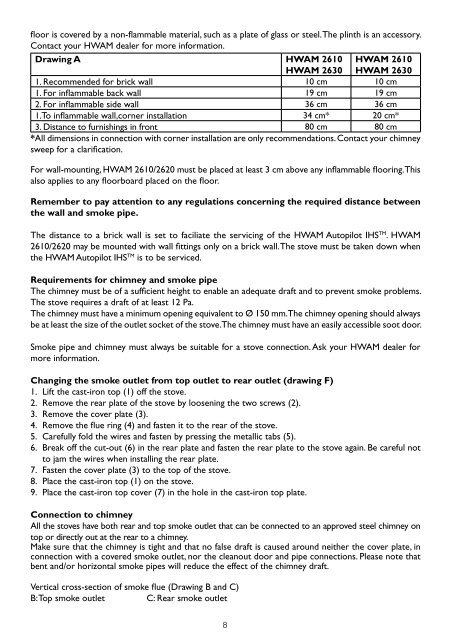
floor is covered by a non-flammable material, such as a plate of glass or steel. The plinth is an accessory.Contact your HWAM dealer for more information.Drawing A HWAM 2610HWAM 2630HWAM 2610HWAM 26301. Recommended for brick wall 10 cm 10 cm1. For inflammable back wall 19 cm 19 cm2. For inflammable side wall 36 cm 36 cm1.To inflammable wall,corner installation 34 cm* 20 cm*3. Distance to furnishings in front 80 cm 80 cm*All dimensions in connection with corner installation are only recommendations. Contact your chimneysweep for a clarification.For wall-mounting, HWAM 2610/2620 must be placed at least 3 cm above any inflammable flooring. Thisalso applies to any floorboard placed on the floor.Remember to pay attention to any regulations concerning the required distance betweenthe wall and smoke pipe.The distance to a brick wall is set to faciliate the servicing of the HWAM Autopilot IHS TM . HWAM2610/2620 may be mounted with wall fittings only on a brick wall. The stove must be taken down whenthe HWAM Autopilot IHS TM is to be serviced.Requirements for chimney and smoke pipeThe chimney must be of a sufficient height to enable an adequate draft and to prevent smoke problems.The stove requires a draft of at least 12 Pa.The chimney must have a minimum opening equivalent to Ø 150 mm. The chimney opening should alwaysbe at least the size of the outlet socket of the stove. The chimney must have an easily accessible soot door.Smoke pipe and chimney must always be suitable for a stove connection. Ask your HWAM dealer formore information.Changing the smoke outlet from top outlet to rear outlet (drawing F)1. Lift the cast-iron top (1) off the stove.2. Remove the rear plate of the stove by loosening the two screws (2).3. Remove the cover plate (3).4. Remove the flue ring (4) and fasten it to the rear of the stove.5. Carefully fold the wires and fasten by pressing the metallic tabs (5).6. Break off the cut-out (6) in the rear plate and fasten the rear plate to the stove again. Be careful notto jam the wires when installing the rear plate.7. Fasten the cover plate (3) to the top of the stove.8. Place the cast-iron top (1) on the stove.9. Place the cast-iron top cover (7) in the hole in the cast-iron top plate.Connection to chimneyAll the stoves have both rear and top smoke outlet that can be connected to an approved steel chimney ontop or directly out at the rear to a chimney.Make sure that the chimney is tight and that no false draft is caused around neither the cover plate, inconnection with a covered smoke outlet, nor the cleanout door and pipe connections. Please note thatbent and/or horizontal smoke pipes will reduce the effect of the chimney draft.Vertical cross-section of smoke flue (Drawing B and C)B: Top smoke outlet C: Rear smoke outlet8


