Man. KT-370EE - Intek
Man. KT-370EE - Intek
Man. KT-370EE - Intek

You also want an ePaper? Increase the reach of your titles
YUMPU automatically turns print PDFs into web optimized ePapers that Google loves.
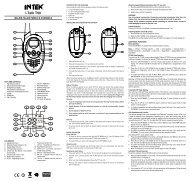
Preliminary StepsEnglishTo install / to remove the belt clipIf necessary, attach the belt clip to the tranceiver, making it slide along thefit runner placed on the rear side of the battery untill the lock will hook. Toremove the belt clip press the lock and slide the belt clip away fromthe battery.Install the external earset-microphone jack rubber cover.If an external earset-microphone is not used, please install the earsetmicrophonejack rubber cover.Install the earset-microphone jack rubber cover, by matching the threerubber tabs with the holes on the radio, as showed on the drawing.If the earset-microphone jack rubber cover is removed, radio will not besplash proof.To install the external microphone (optional)To install the external microphone, remove the protection cover of theexternal microphone/speaker jack. This cover ensures the watertightintegrity of the transceiver (spray-guard) that will not be ensured after itsremoving. Insert the connector of the external microphone into theright jack.In order to avoid mulfunction or damage to the transceiver, use onlyoriginal microphones. Using non original accessories will authomaticallyvoid the warranty.Warning !If an external earset-microphone is used, radio will not be splash proof.- 6 -