English - Porkka
English - Porkka
English - Porkka

You also want an ePaper? Increase the reach of your titles
YUMPU automatically turns print PDFs into web optimized ePapers that Google loves.
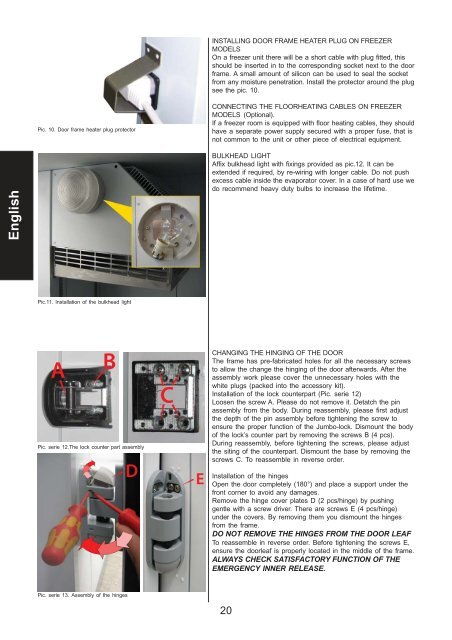
INSTALLING DOOR FRAME HEATER PLUG ON FREEZERMODELSOn a freezer unit there will be a short cable with plug fitted, thisshould be inserted in to the corresponding socket next to the doorframe. A small amount of silicon can be used to seal the socketfrom any moisture penetration. Install the protector around the plugsee the pic. 10.Pic. 10. Door frame heater plug protectorCONNECTING THE FLOORHEATING CABLES ON FREEZERMODELS (Optional).If a freezer room is equipped with floor heating cables, they shouldhave a separate power supply secured with a proper fuse, that isnot common to the unit or other piece of electrical equipment.<strong>English</strong>BULKHEAD LIGHTAffix bulkhead light with fixings provided as pic.12. It can beextended if required, by re-wiring with longer cable. Do not pushexcess cable inside the evaporator cover. In a case of hard use wedo recommend heavy duty bulbs to increase the lifetime.Pic.11. Installation of the bulkhead lightPic. serie 12.The lock counter part assemblyCHANGING THE HINGING OF THE DOORThe frame has pre-fabricated holes for all the necessary screwsto allow the change the hinging of the door afterwards. After theassembly work please cover the unnecessary holes with thewhite plugs (packed into the accessory kit).Installation of the lock counterpart (Pic. serie 12)Loosen the screw A. Please do not remove it. Detatch the pinassembly from the body. During reassembly, please first adjustthe depth of the pin assembly before tightening the screw toensure the proper function of the Jumbo-lock. Dismount the bodyof the lock’s counter part by removing the screws B (4 pcs).During reassembly, before tightening the screws, please adjustthe siting of the counterpart. Dismount the base by removing thescrews C. To reassemble in reverse order.Installation of the hingesOpen the door completely (180°) and place a support under thefront corner to avoid any damages.Remove the hinge cover plates D (2 pcs/hinge) by pushinggentle with a screw driver. There are screws E (4 pcs/hinge)under the covers. By removing them you dismount the hingesfrom the frame.DO NOT REMOVE THE HINGES FROM THE DOOR LEAFTo reassemble in reverse order. Before tightening the screws E,ensure the doorleaf is properly located in the middle of the frame.ALWAYS CHECK SATISFACTORY FUNCTION OF THEEMERGENCY INNER RELEASE.Pic. serie 13. Assembly of the hinges20