mode d'emploi (pdf) - Cicognani Varide
mode d'emploi (pdf) - Cicognani Varide
mode d'emploi (pdf) - Cicognani Varide

Create successful ePaper yourself
Turn your PDF publications into a flip-book with our unique Google optimized e-Paper software.
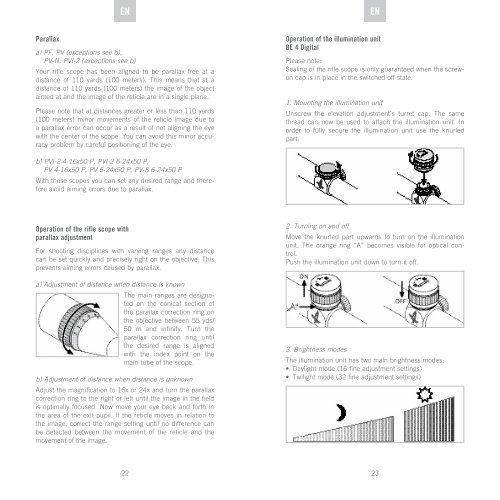
DE ENDE ENParallaxa) PF, PV (exceptions see b),PV-N, PVI-2 (exceptions see b)Your rifle scope has been aligned to be parallax free at adistance of 110 yards (100 meters). This means that at adistance of 110 yards (100 meters) the image of the objectaimed at and the image of the reticle are in a single plane.Please note that at distances greater or less than 110 yards(100 meters) minor movements of the reticle image due toa parallax error can occur as a result of not aligning the eyewith the center of the scope. You can avoid this minor accuracyproblem by careful positioning of the eye.Operation of the illumination unitBE 4 DigitalPlease note:Sealing of the rifle scope is only guaranteed when the screwoncap is in place in the switched off state.1. Mounting the illumination unitUnscrew the elevation adjustment’s turret cap. The samethread can now be used to attach the illumination unit. Inorder to fully secure the illumination unit use the knurledpart.b) PVI-2 4-16x50 P, PVI-2 6-24x50 P,PV 4-16x50 P, PV 6-24x50 P, PV-S 6-24x50 PWith these scopes you can set any desired range and thereforeavoid aiming errors due to parallax.Operation of the rifle scope withparallax adjustmentFor shooting disciplines with varying ranges any distancecan be set quickly and precisely right on the objective. Thisprevents aiming errors caused by parallax.a) Adjustment of distance when distance is knownThe main ranges are designatedon the conical section ofthe parallax correction ring onthe objective between 55 yds/50 m and infinity. Turn theparallax correction ring untilthe desired range is alignedwith the index point on themain tube of the scope.b) Adjustment of distance when distance is unknownAdjust the magnification to 16x or 24x and turn the parallaxcorrection ring to the right or left until the image in the fieldis optimally focused. Now move your eye back and forth inthe area of the exit pupil. If the reticle moves in relation tothe image, correct the range setting until no difference canbe detected between the movement of the reticle and themovement of the image.2. Turning on and offMove the knurled part upwards to turn on the illuminationunit. The orange ring “A” becomes visible for optical control.Push the illumination unit down to turn it off.3. Brightness <strong>mode</strong>sThe illumination unit has two main brightness <strong>mode</strong>s:• Daylight <strong>mode</strong> (16 fine adjustment settings)• Twilight <strong>mode</strong> (32 fine adjustment settings)2223