Ultra S - Normstahl
Ultra S - Normstahl
Ultra S - Normstahl

You also want an ePaper? Increase the reach of your titles
YUMPU automatically turns print PDFs into web optimized ePapers that Google loves.
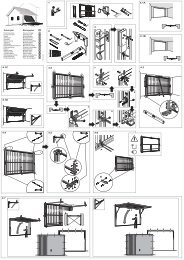
Drive assembly<br />
[4-14] See installation scheme (image<br />
part).<br />
Adjusting tension of drive<br />
belt<br />
[15-] Tighten safety nut (24), until the<br />
drive belt (5) does not lie tight inside<br />
the guide rail (10) and is<br />
slightly tightened.<br />
Installation<br />
[17-29] See installation scheme (image<br />
part).<br />
Support drive with suitable aids<br />
after lifting towards the ceiling and<br />
secure against falling. Inspect mountings<br />
at ceiling and lintel again after<br />
installation [23,24,29].<br />
Door connection<br />
Depending on the door type, there<br />
are different installation sets available.<br />
Connect door and drive according to the<br />
instruction, enclosed in the installation<br />
set.<br />
If the door cannot be coupled with<br />
the drive, the sled (4) has to be run in<br />
closing direction by means of button 2 of<br />
the transmitter, or the sled has to be unlocked.<br />
Couple door for performing of<br />
learning runs [35]. If the end position<br />
has been activated unintentionally, the<br />
mains plug has to be unplugged for 2<br />
seconds (=reset).<br />
Control components<br />
Control and display elements [30]<br />
1 „Impulse“ button<br />
2 „Program“ button<br />
3 LED (red)<br />
4 LED „Power“ (green)<br />
External connections [30]<br />
5 Emergency stop<br />
6 Safety strip/optical sensor/light barrier<br />
(SE/LS)<br />
7 Impulse<br />
8 Antenna A = Antenna<br />
E = Earthing<br />
Putting door drive into<br />
operation<br />
Connect antenna<br />
[31] Unpack hand-held transmitter and<br />
antenna.<br />
[32] Connect antenna (8) to external<br />
terminal (8, right screw terminal A).<br />
Connect to mains power<br />
[33] Open door slowly by hand until the<br />
sled audibly snaps in.<br />
[34] Plug in mains plug. The LED „Power“<br />
(4) must light, the drive lamp<br />
flashes 4 times.<br />
Make sure that no people, animals<br />
or objects are in the range of<br />
movement of the door before activating<br />
the drive.<br />
English<br />
Basic settings (learning of<br />
end positions and forces)<br />
For performing basic settings<br />
the door drive must be coupled with<br />
the door. During learning there is still<br />
no protection by the safety switch-off<br />
due to excess force.<br />
There are two learning<br />
possibilities:<br />
• With transmitter [35]<br />
• Without transmitter [36-39]<br />
Learning with transmitter<br />
Button 1: Dead man operation and finetuning<br />
up<br />
Button 2: Dead man operation and finetuning<br />
down<br />
Button 3: Confirmation (save)<br />
Button 4: Confirmation (save)<br />
End position „UP“<br />
[35] Activate button 1 and keep it<br />
pushed, the door moves to open.<br />
At the moment, where the desired<br />
end position „UP“ is reached, release<br />
button 1.<br />
A correction of end position „UP“ is<br />
possible by pushing button 2.<br />
Confirm reached end position<br />
„UP“ by short pushing of button<br />
3 or 4, the drive lamp flashes<br />
3 times. After learning end position<br />
„UP“, the door is run automatically<br />
in closing direction. The drive stops<br />
automatically, once the right closed<br />
position is reached.<br />
47