Ultra S - Normstahl
Ultra S - Normstahl
Ultra S - Normstahl

Create successful ePaper yourself
Turn your PDF publications into a flip-book with our unique Google optimized e-Paper software.
Repair<br />
[55] Replace battery of hand-held<br />
transmitter<br />
• Pull off case lid (2) and remove it.<br />
• Remove battery (1) and replace it.<br />
Use leak proof batteries only. Observe<br />
correct polarity during inserting.<br />
Dispose of old battery environmentalfriendly.<br />
• Push case lid back in place.<br />
[56] Replace glow lamp<br />
Disconnect mains plug.<br />
[57] Replace fuse<br />
Disconnect mains plug.<br />
• Remove or unscrew external connections<br />
like control lead (14) or antenna<br />
(8).<br />
• Loosen mounting screw (3).<br />
• Snap off hood (4) at the four snap<br />
pieces and remove it.<br />
• Pull defective fuse (1) out of the fuse<br />
holder (2) and replace it. Observe<br />
fuse value!<br />
• Push hood back in place.<br />
• Tighten mounting screw.<br />
• Re-establish external connections.<br />
[30] Reset of electronic control<br />
If the electronic control has to be reset,<br />
proceed as follows:<br />
• Push „Program“ button (2) first, then<br />
„Impulse“ button (1) simultaneously<br />
for longer than 5 seconds. The red<br />
LED (3) flashes first and goes out afterwards<br />
– the reset is finished. The<br />
drive lamp now starts flashing four<br />
times and in this way indicates that<br />
learning runs have to be carried out.<br />
The learned run stretches for the<br />
soft run and the threshold current for the<br />
switching off due to excess force are deleted<br />
by the reset. The learned radio<br />
commands remain saved.<br />
• Carry out basic setting (learning<br />
runs).<br />
Customer Service<br />
If you ask for help at any of the company<br />
addresses on the back, please indicate<br />
manufacturing number and model designation.<br />
You will find these data on the<br />
type plate on the drive head.<br />
Accessories<br />
Western plugs are required for external<br />
connections on the drive head.<br />
Accessories that can separately be ordered<br />
are listed as follows:<br />
[58] 4-command hand-held transmitter<br />
for multiple uses<br />
[59] 1-command hand-held transmitter<br />
[60] Wall mounting for hand-held transmitter<br />
[61] Wall-fit button<br />
[62] Key turn button<br />
[63] Code button<br />
[64] External antenna<br />
[65] Light barrier<br />
[66] Optical sensor<br />
[67] External emergency unlocking<br />
device<br />
[68] Internal emergency unlocking<br />
device<br />
[69] Safety strip<br />
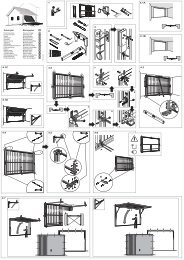
Spare parts<br />
[70] See list of spare parts in installation<br />
scheme (image part).<br />
Spare parts have to comply with technical<br />
requirements, which are defined by<br />
the manufacturer. Only with original<br />
spare parts this is always ensured.<br />
In case of purchase orders the item<br />
number has to be indicated.<br />
Spare parts, which are marked<br />
with „*“, may be replaced by authorized<br />
specialists only.<br />
Disposal<br />
English<br />
The national and local regulations and<br />
statutes for disposal are to be followed.<br />
Electric and electronic<br />
parts have to be recycled<br />
and are not to be<br />
discarded in residential<br />
waste!<br />
51